Wallet Settings
API token
An API token is a unique identifier used to request access to the API. You must include the API token value in the header of every API call. On the API token page you can issue or expire API tokens. For details on how to use API tokens, see here.
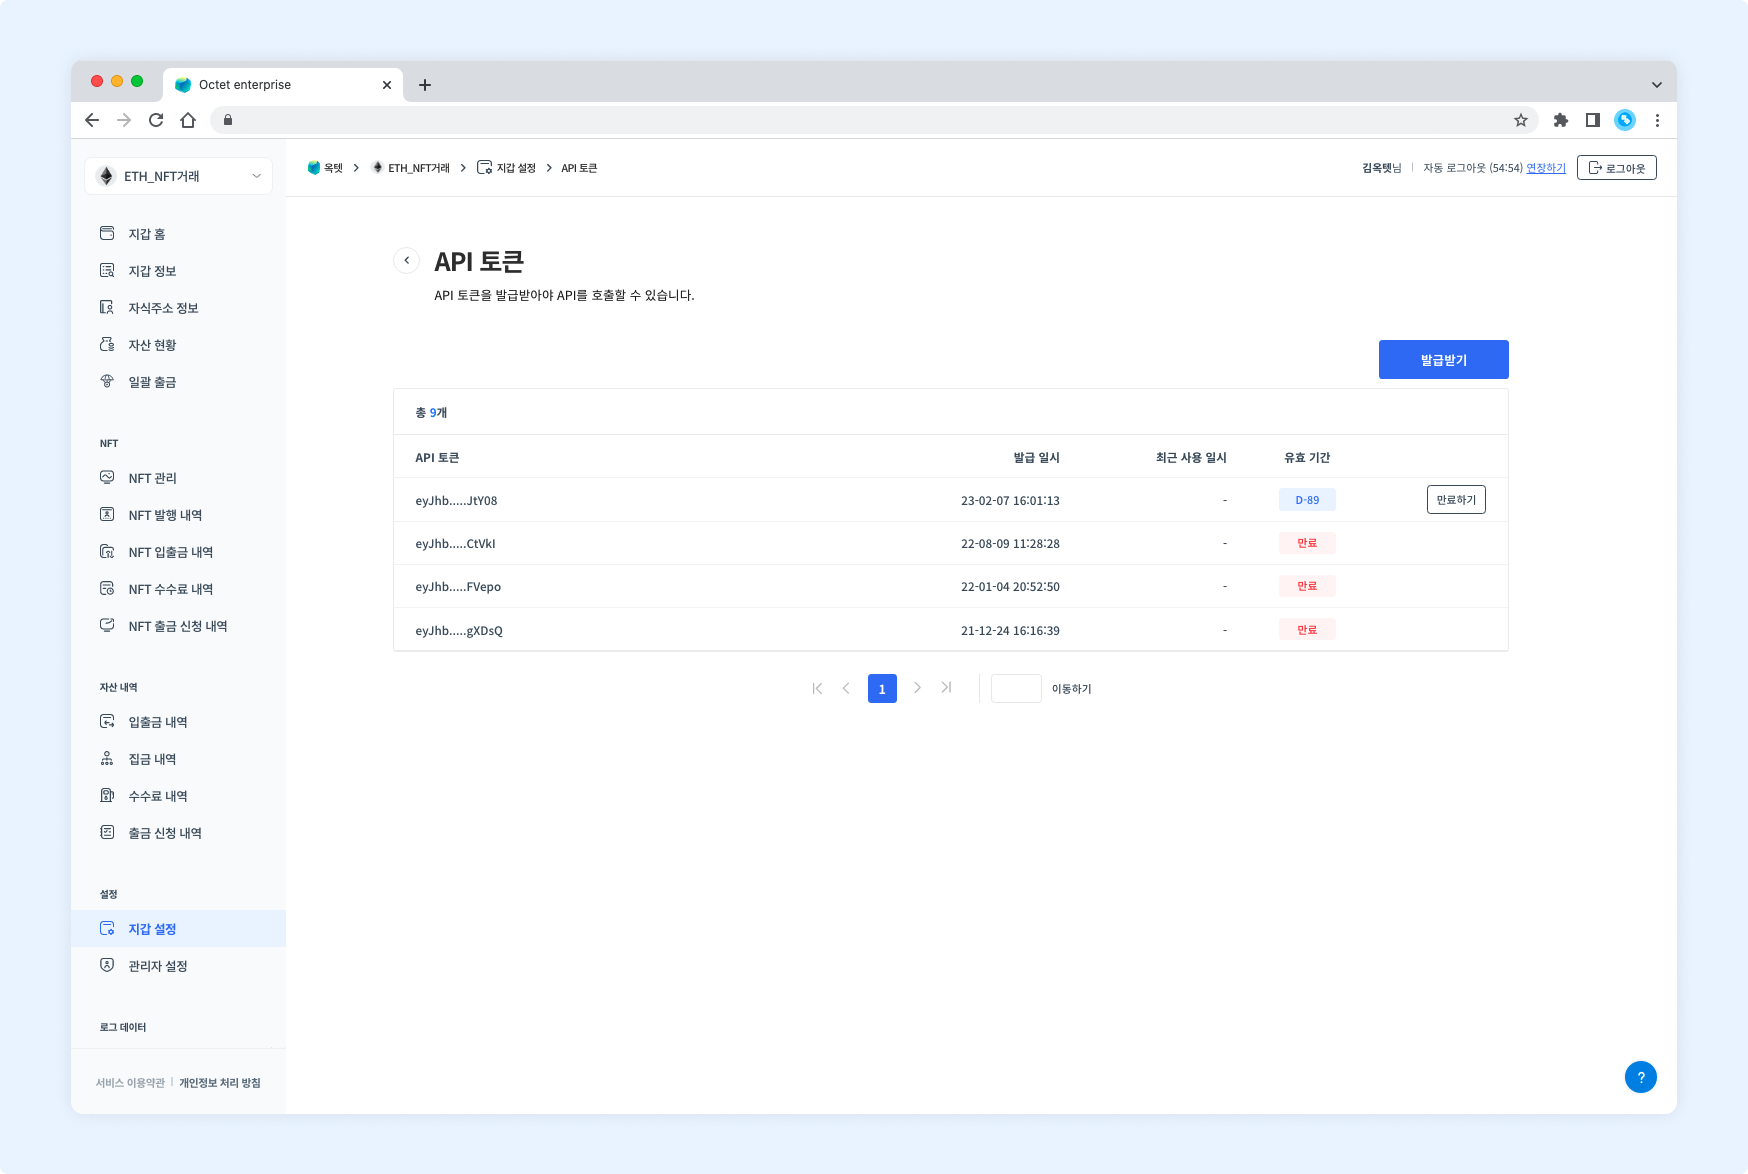
Permission -
Owner,Manager
Issue
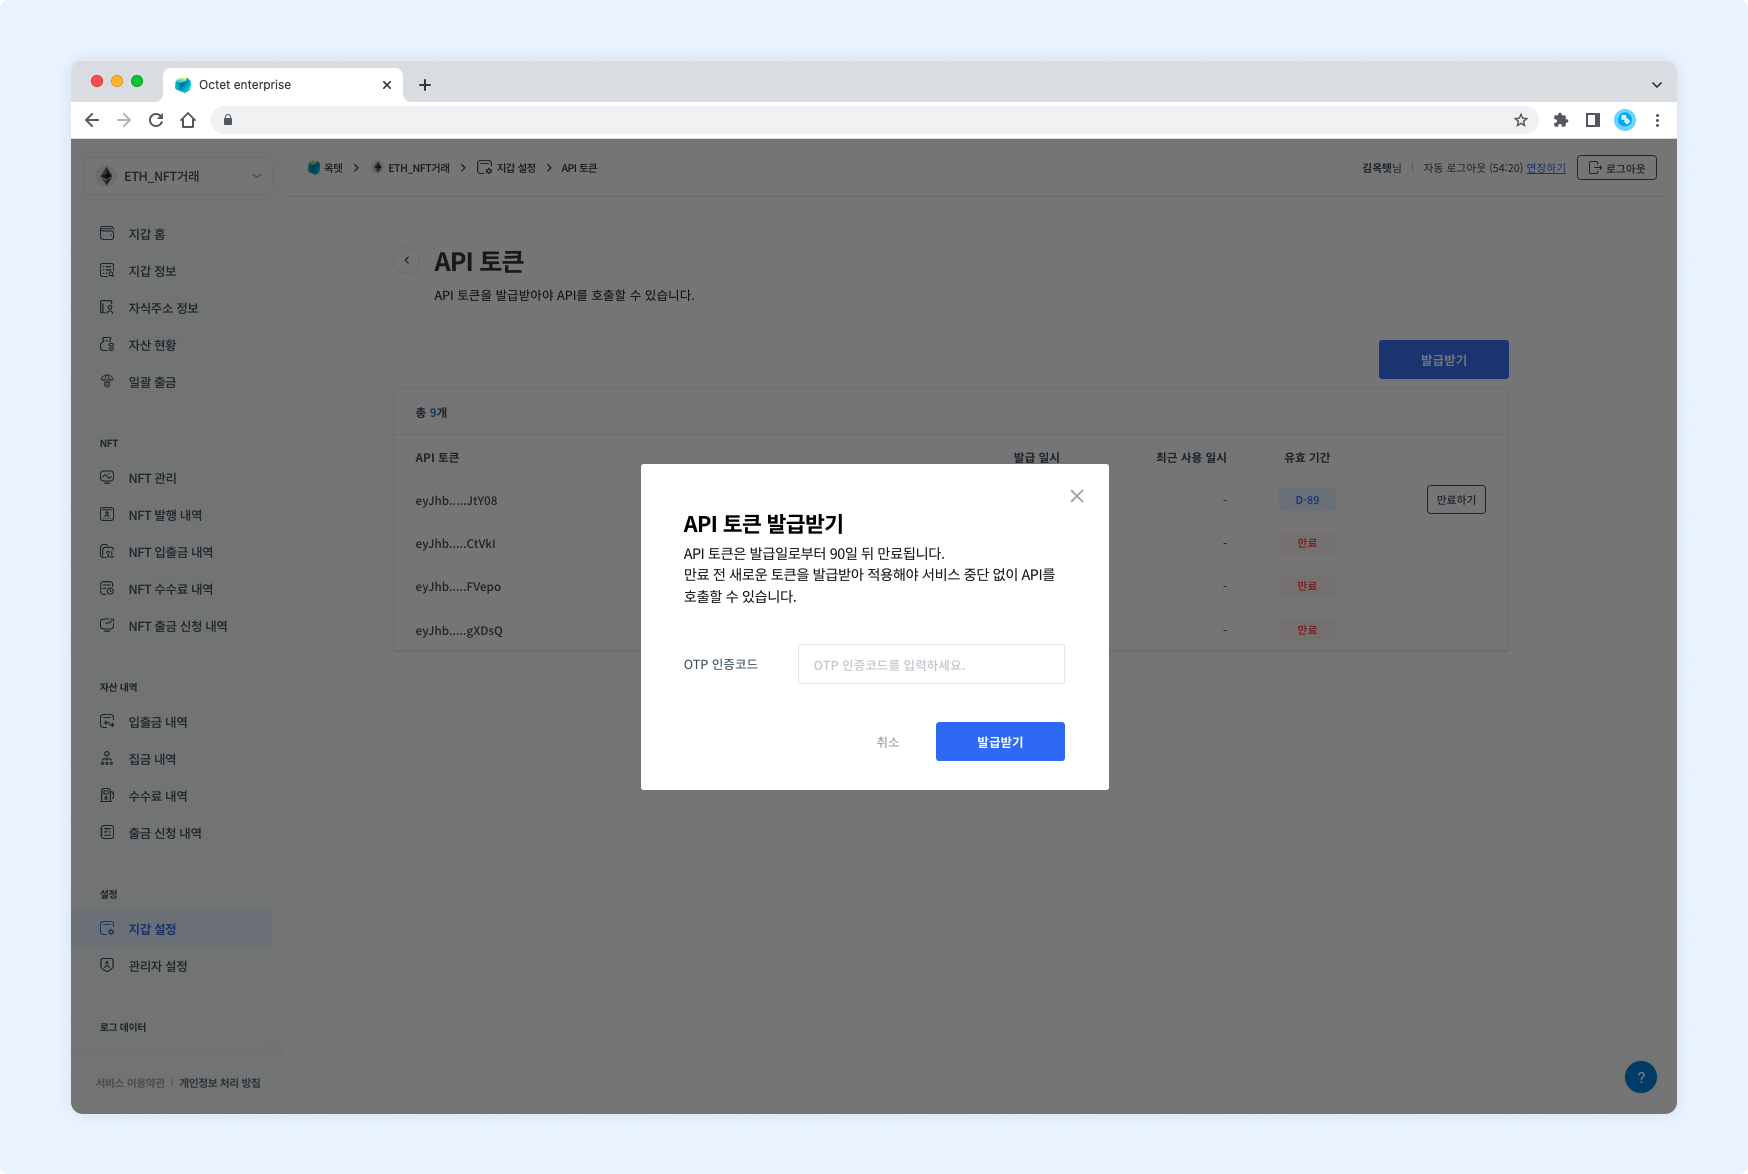
- Click the
Issuebutton. You are taken to the API token issue page. - Configure API access. You can customize the permissions of the API token.
- Enter a name for the API token (optional).
- Enter your OTP code and click the
Issuebutton. - A new API token is issued.
TIP
An issued API token can be viewed only once, at the time of issue. Copy it and store it securely so it is not exposed externally.
Expire
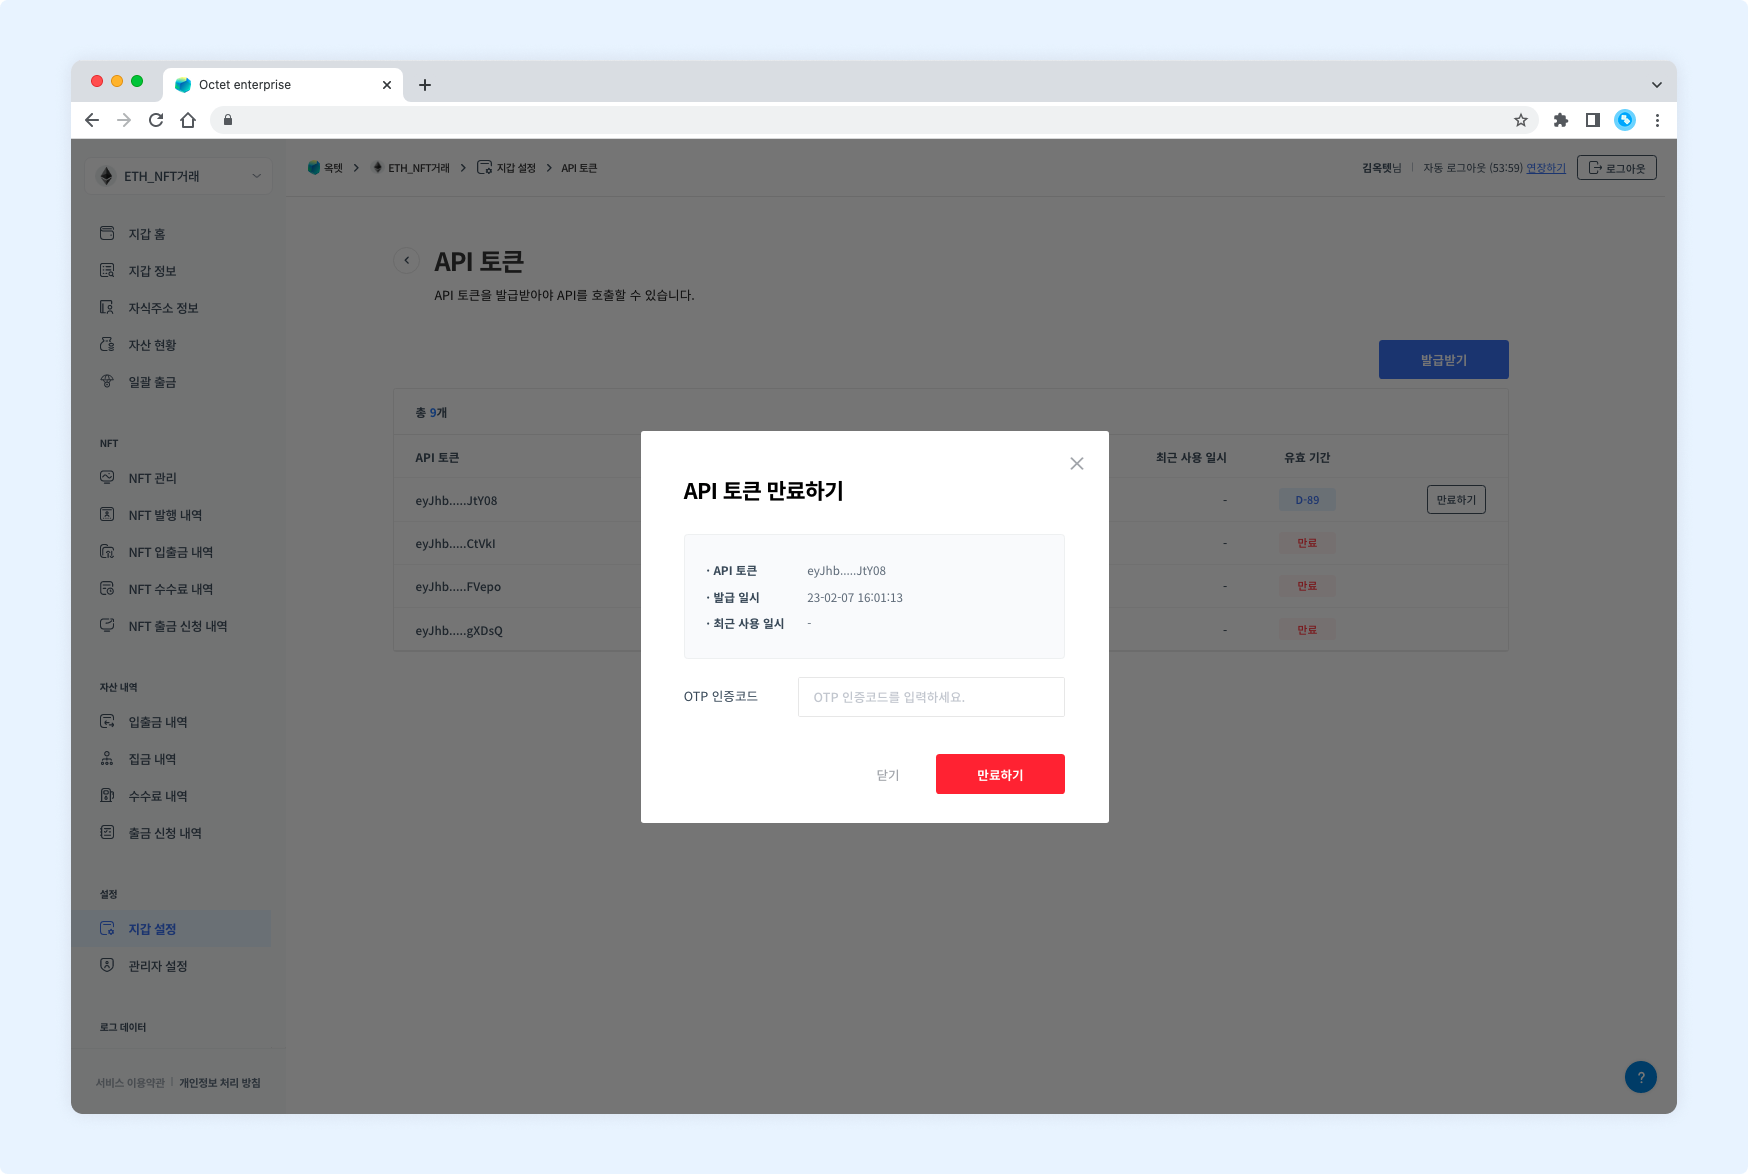
- Click the
Expirebutton. The API token expiration popup appears. - Check the API token to expire.
- Enter your OTP code and click the
Expirebutton. - The API token is expired.
API call IP
An API call IP is an IP address that is allowed to call the API. For security, the API can only be called from registered IP addresses. Always check the API call IP before calling the API. By default, the IP address that first accessed the console is registered as an API call IP. For details on how to use API call IPs, see here.
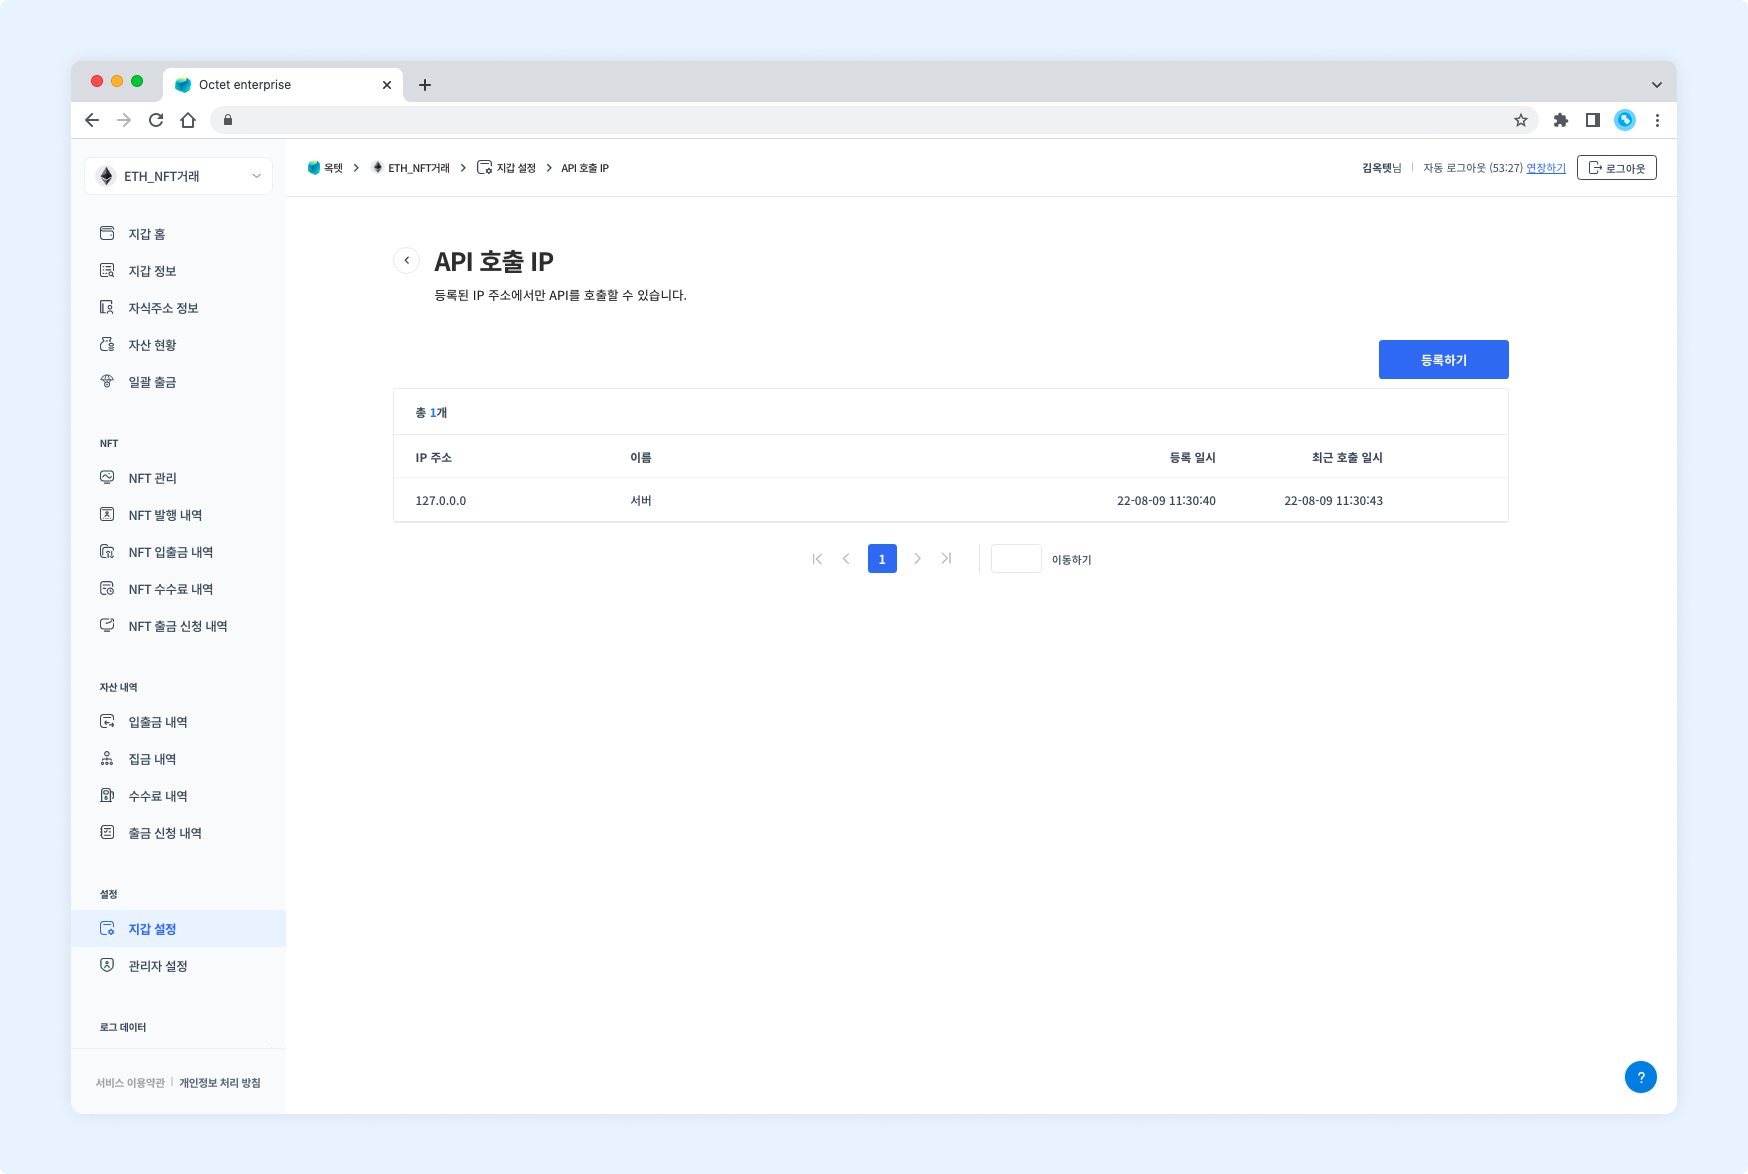
Permission -
Owner,Manager
Register
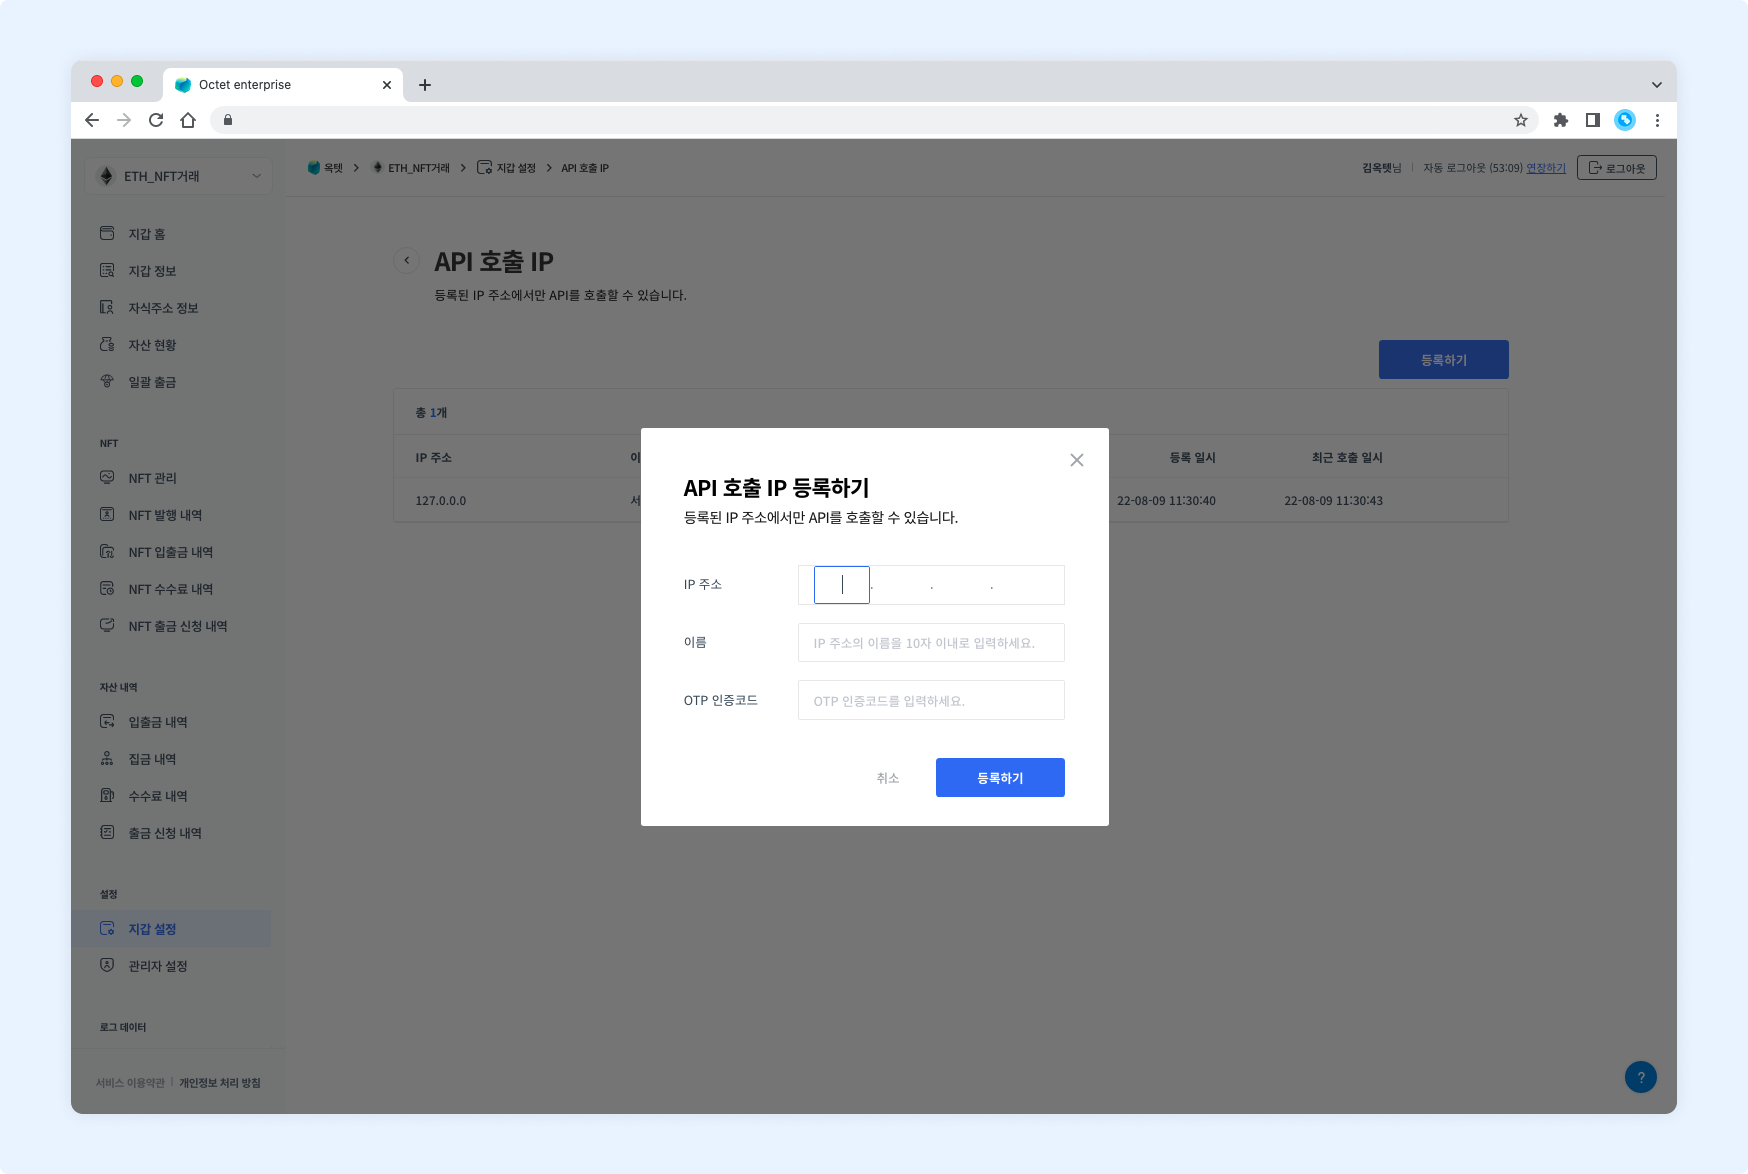
- Click the
Registerbutton. The API call IP registration popup appears. - Enter the IP address to register.
- Enter a name (alias) for the IP address.
- Enter your OTP code and click the
Registerbutton. - The new API call IP is registered.
Delete
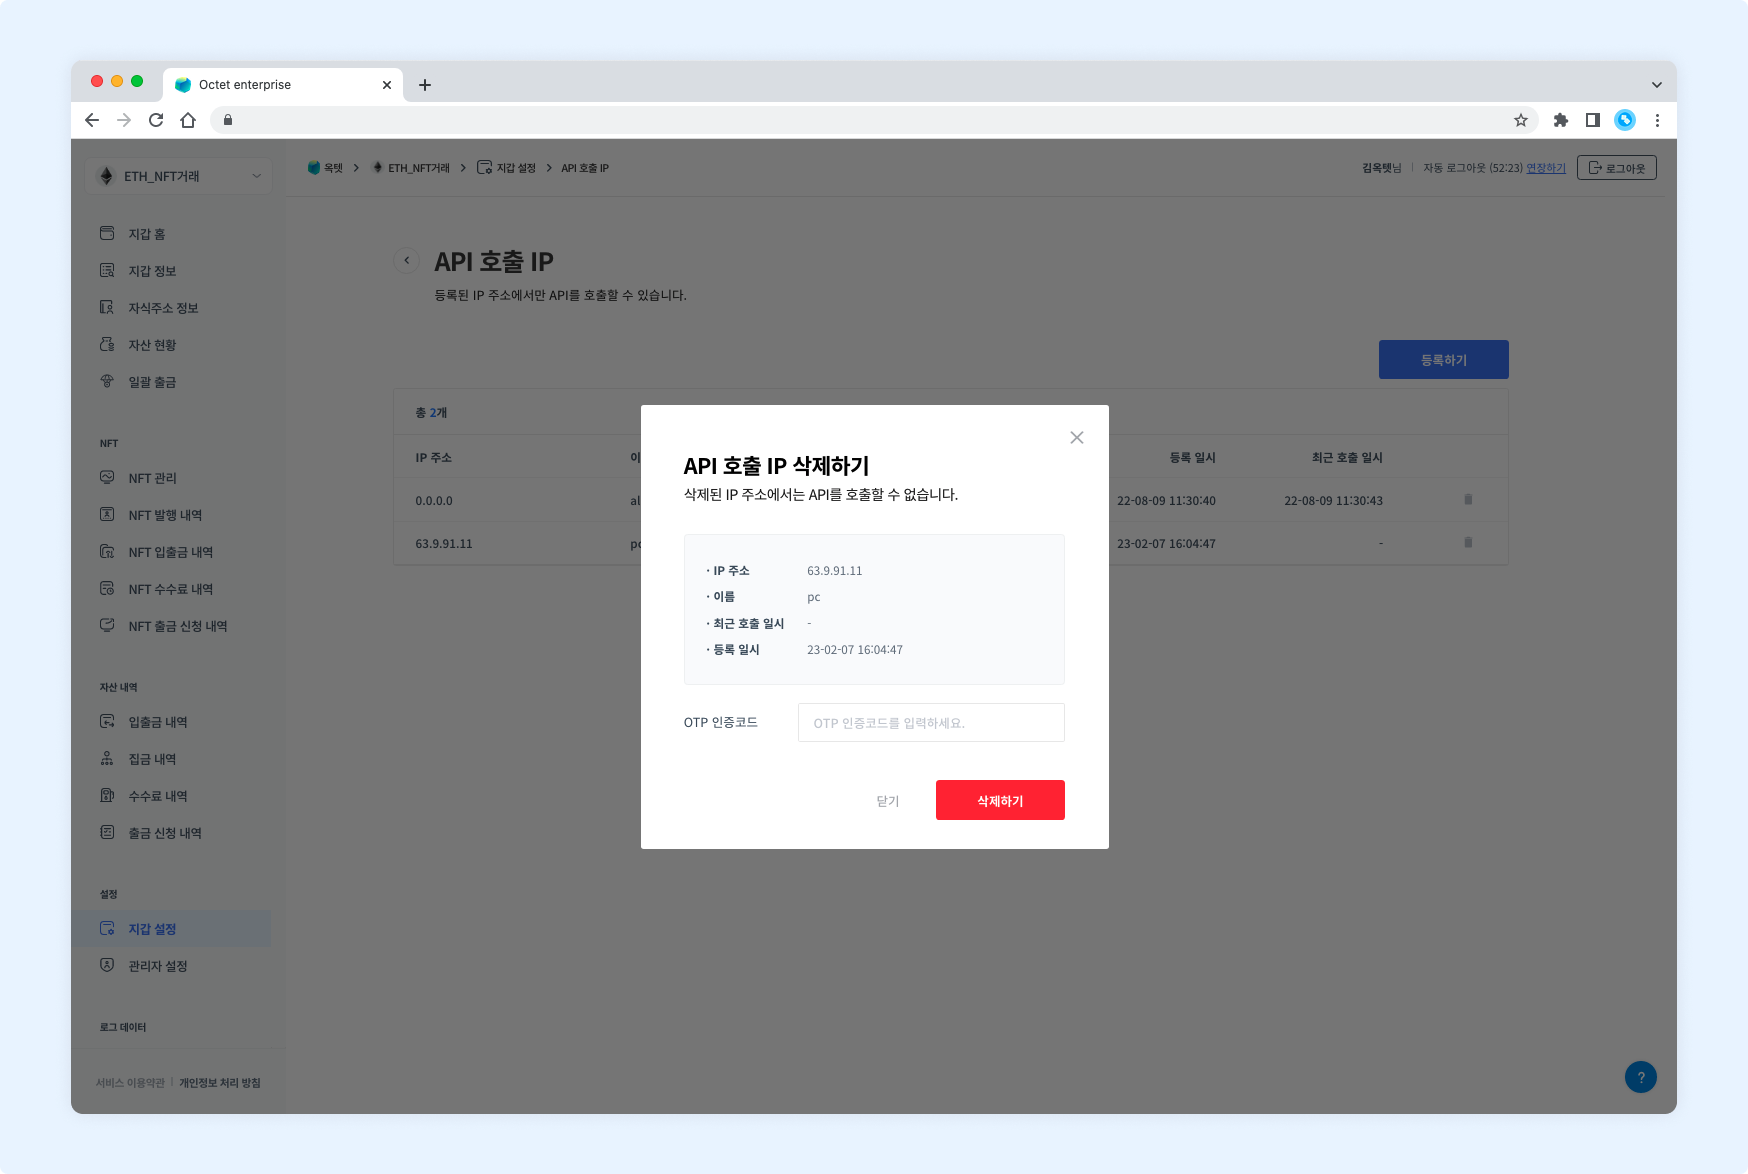
- Click the
Deletebutton. The API call IP deletion popup appears. - Check the API call IP to delete.
- Enter your OTP code and click the
Deletebutton. - The API call IP is deleted.
Webhook
Octet provides webhooks so you can track events within Octet, such as deposits and withdrawals, in real time. When you register a URL to receive data for a specific event, Octet sends the data to that URL when the event occurs. For details on how to use webhooks, see here.
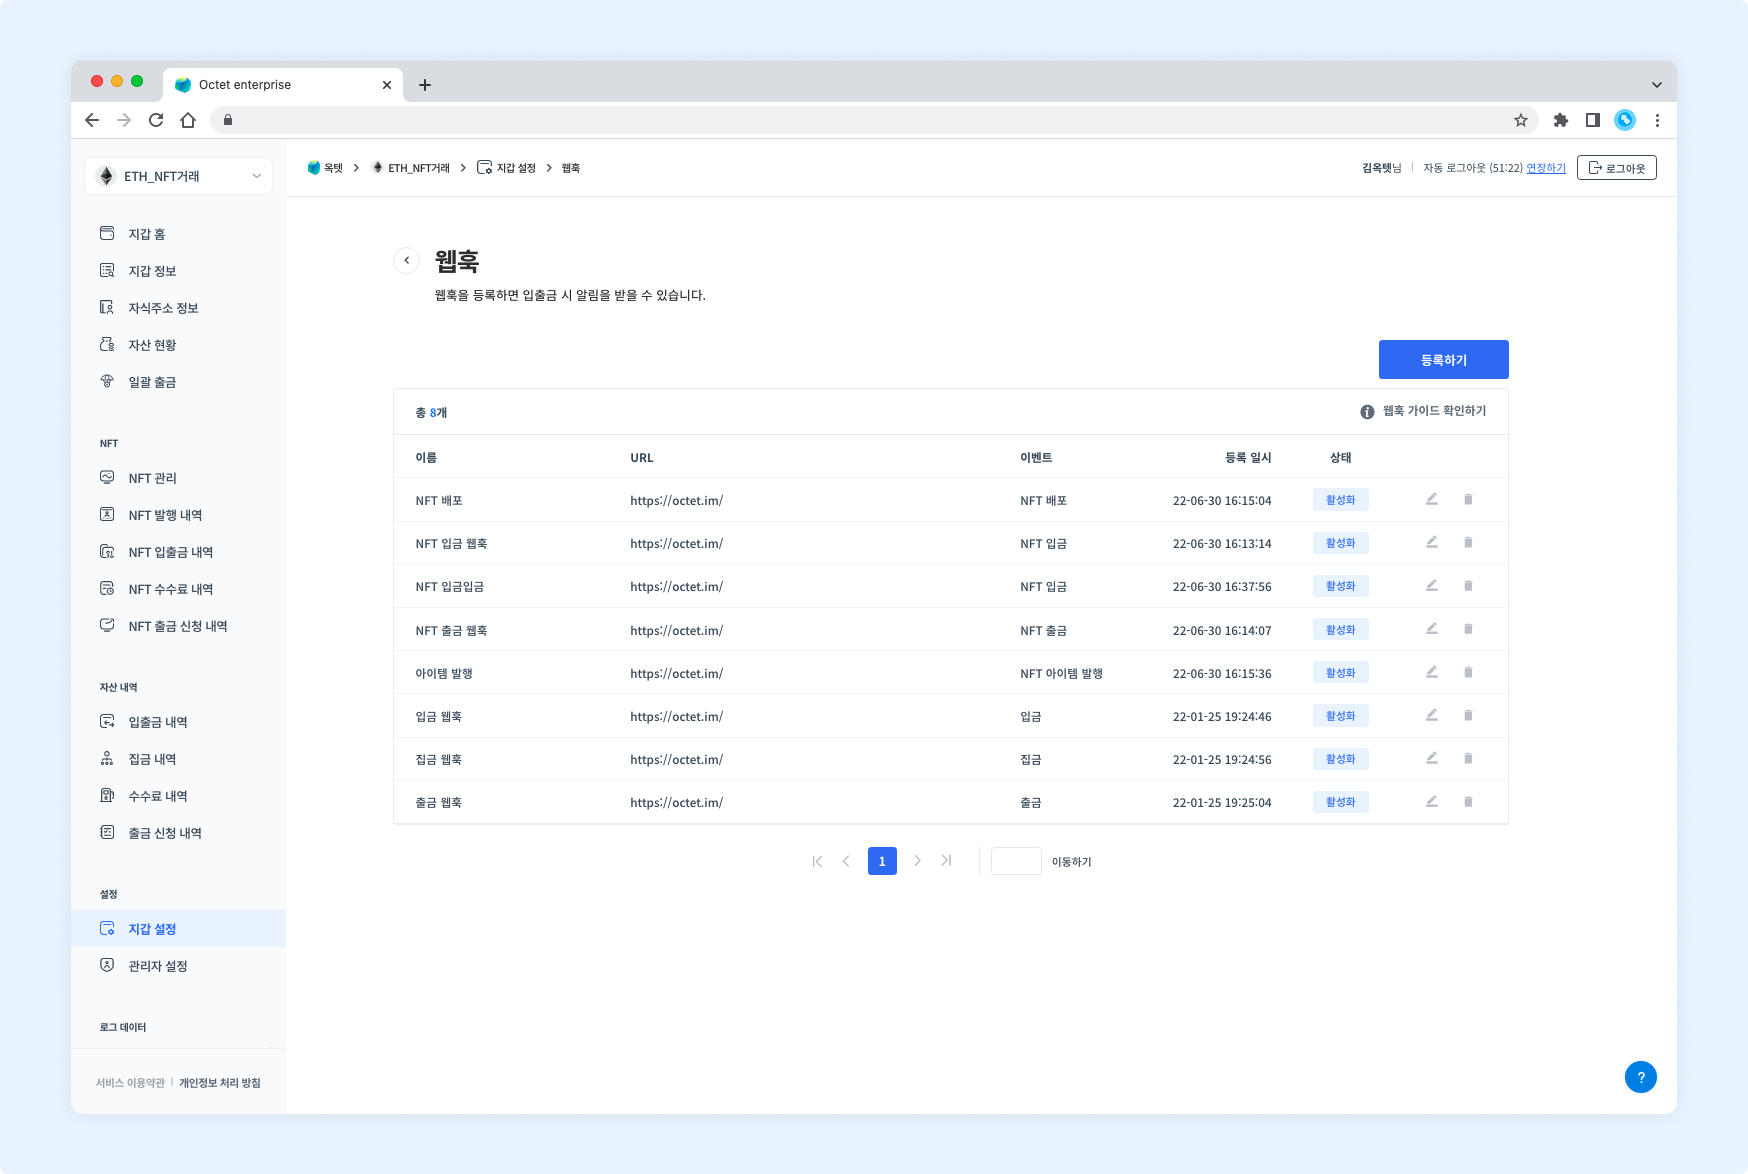
Permission -
Owner,Manager
Register
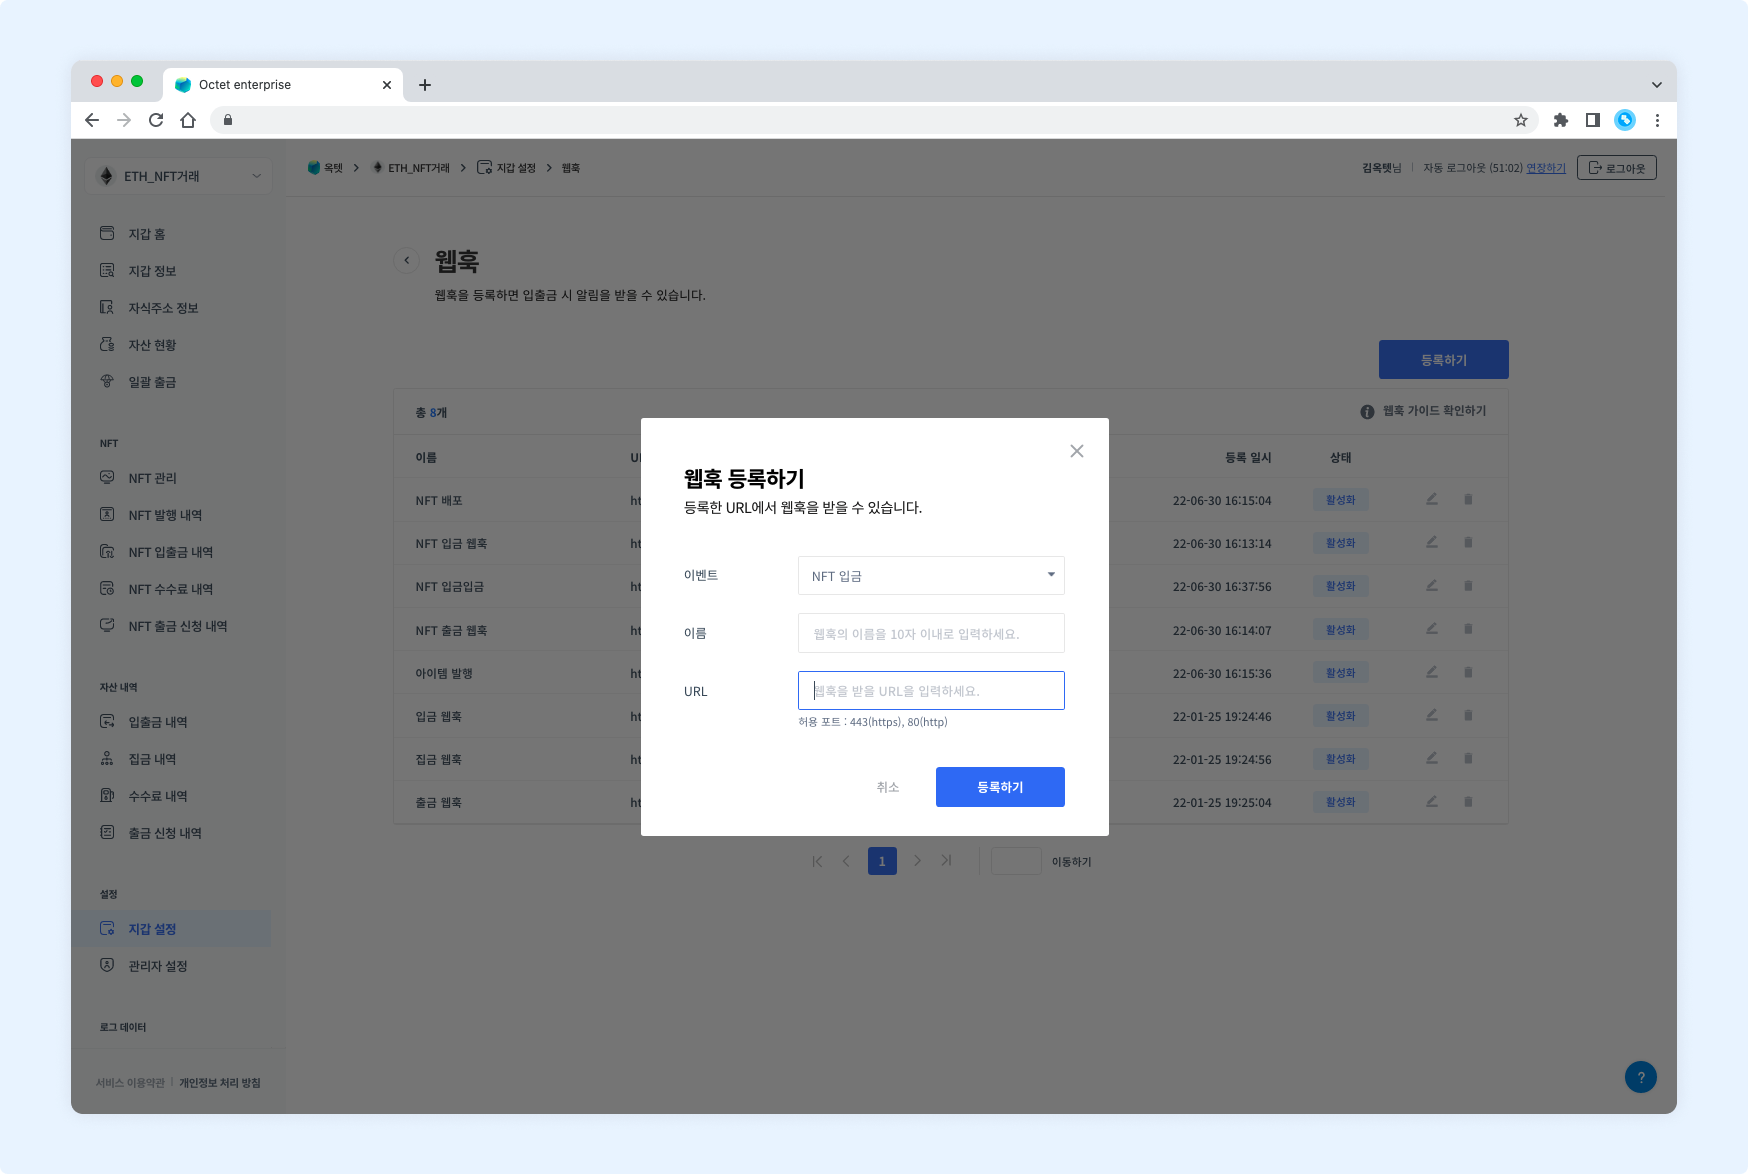
- Click the
Registerbutton. The webhook registration popup appears. - Select the event to register the webhook for.
- Enter a name (alias) for the webhook.
- Enter the URL that will receive the webhook and click the
Nextbutton. - Choose whether to enable integrity verification.
- If you enable it, enter the hash key value to use.
- Enter your OTP code and click the
Registerbutton.
TIP
The allowed webhook ports are 443 and 80.
Delete
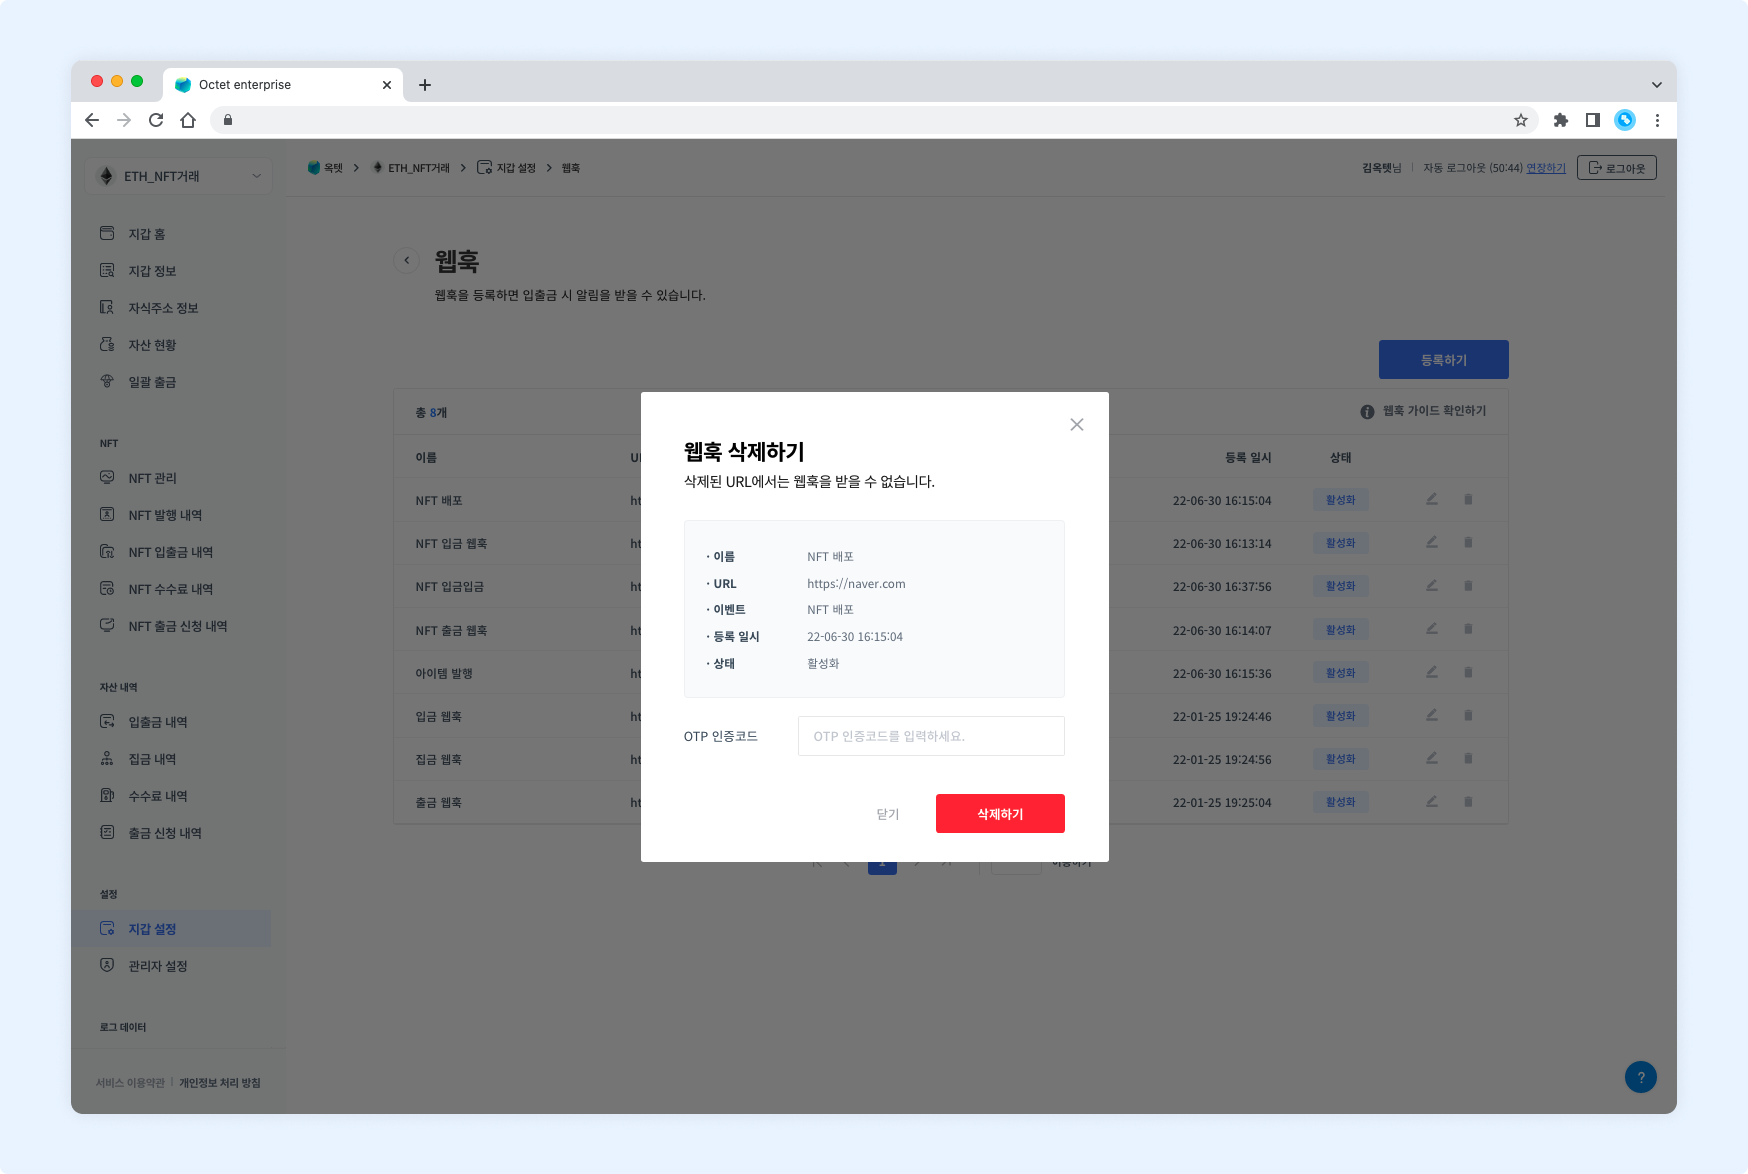
- Click the
Deletebutton. The webhook deletion popup appears. - Check the webhook to delete.
- Enter your OTP code and click the
Deletebutton. - The webhook is deleted.
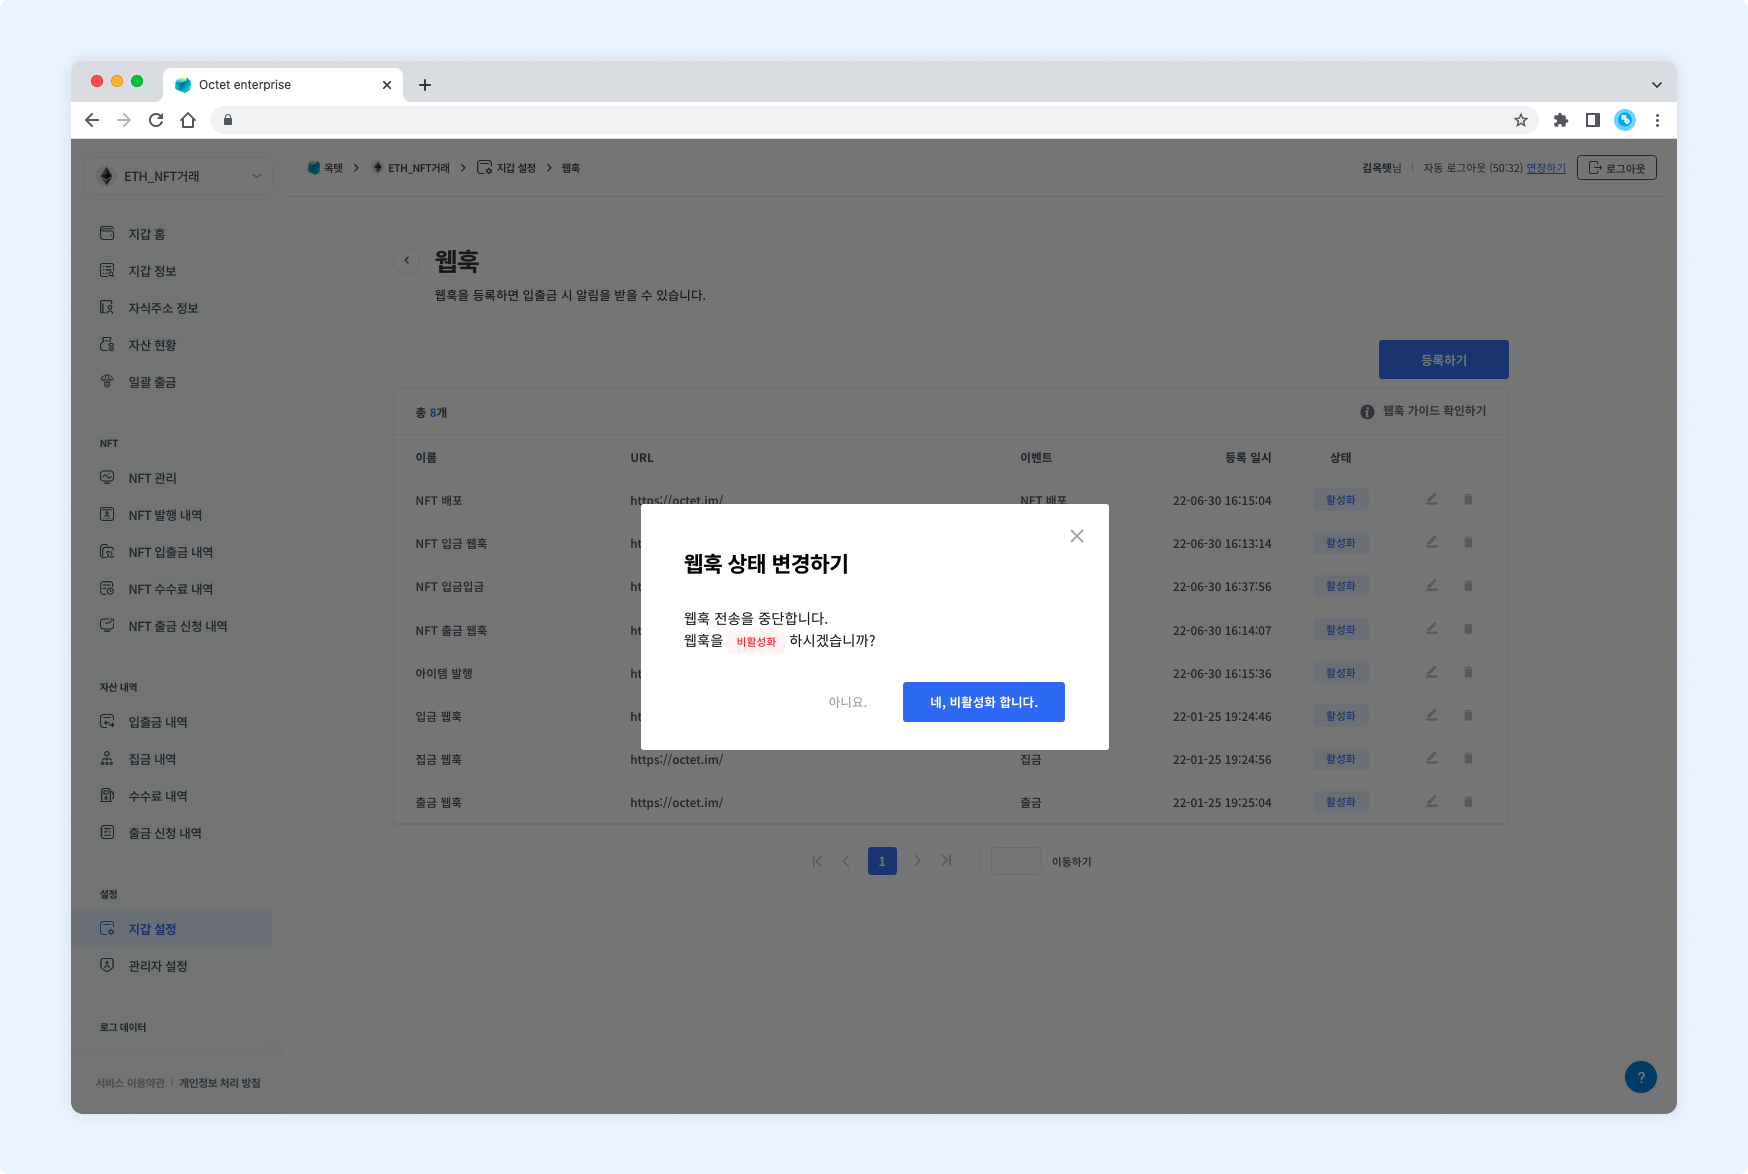
Security alerts
You can receive a notification through the configured email channel when a specific event occurs. Set up alerts per wallet to further strengthen security.
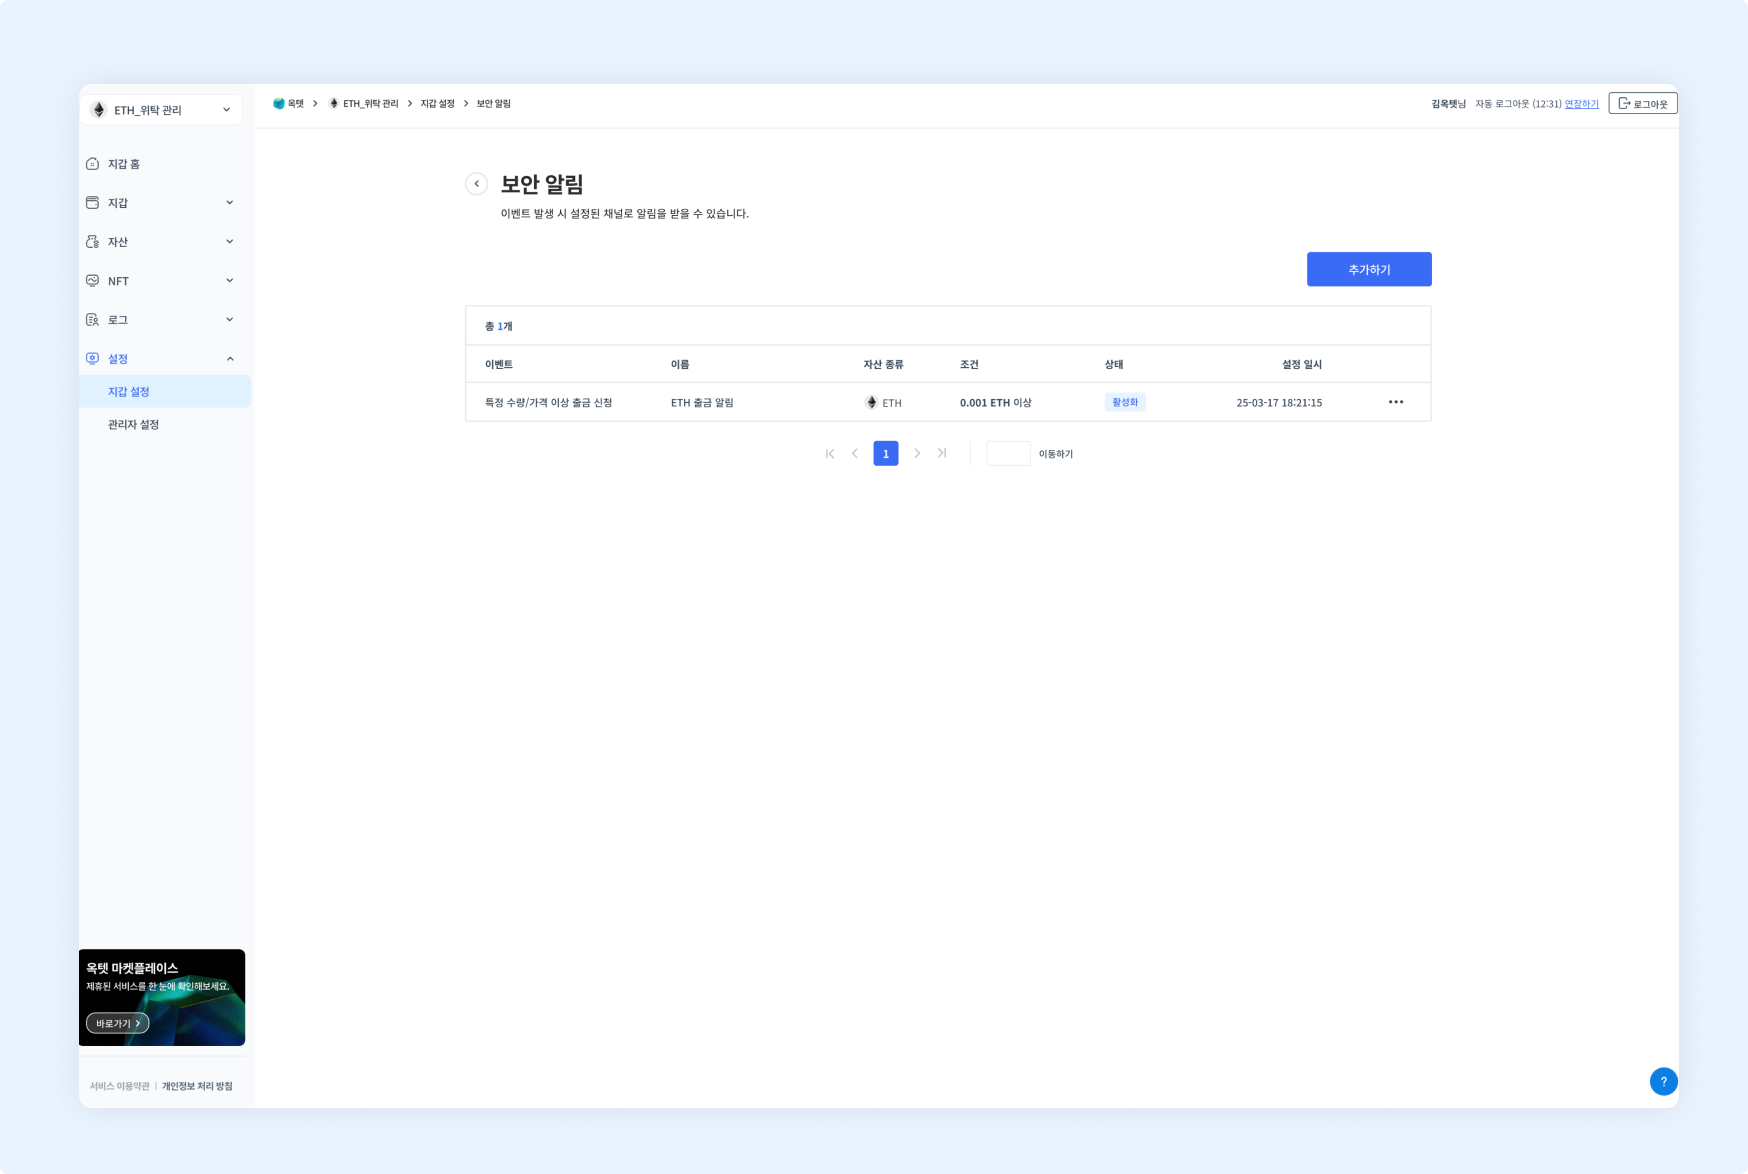
Permission -
Owner,Manager
Add an alert
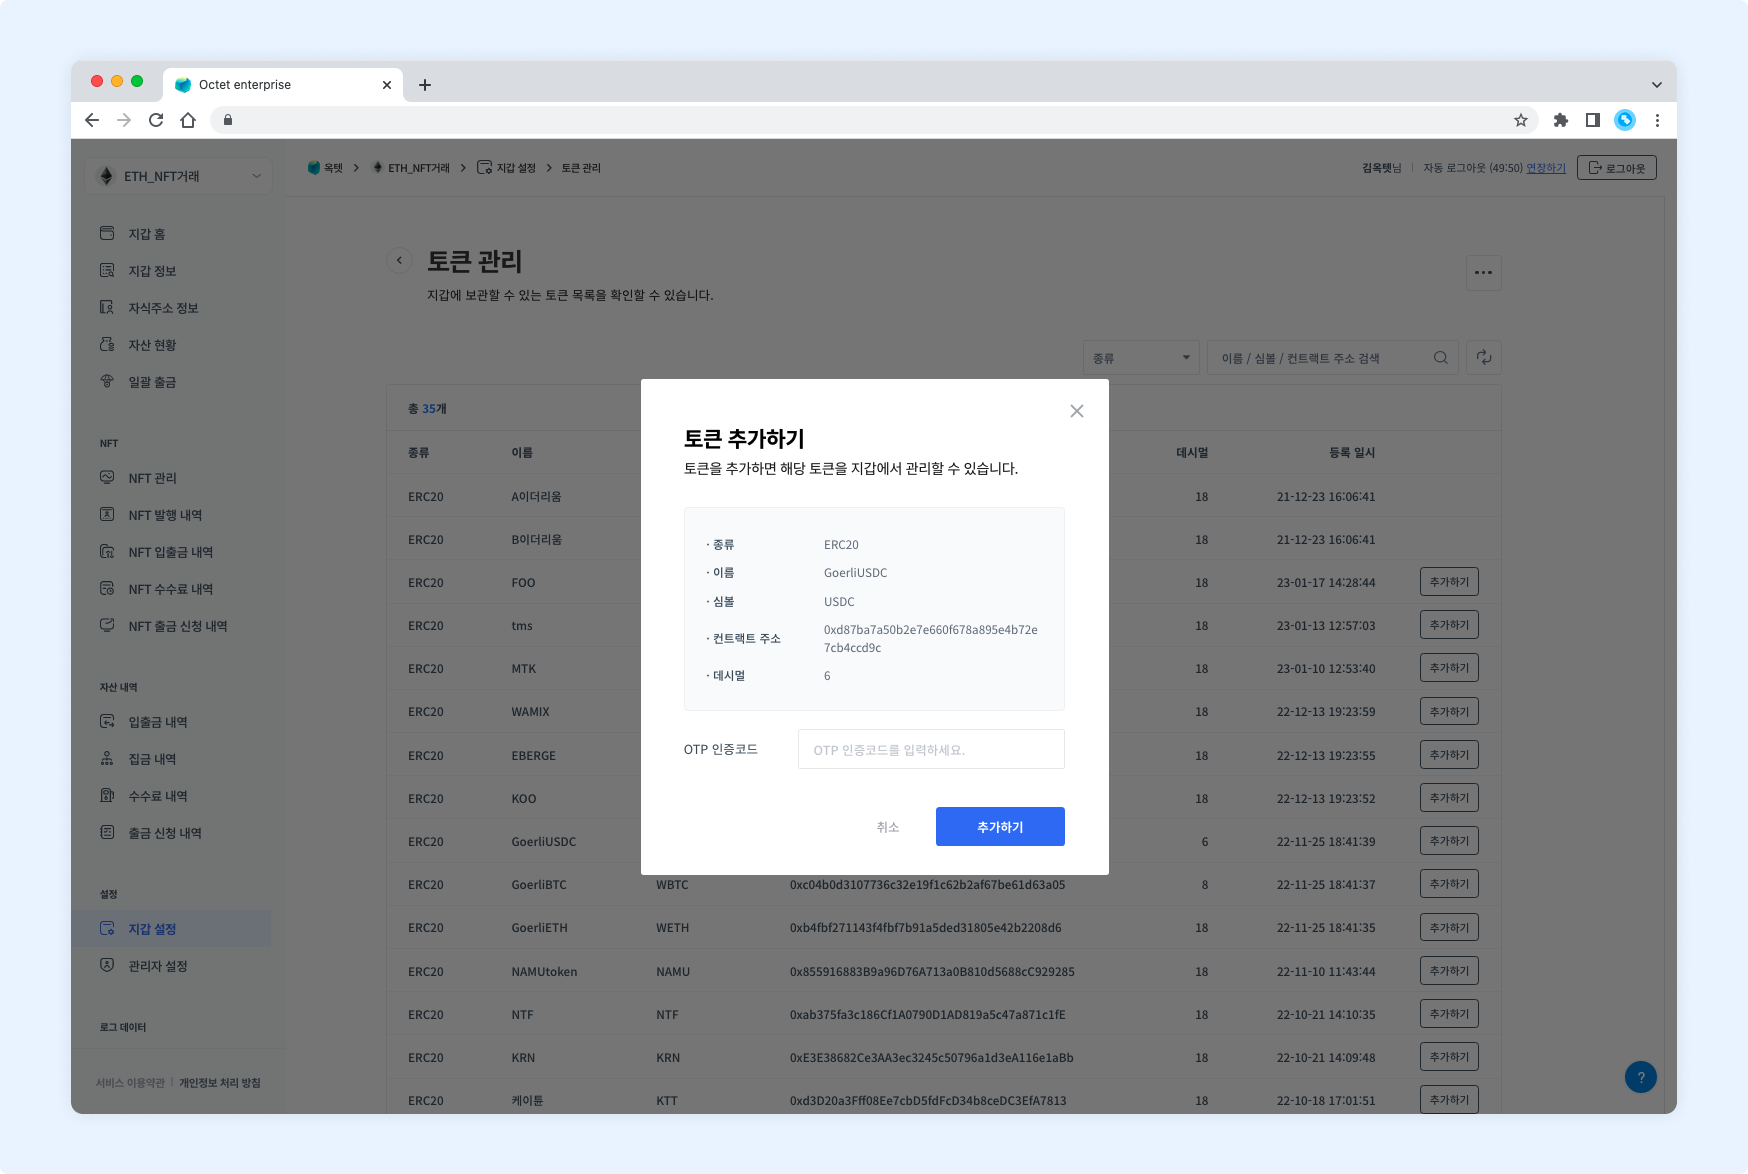
- Click the
Addbutton. The alert setup popup appears. - Select the alert type.
- Withdrawal request above a specific amount/price
- Enter a name for the alert.
- Select the asset and enter the amount or price condition.
- Enter your OTP code and click the
Setbutton. - The alert is set.
Change status
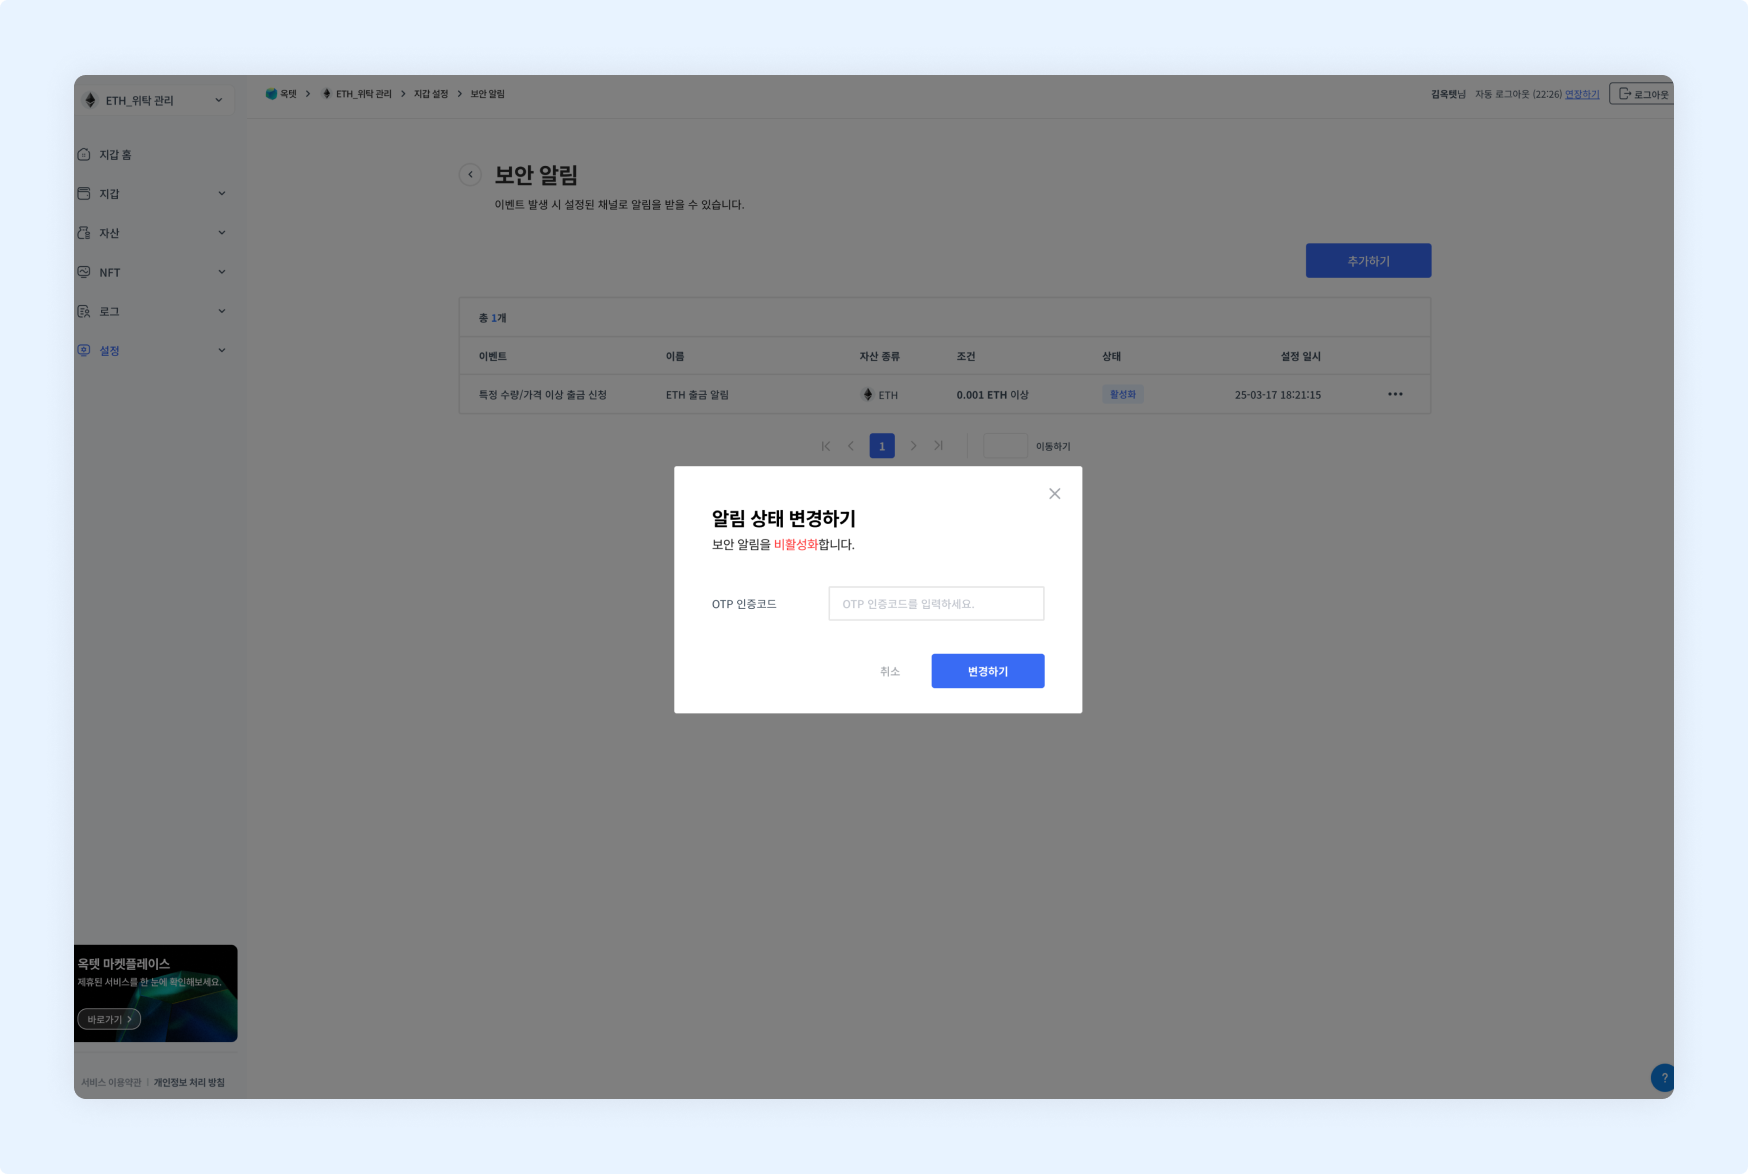
- Click the
Morebutton in the table row. - Click the
DeactivateorActivatebutton. The alert status change popup appears. - Enter your OTP code and click the
Changebutton. - The alert status is changed.
Edit
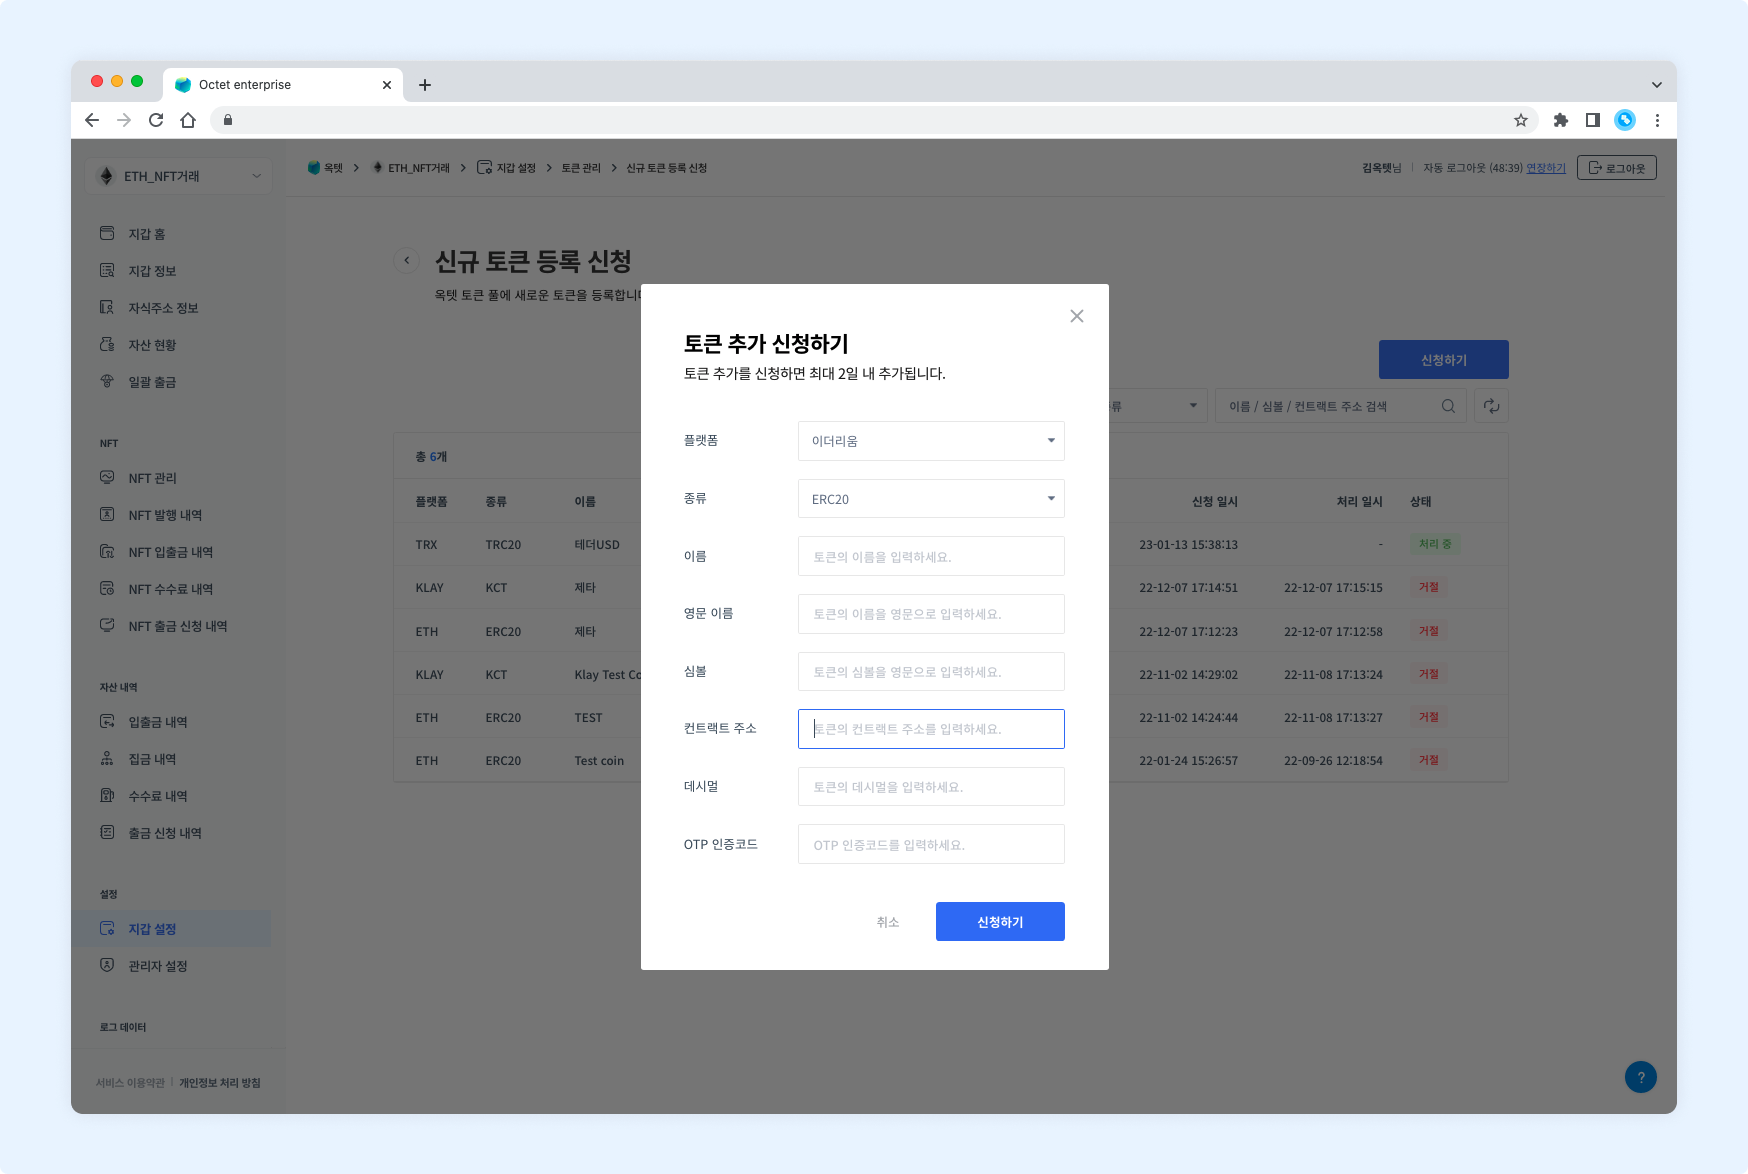
- Click the
Morebutton in the table row. - Click the
Editbutton. The alert edit popup appears. - Change the information you want to edit, enter your OTP code, and click the
Editbutton. - The alert is updated.
Delete
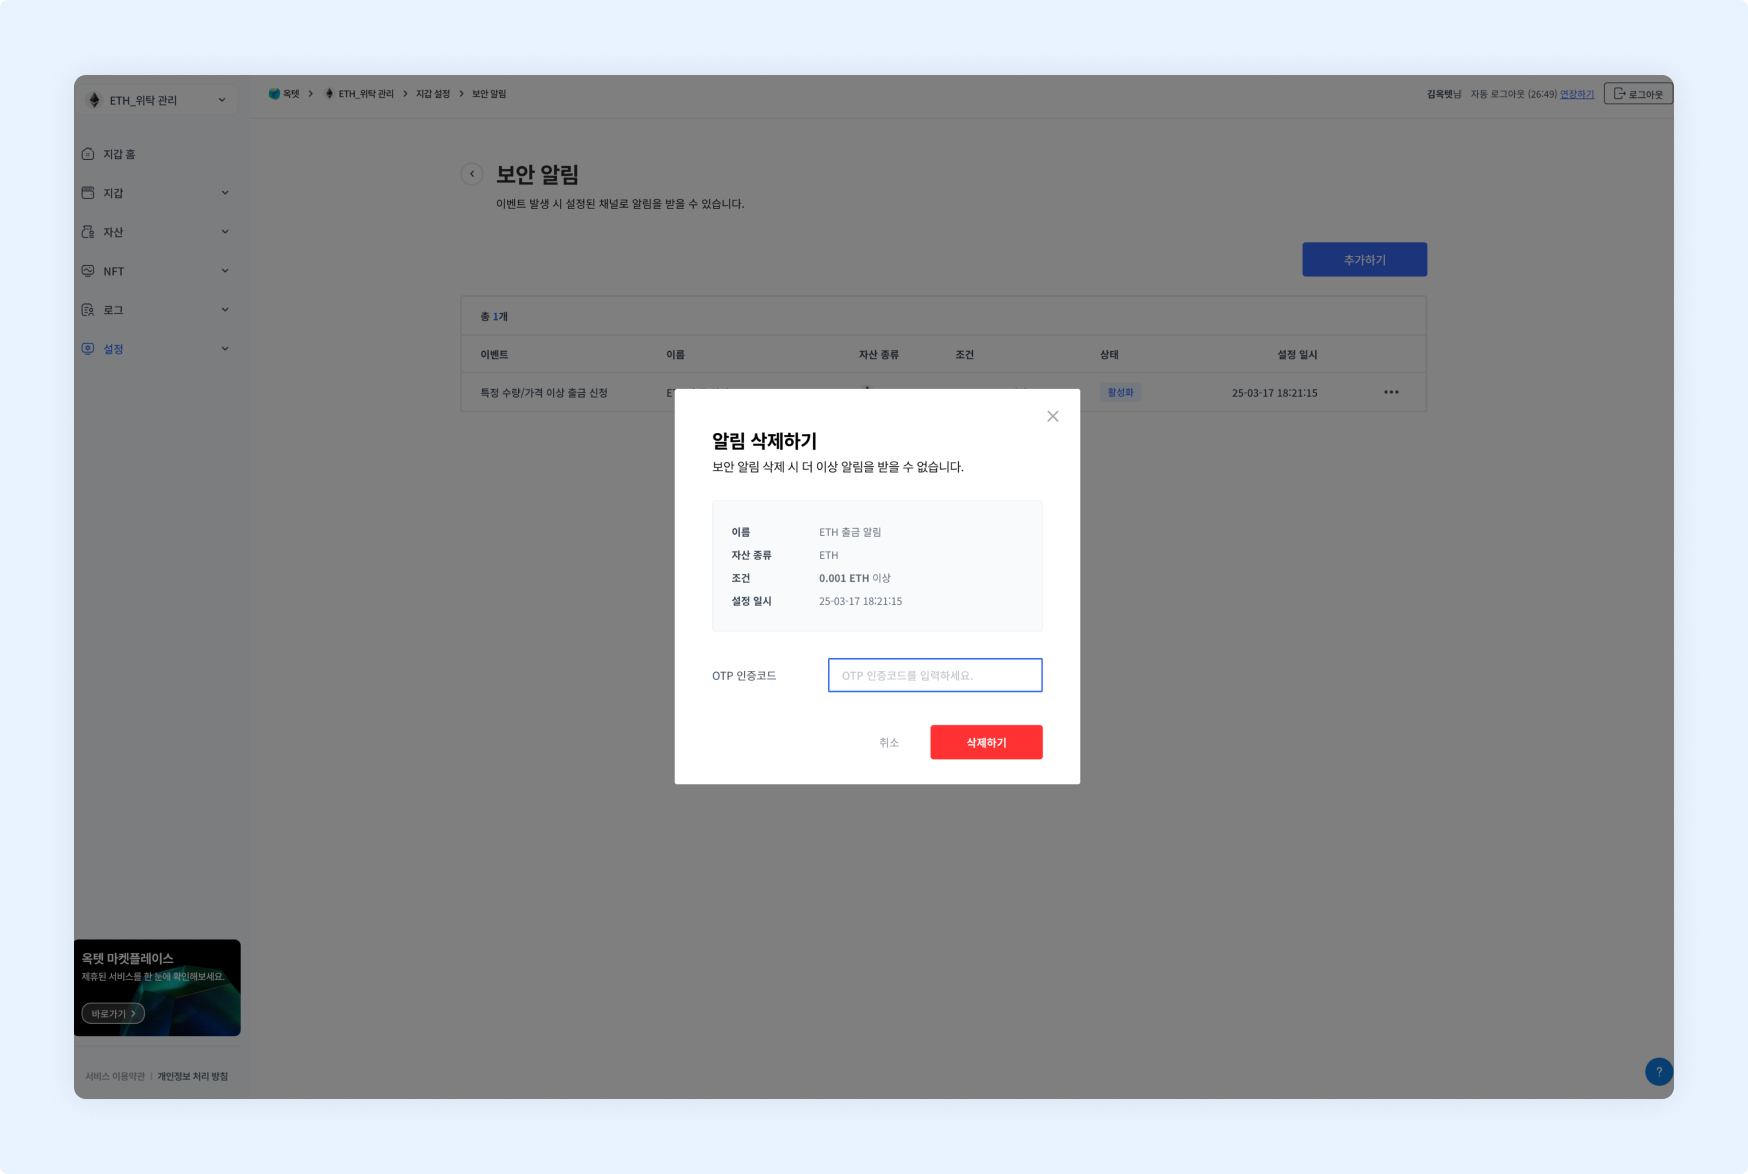
- Click the
Morebutton in the table row. - Click the
Deletebutton. The alert deletion popup appears. - Enter your OTP code and click the
Deletebutton. - The alert is deleted.
Token management
Octet processes deposits only for tokens registered to the wallet. Before depositing a token, you must add it to the wallet.
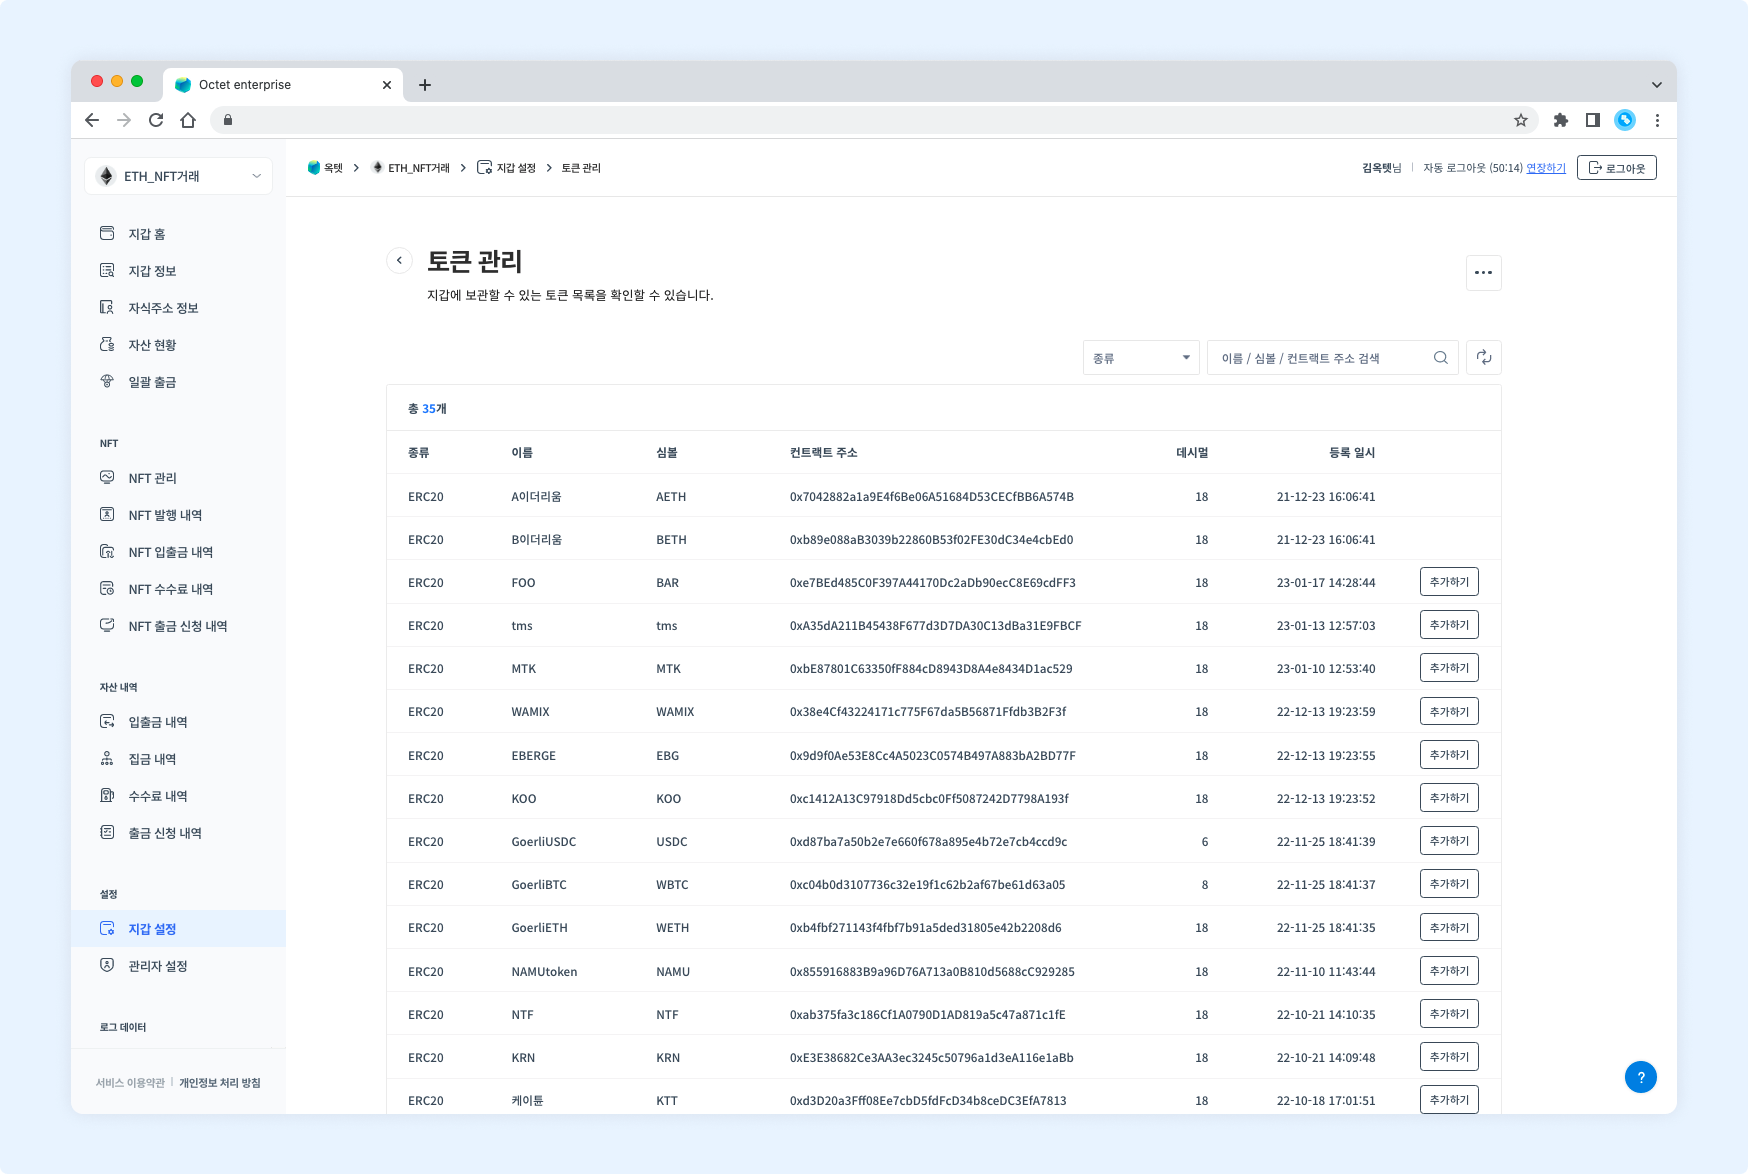
Permission -
Owner,Manager
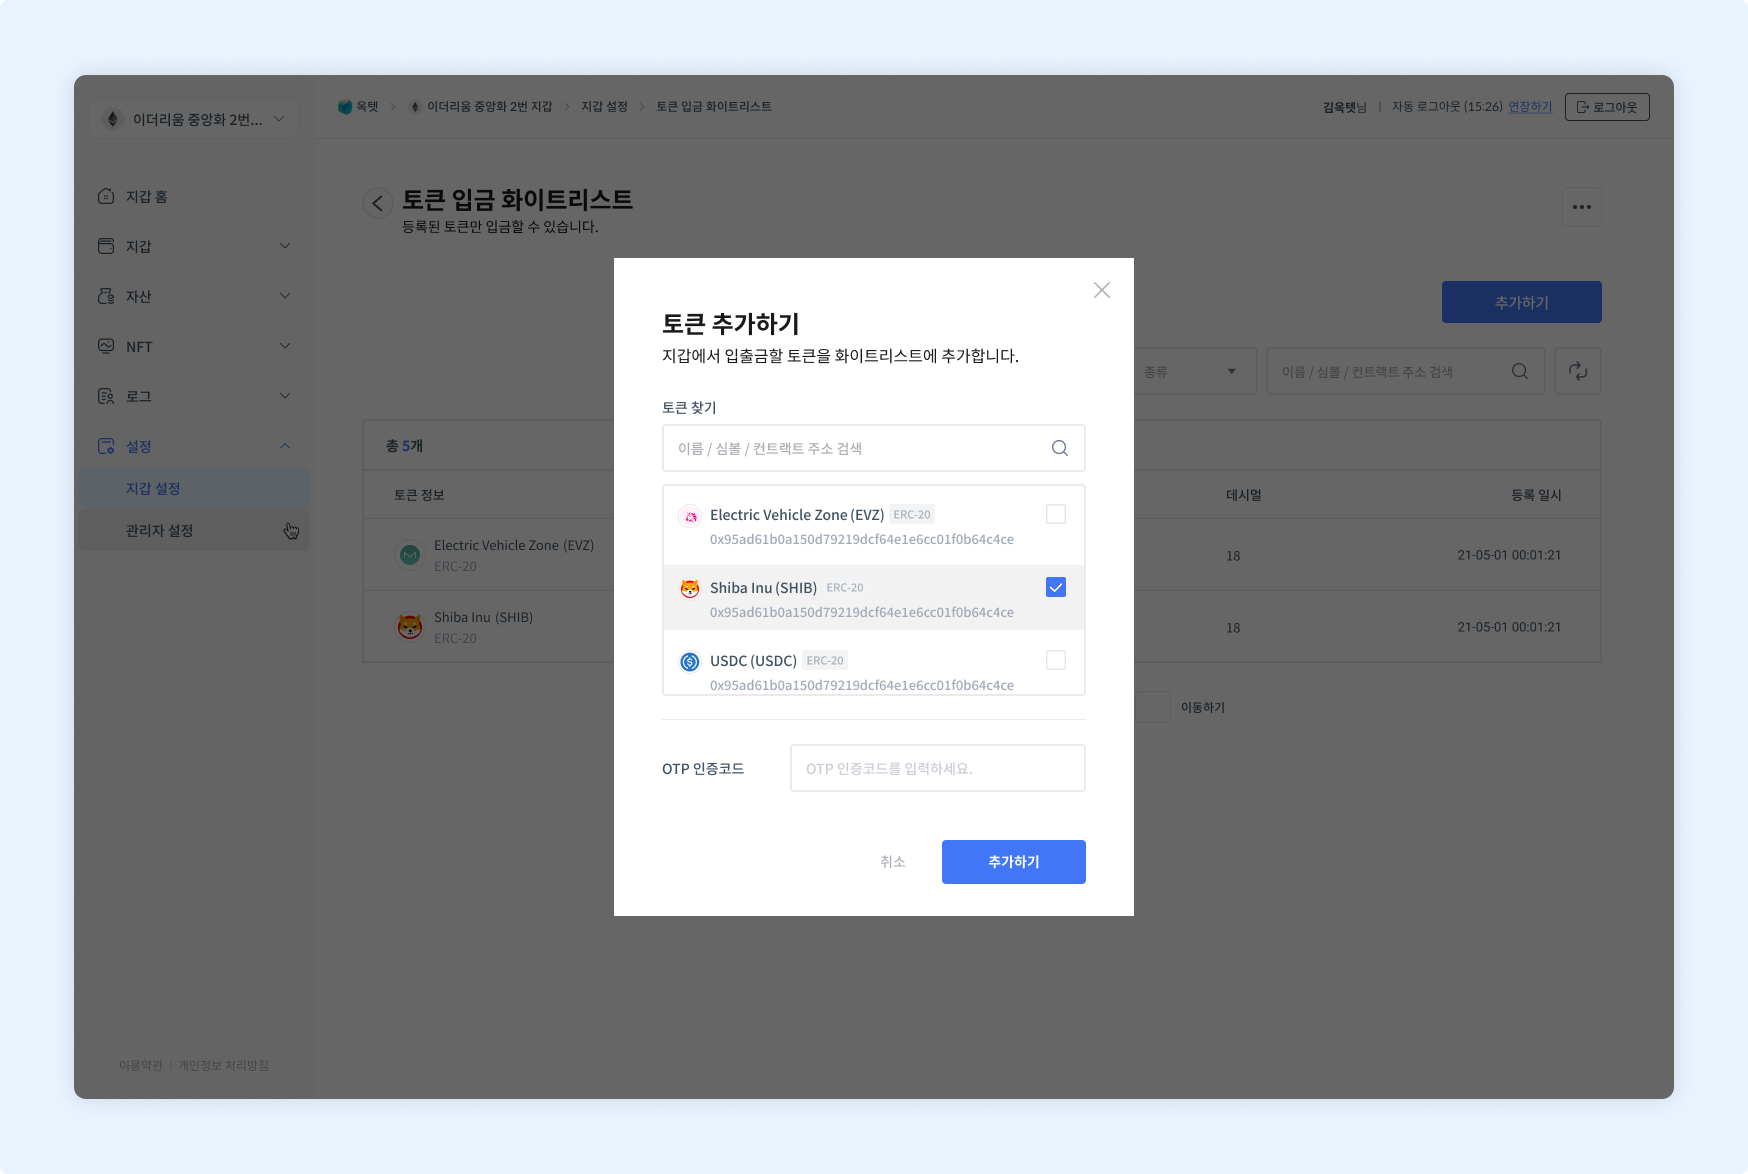
- Click the
Addbutton. The add token popup appears. - Check the token to add.
- Enter your OTP code and click the
Addbutton. - The token is added.
Request a new token registration
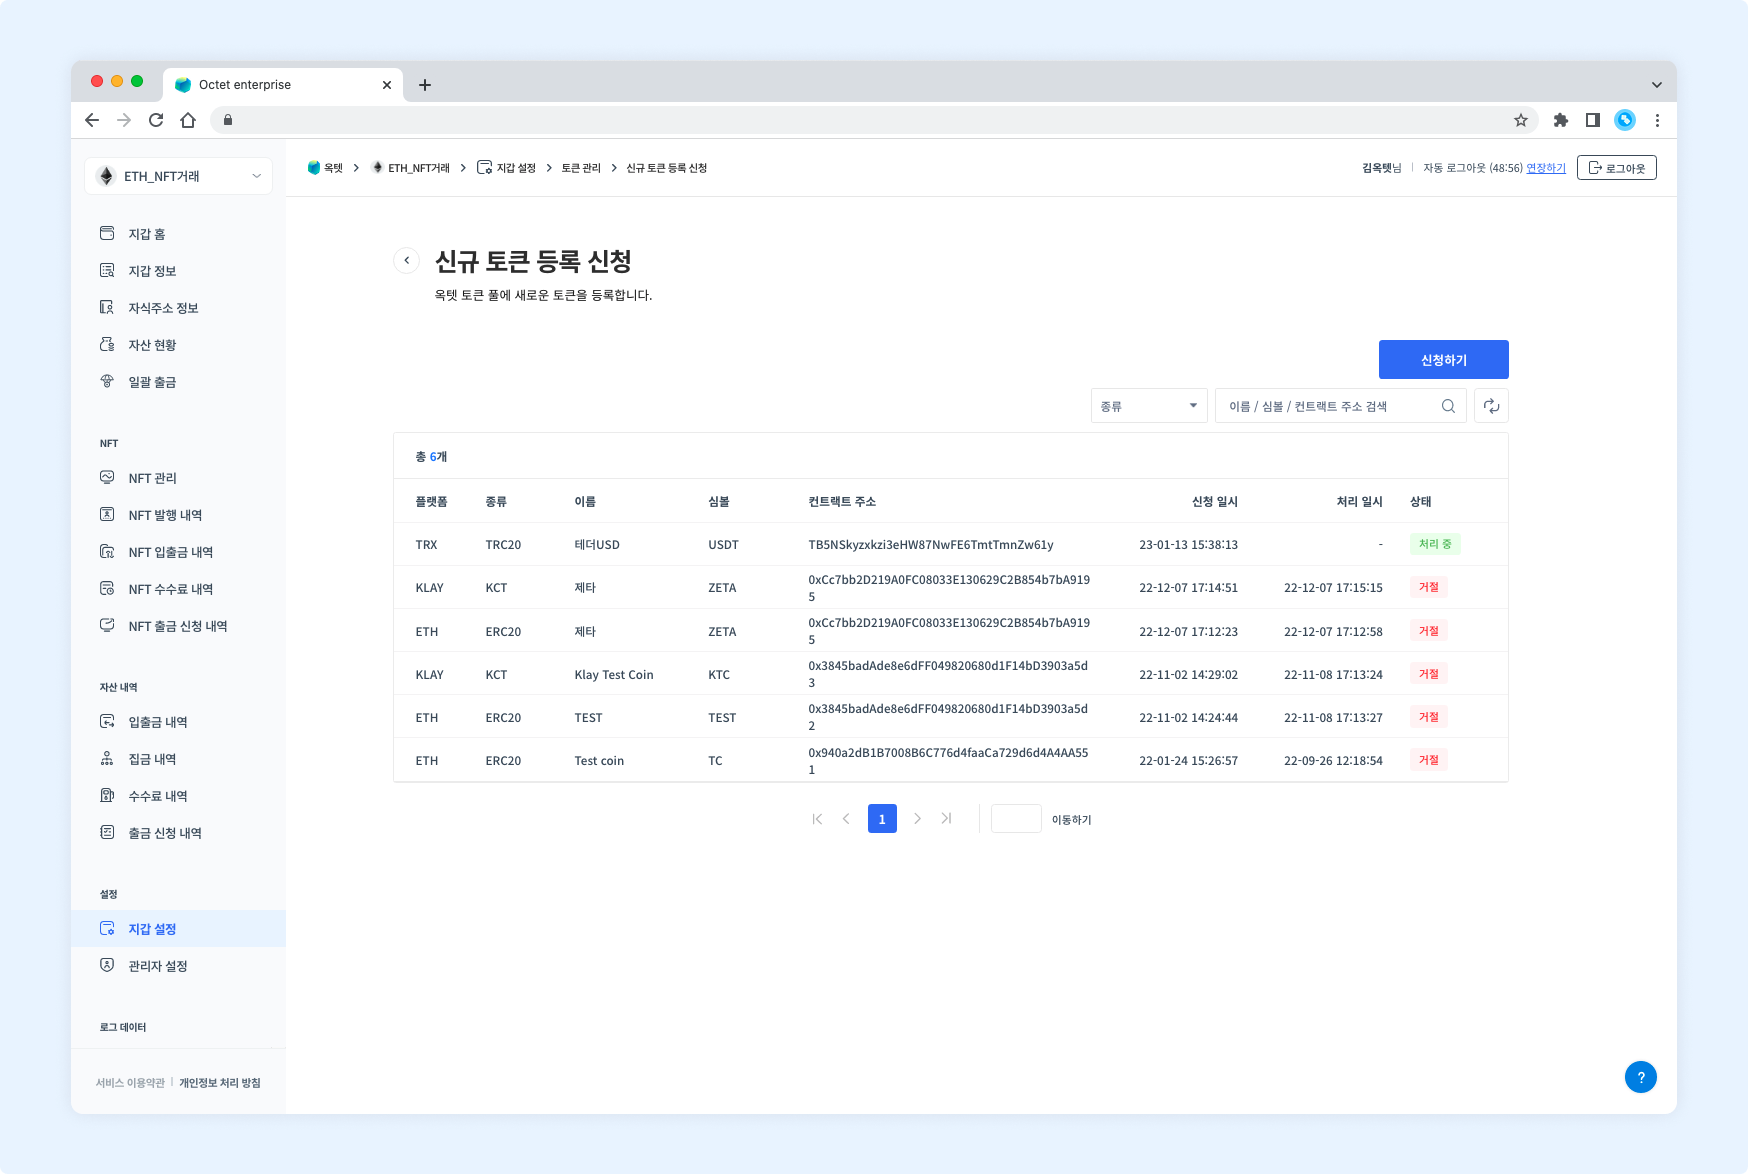
Click the More button in the upper right of the [Token Management] page to go to the new token registration request page. If the token you want is not on the [Token Whitelist] page, you must request it on the new token registration request page. A requested new token takes up to 2 business days to be registered.
Permission -
Owner,All administrators
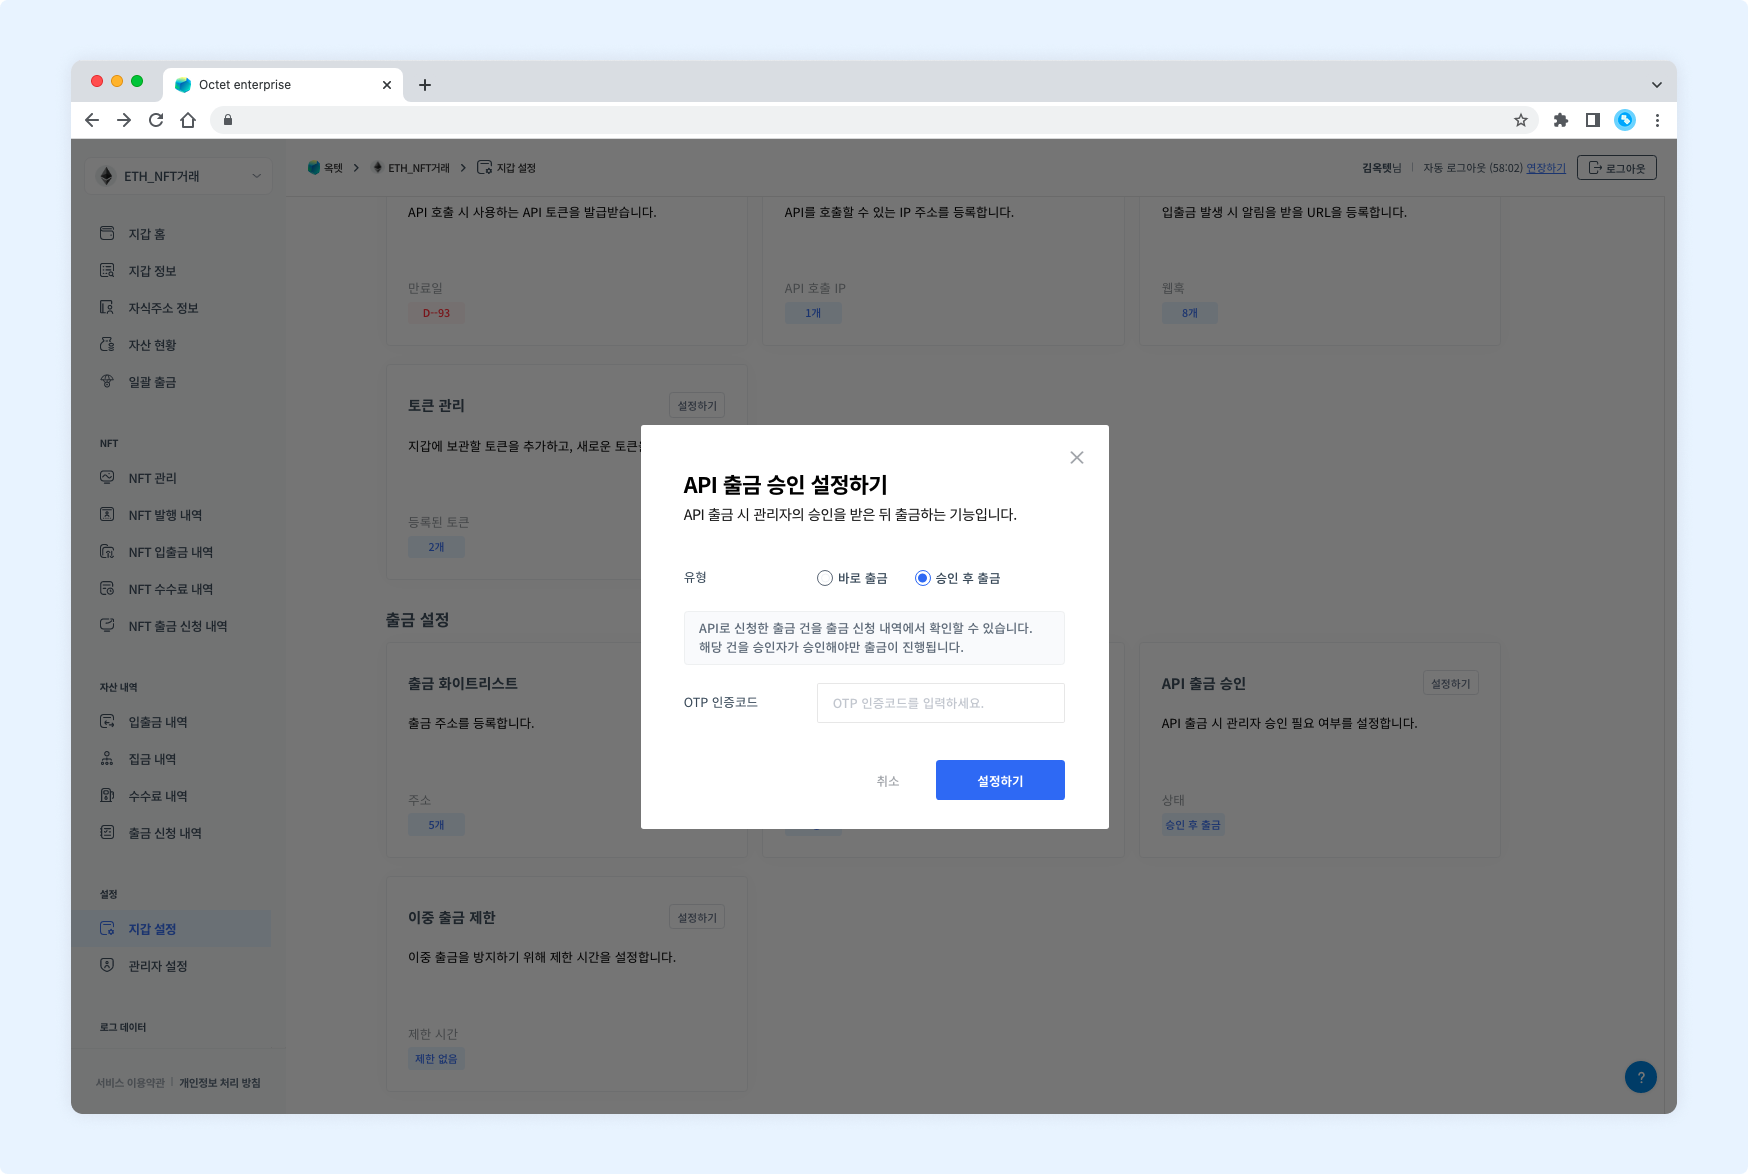
- Click the
Requestbutton. The new token registration popup appears. - Enter the basic information of the token to register (platform, type, contract address). The request cannot be submitted if the contract address is incorrect.
- Enter the token details (Korean name). The token's English name, symbol, and decimals are filled in automatically.
- Enter your OTP code and click the
Requestbutton.
Withdrawal whitelist
When requesting a withdrawal from the console, you can only withdraw to addresses registered in the withdrawal whitelist.
Permission -
Owner,Requester
Register
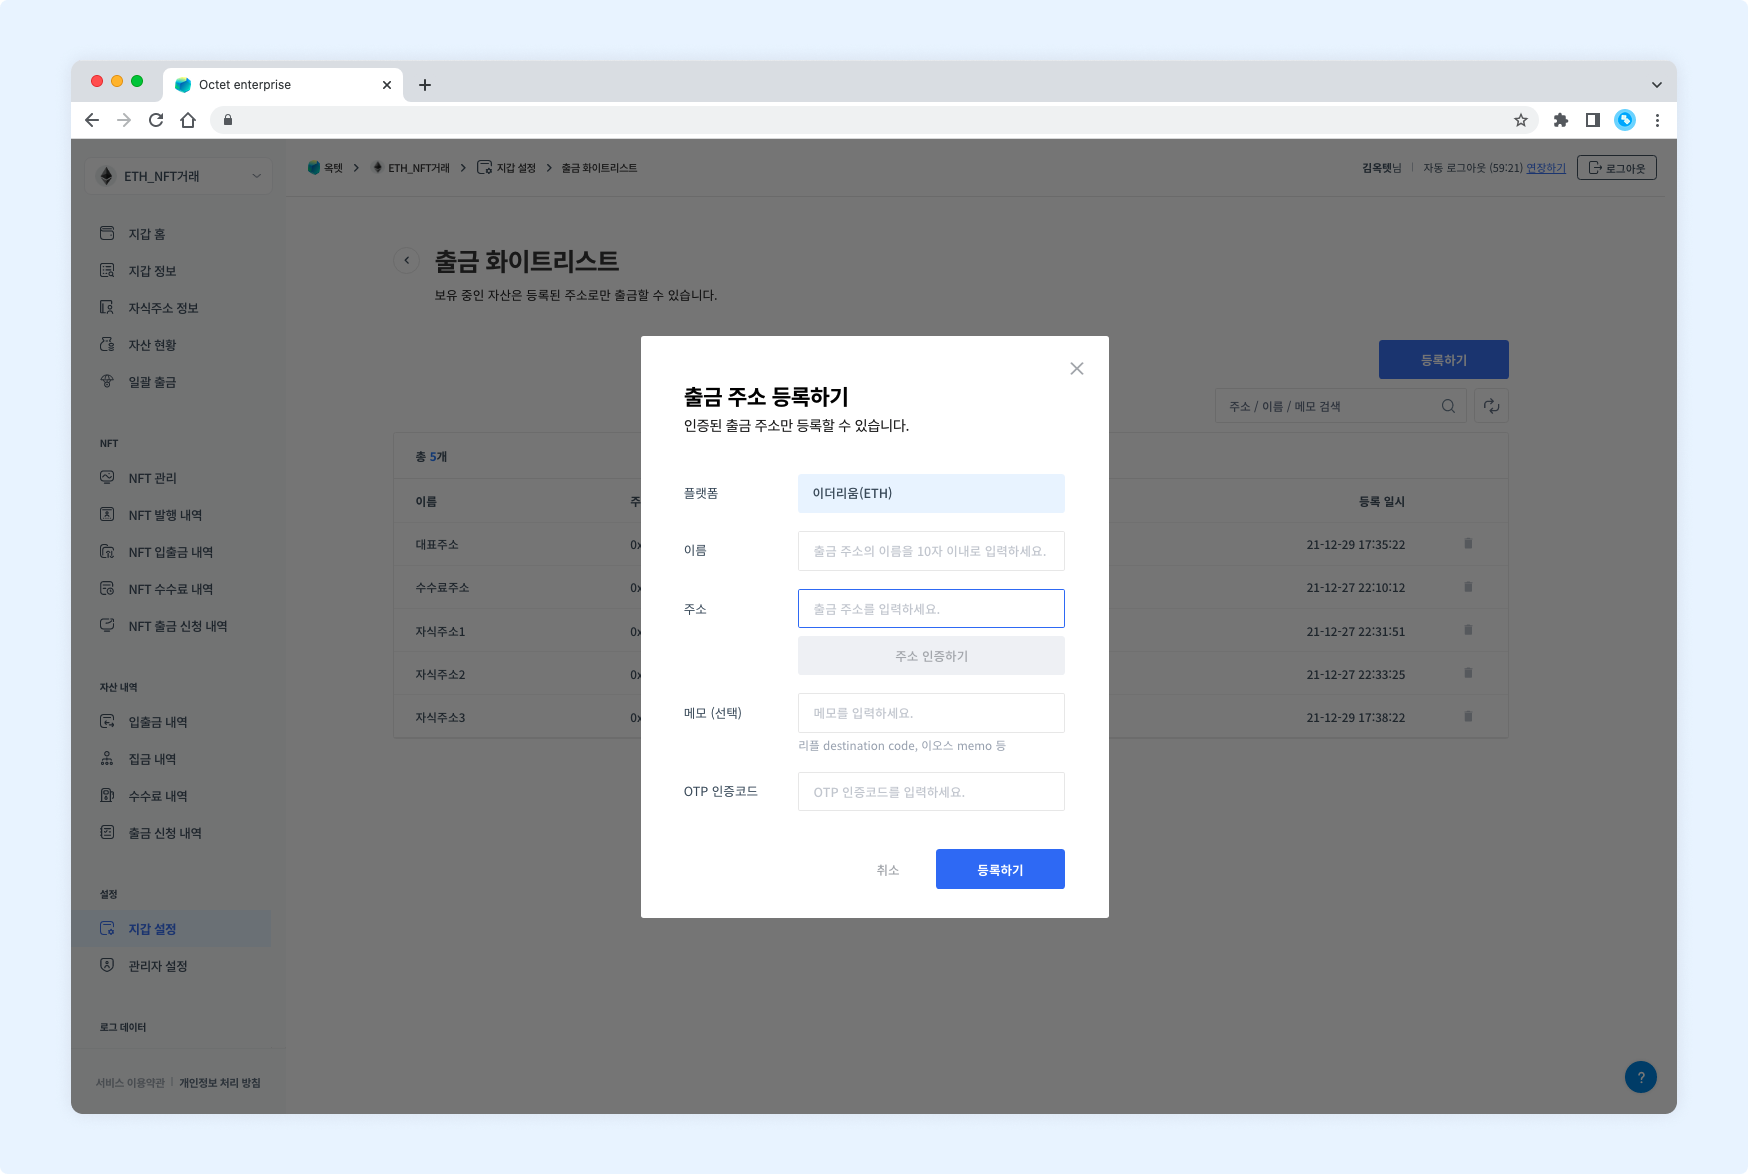
- Click the
Registerbutton. The withdrawal address registration popup appears. - Enter a name (alias) for the address to register.
- Enter the address to register and verify it.
- Enter your OTP code and click the
Addbutton. - The new withdrawal address is registered.
Delete
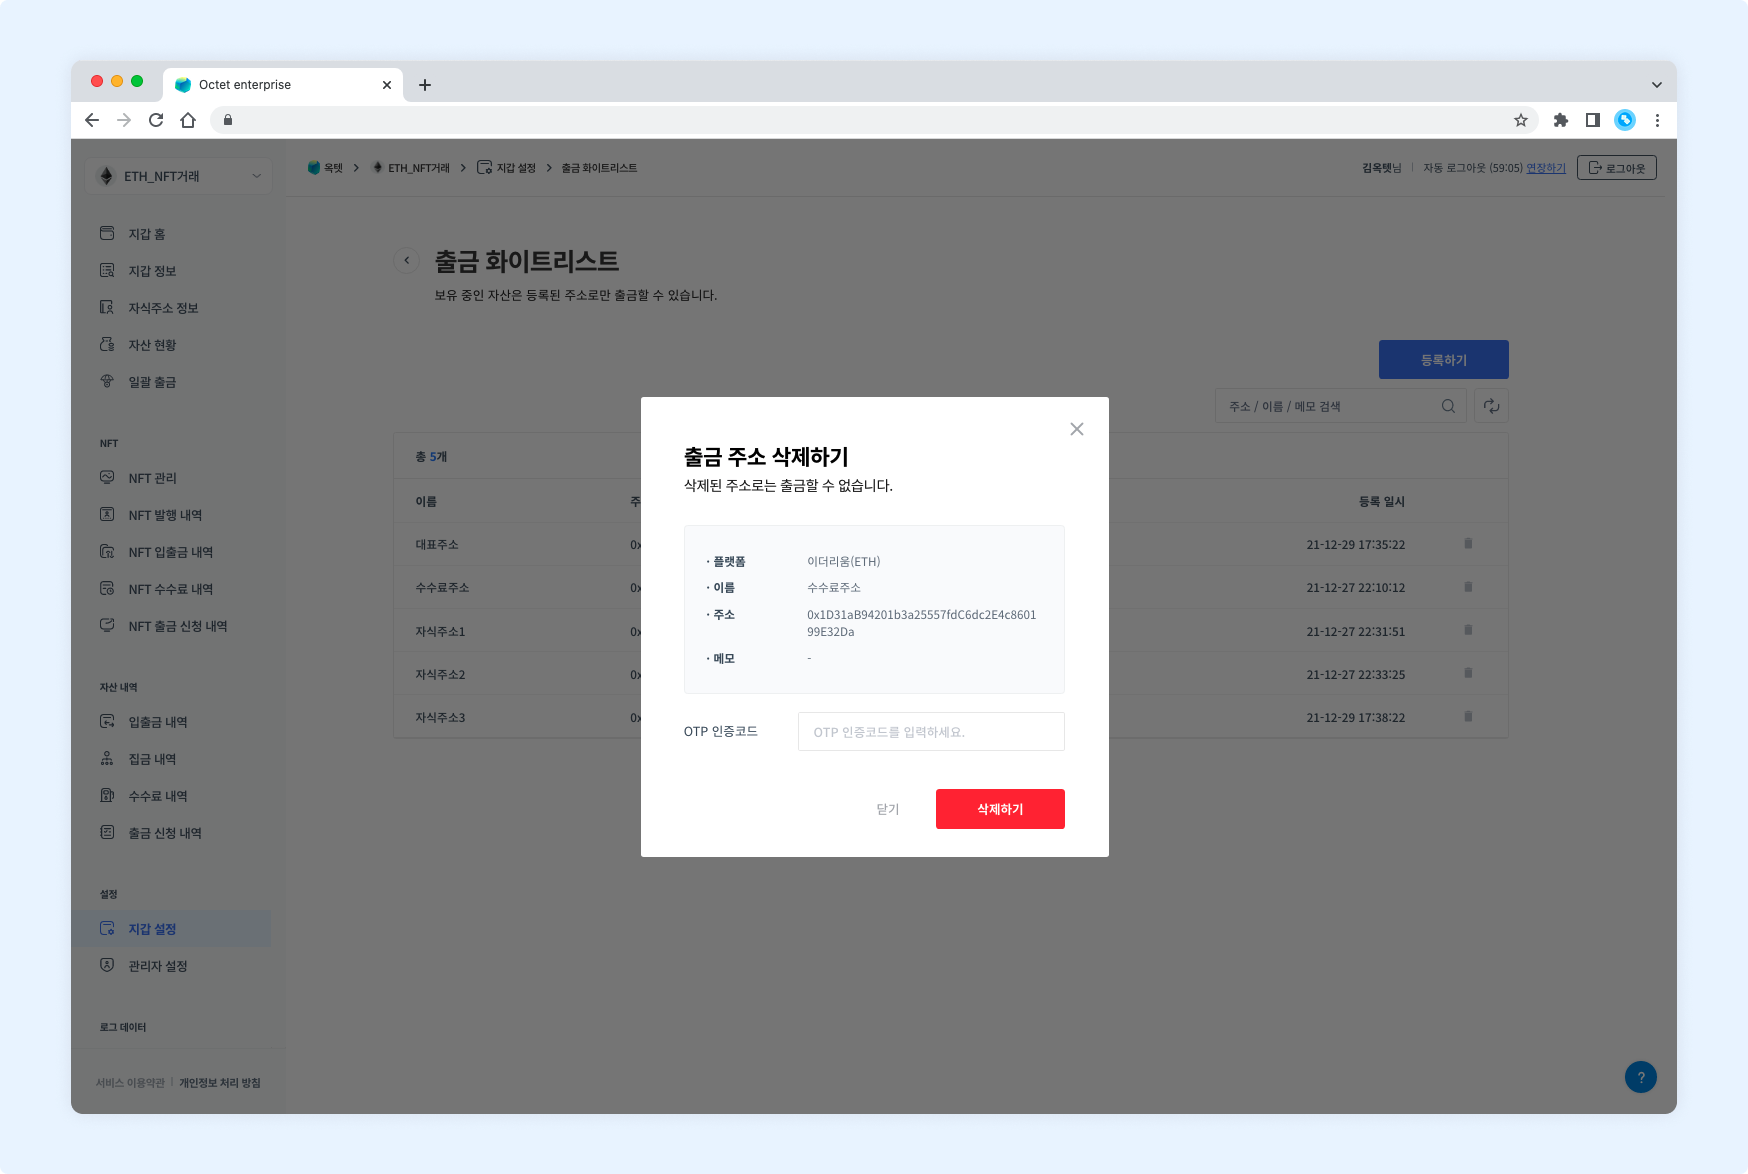
- Click the
Deletebutton. The withdrawal address deletion popup appears. - Check the address to delete.
- Enter your OTP code and click the
Deletebutton. - The withdrawal address is deleted.
Number of withdrawal approvers
A withdrawal proceeds only after all of the configured number of approvers have approved it.
Permission -
Owner
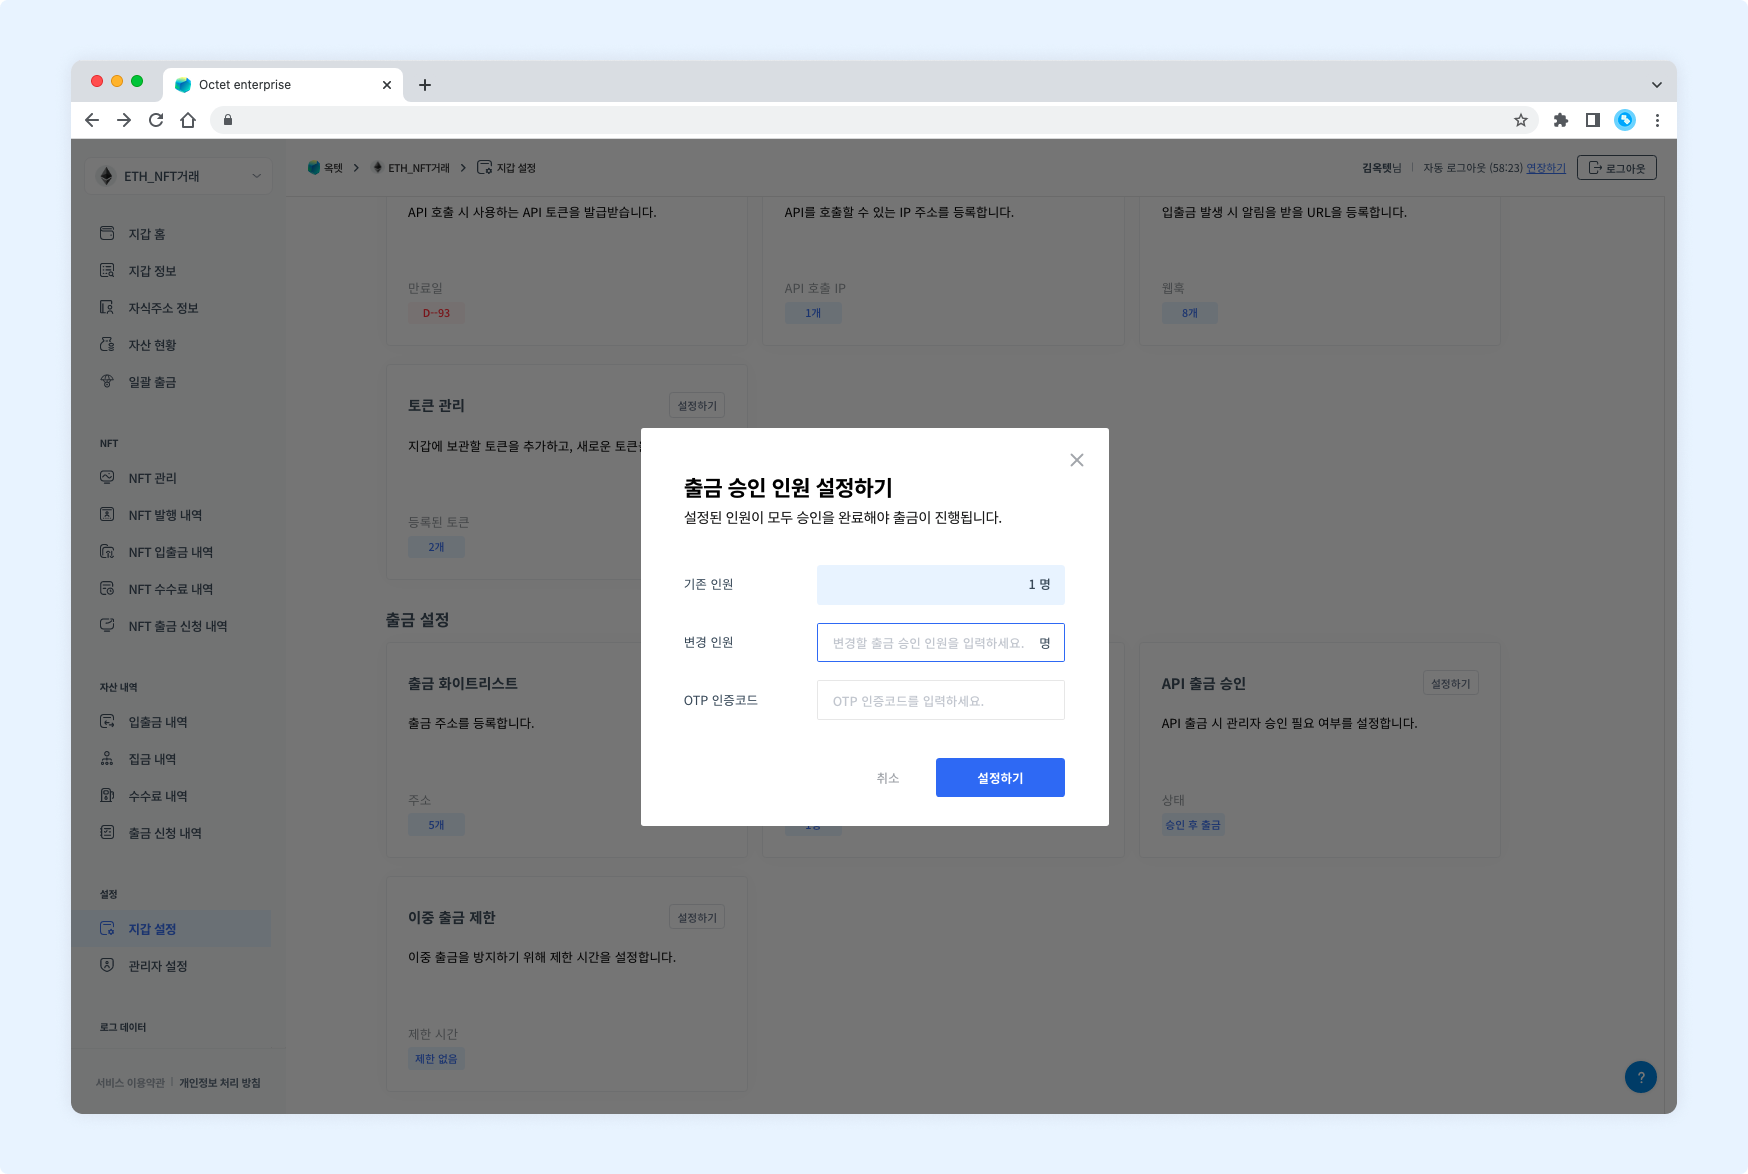
- Click the
Setbutton. The withdrawal approver count setting popup appears. - Enter the new number of withdrawal approvers.
- Enter your OTP code and click the
Setbutton. - The number of withdrawal approvers is changed.
API withdrawal approval
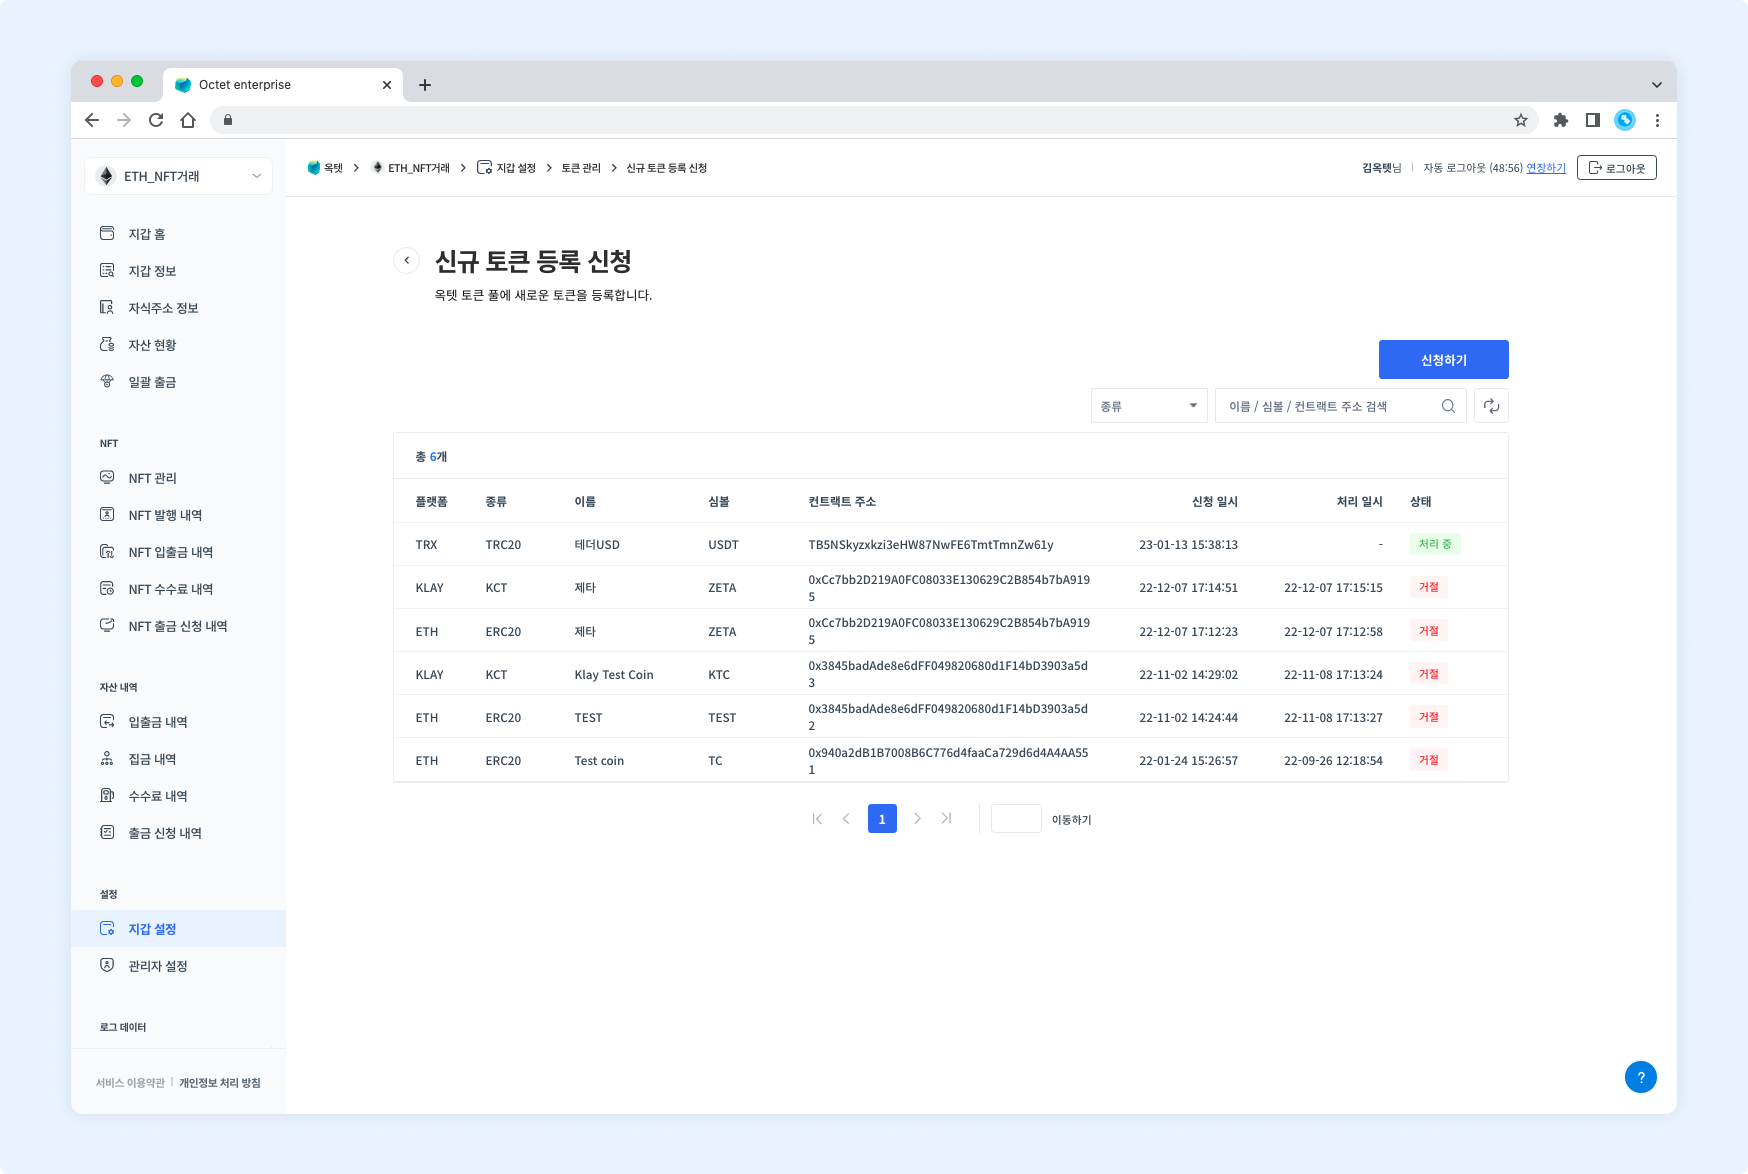
In Octet, every withdrawal must be approved by an administrator in the console by default. However, for operational convenience, you can change the setting so that withdrawals requested through the API are withdrawn immediately without approval, and you can configure whether approval is required per condition. The conditions and how to set them are as follows.
Permission -
Owner
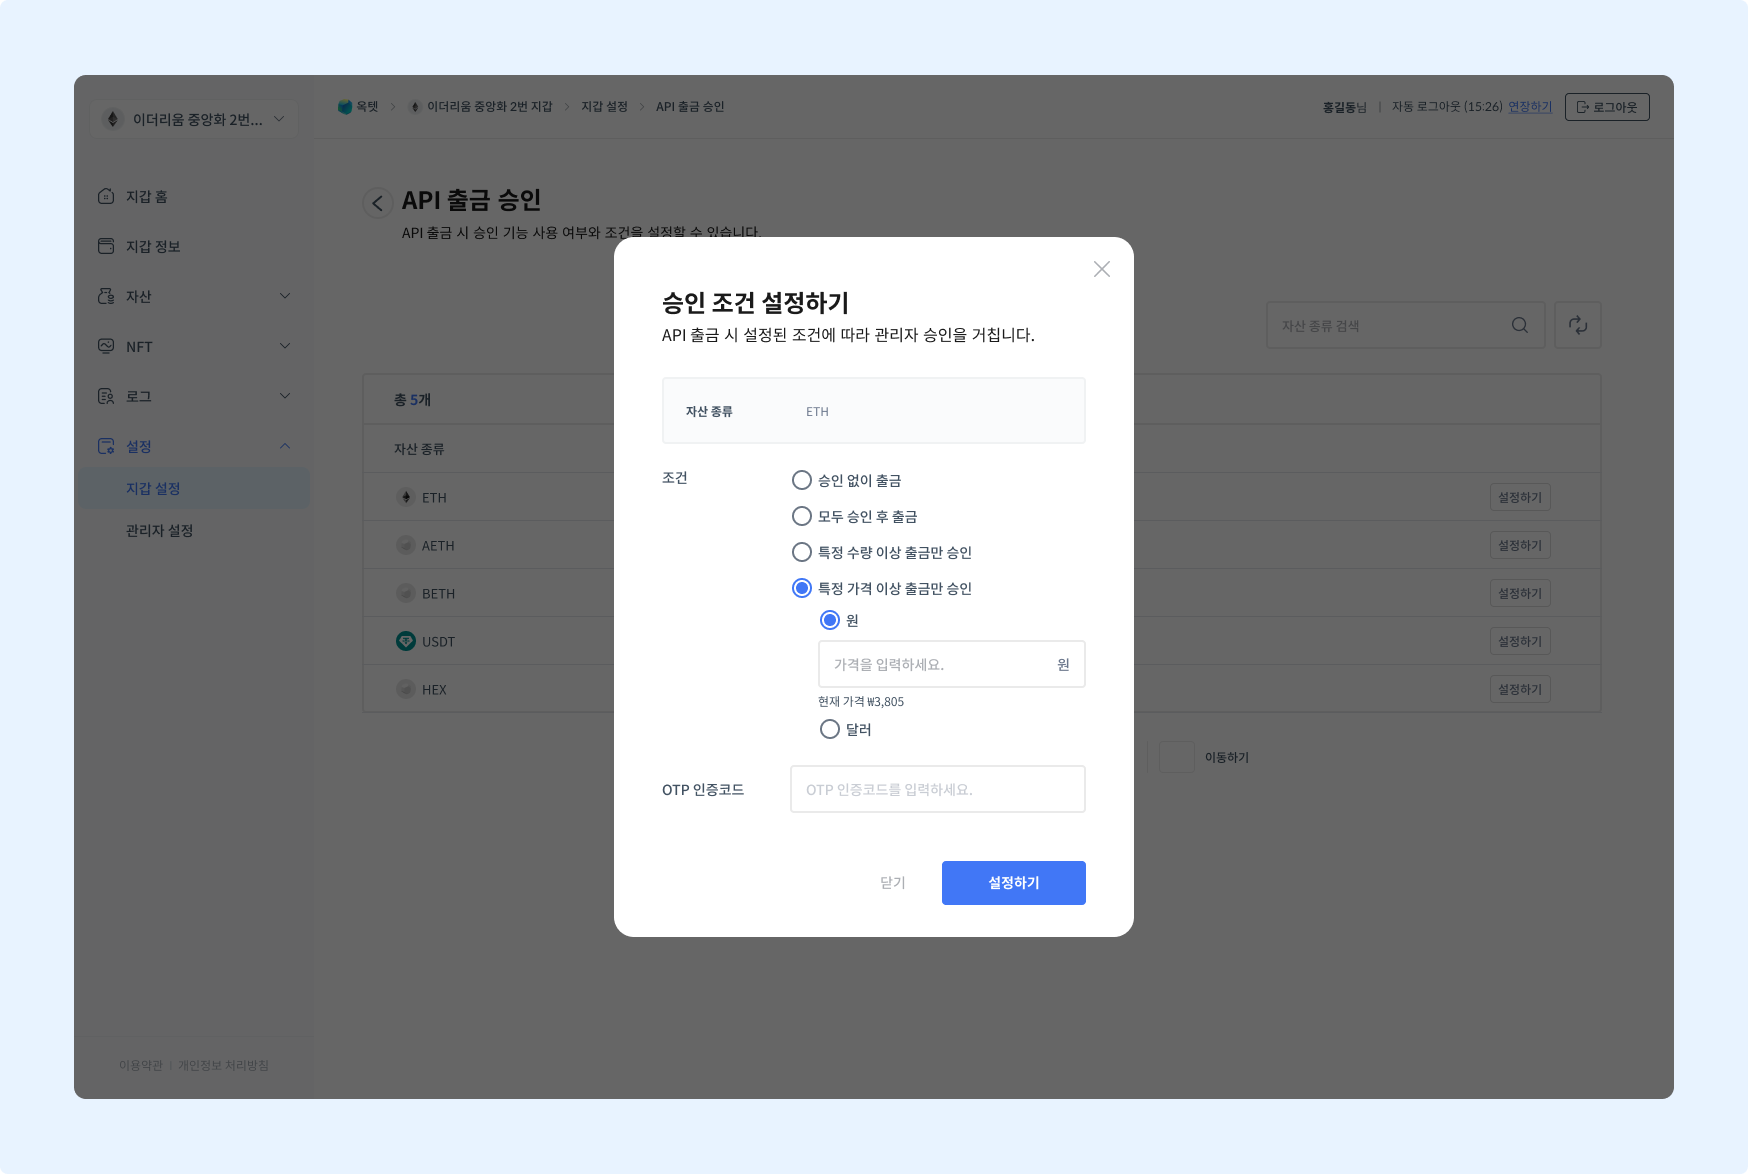
| Condition | Description |
|---|---|
| Withdraw after approving all | All withdrawals requested through the API are withdrawn after administrator approval. |
| Withdraw without approval | All withdrawals requested through the API are withdrawn immediately upon request. |
| Approve only withdrawals above an amount | Among withdrawals requested through the API, only those above a specific amount require administrator approval. |
| Approve only withdrawals above a price | Among withdrawals requested through the API, only those above a specific price require administrator approval. |
- Click the
Setbutton in the table. - Select the approval condition.
- If you select 'Approve only withdrawals above an amount' or 'Approve only withdrawals above a price', you must set the amount or price.
- Enter your OTP code and click the
Setbutton. The approval condition is set.
Duplicate withdrawal restriction
You can set a restriction period to prevent double withdrawals. Withdrawals with identical withdrawal conditions are restricted for the set period.
Permission -
Owner
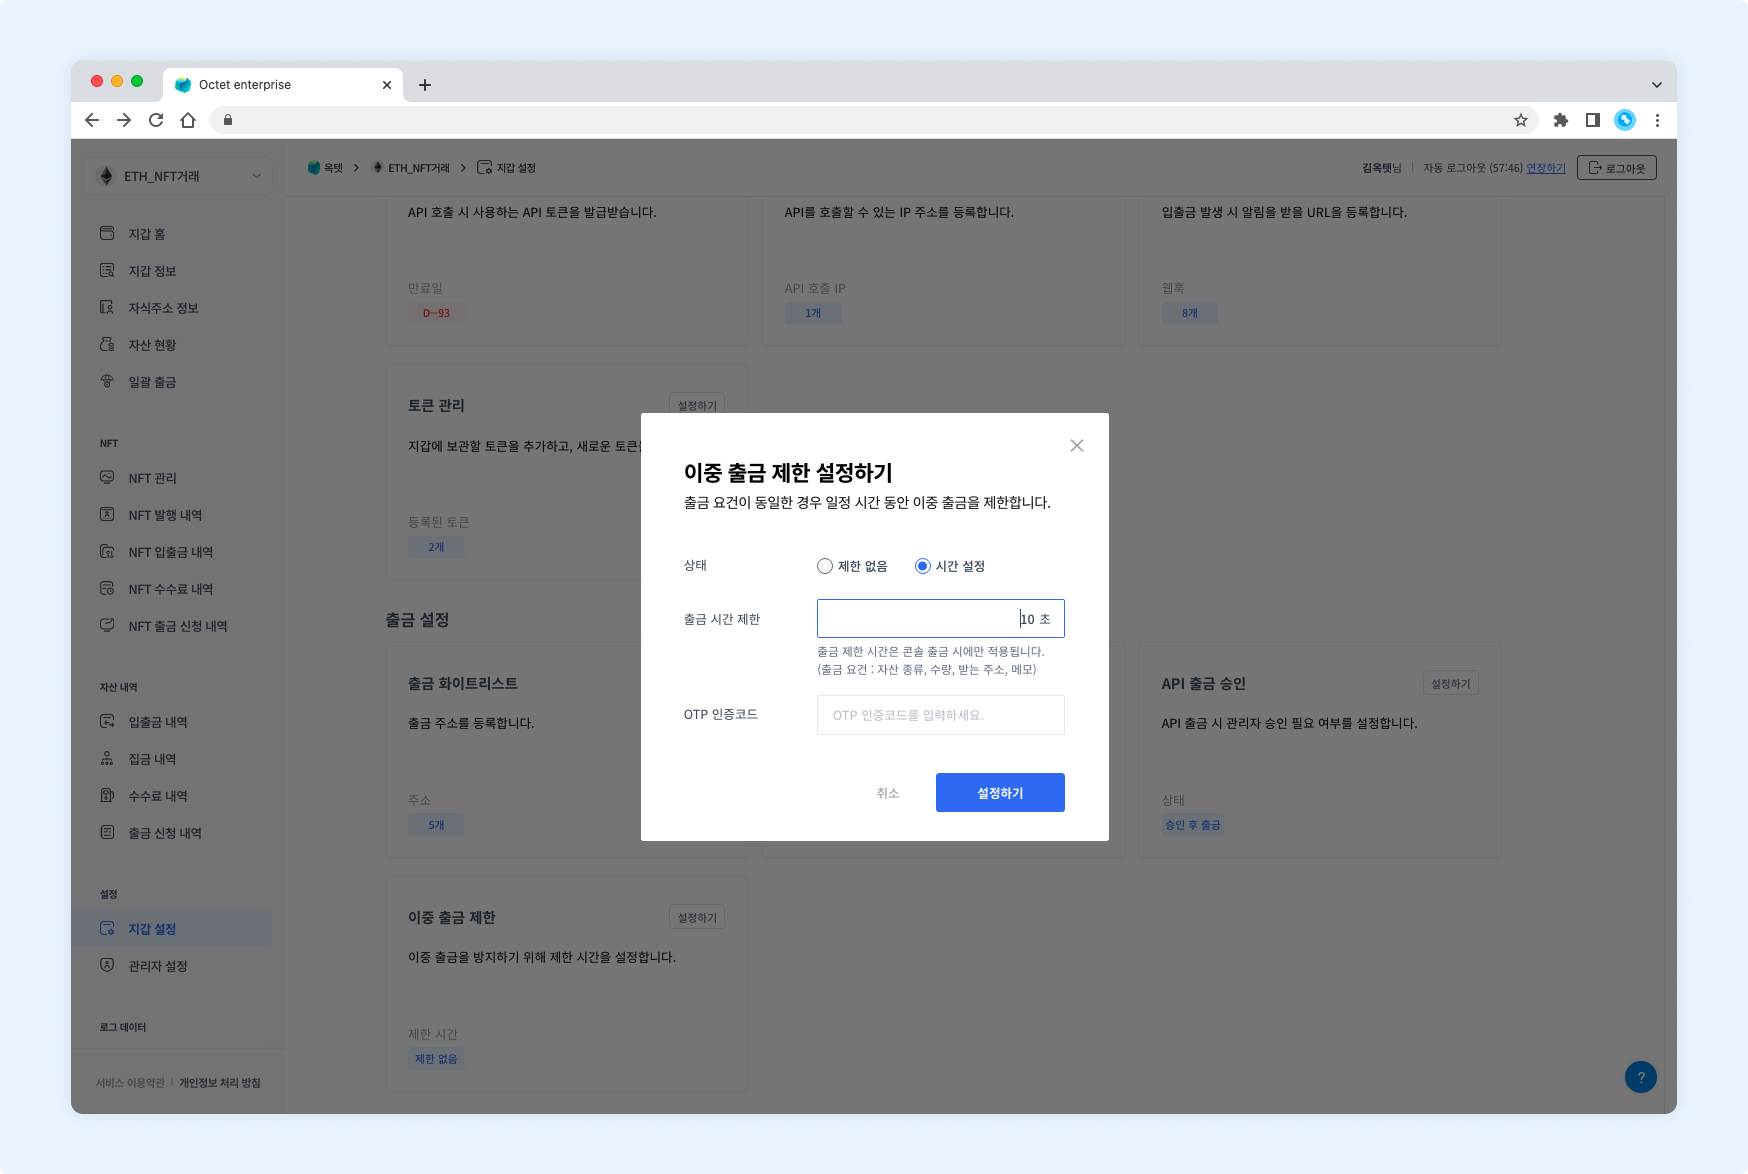
- Click the
Setbutton. The duplicate withdrawal restriction setting popup appears. - Select
Set timein the 'Status' field. - Enter the withdrawal restriction time.
- Enter your OTP code and click the
Setbutton. - The duplicate withdrawal time is set.
TIP
Withdrawal conditions: asset, amount, to address, memo
Withdrawal suspension
If an unverified withdrawal occurs or you urgently need to stop withdrawals, you can suspend withdrawals per wallet in the console. However, only the Octet team can lift a withdrawal suspension. If you want a withdrawal suspension lifted, contact the Octet team.
Permission -
Owner,Manager
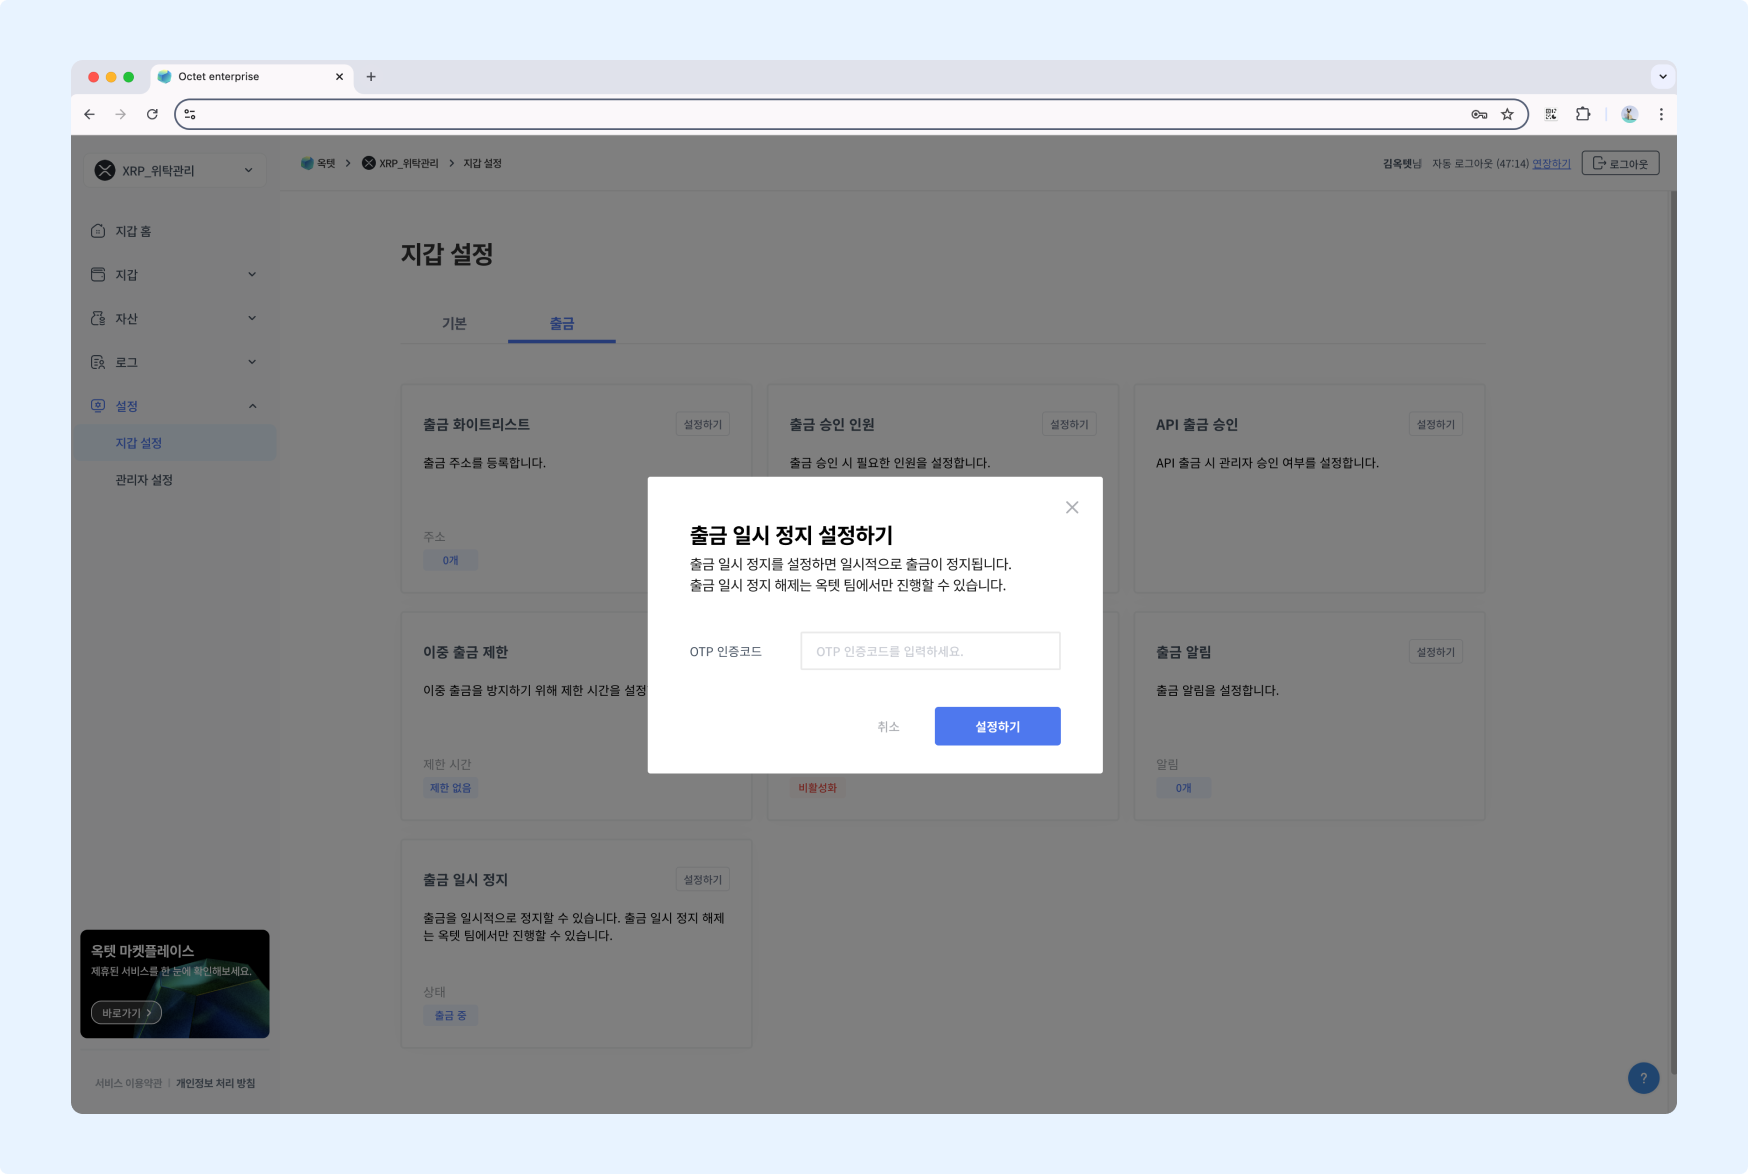
- Click the
Setbutton. The withdrawal suspension popup appears. - Enter your OTP code and click the
Setbutton. - Withdrawals from this wallet are suspended.
NFT deposit method
You can choose the NFT deposit method. If you select Deposit all, every NFT is deposited, including NFTs not registered to the wallet. If you select Whitelist deposit, only NFTs registered to the wallet are deposited.
Permission -
Owner
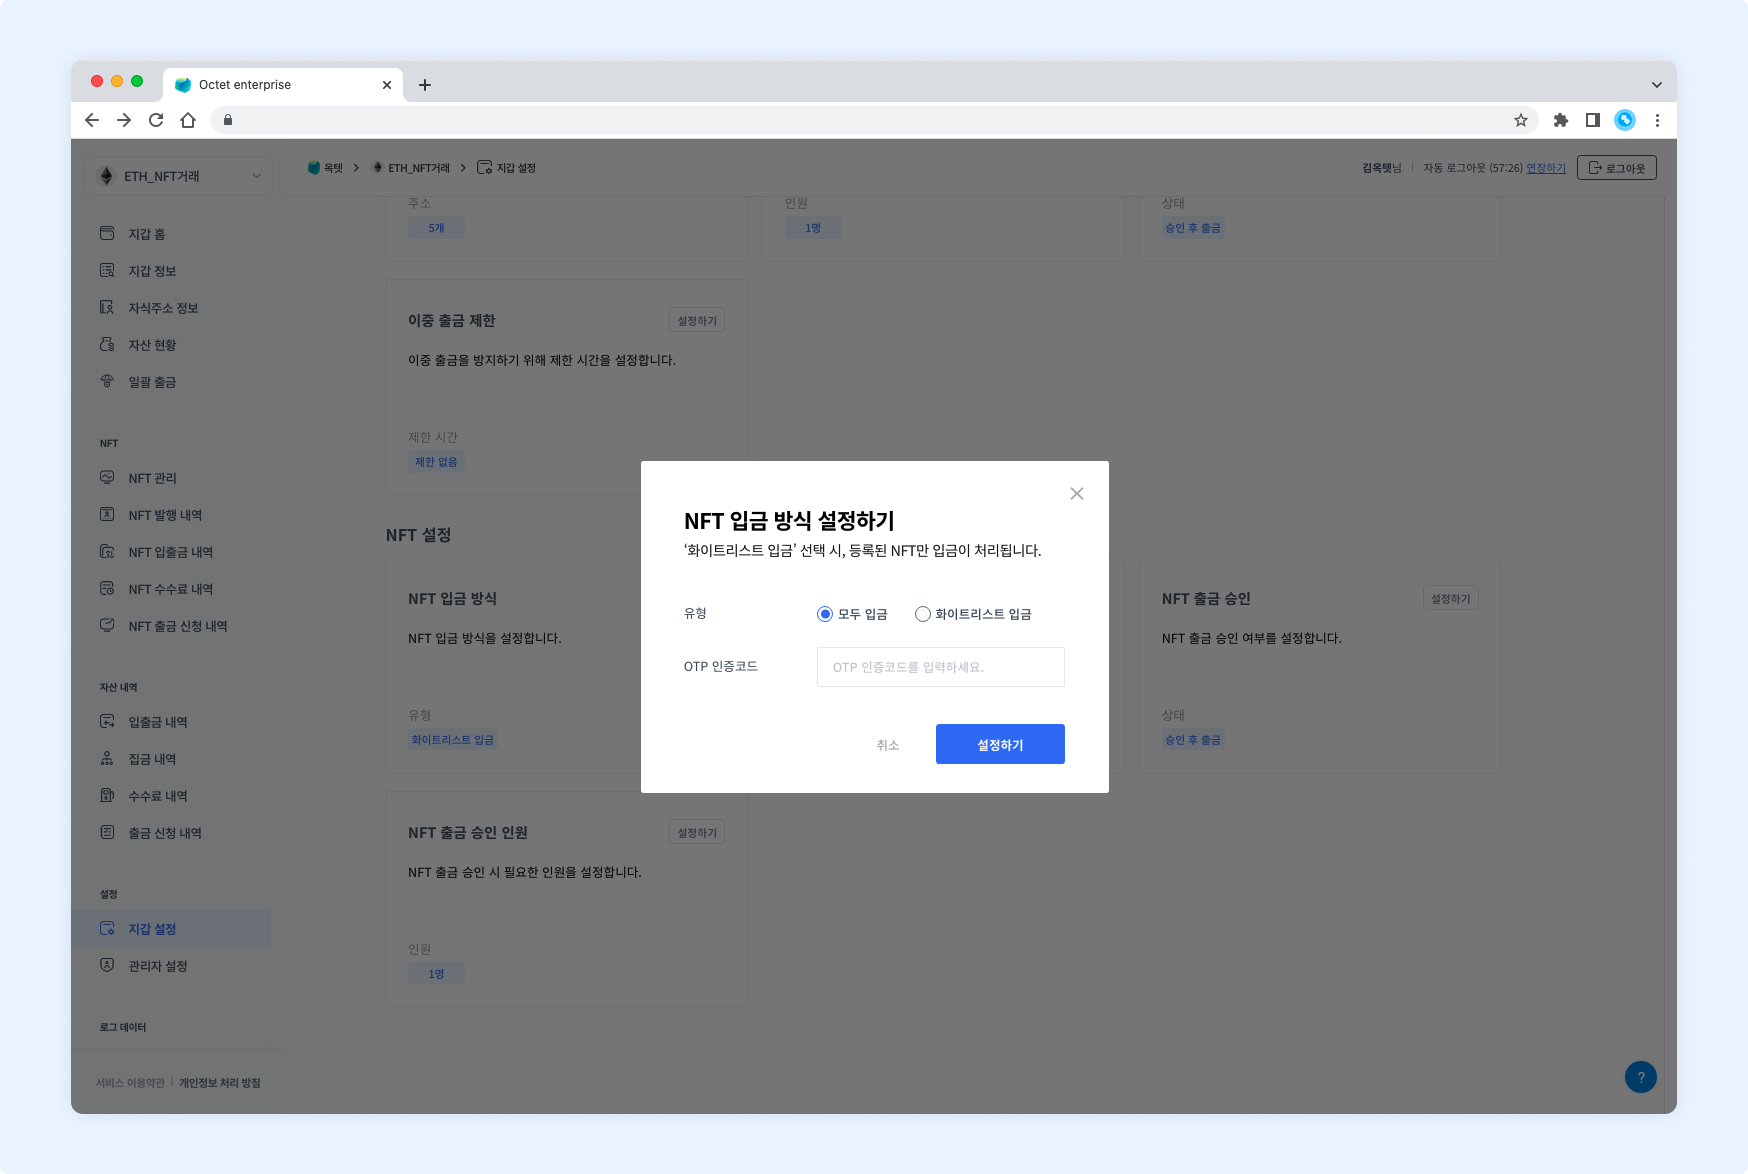
- Click the
Setbutton. The NFT deposit method setting popup appears. - Select the deposit type.
- Enter your OTP code and click the
Setbutton. - The NFT deposit method is set.
NFT deposit whitelist
When the NFT deposit method is Whitelist deposit, only NFTs registered to the wallet are deposited. Before depositing an NFT, you must add its NFT contract to the wallet.
Permission -
Owner,Manager
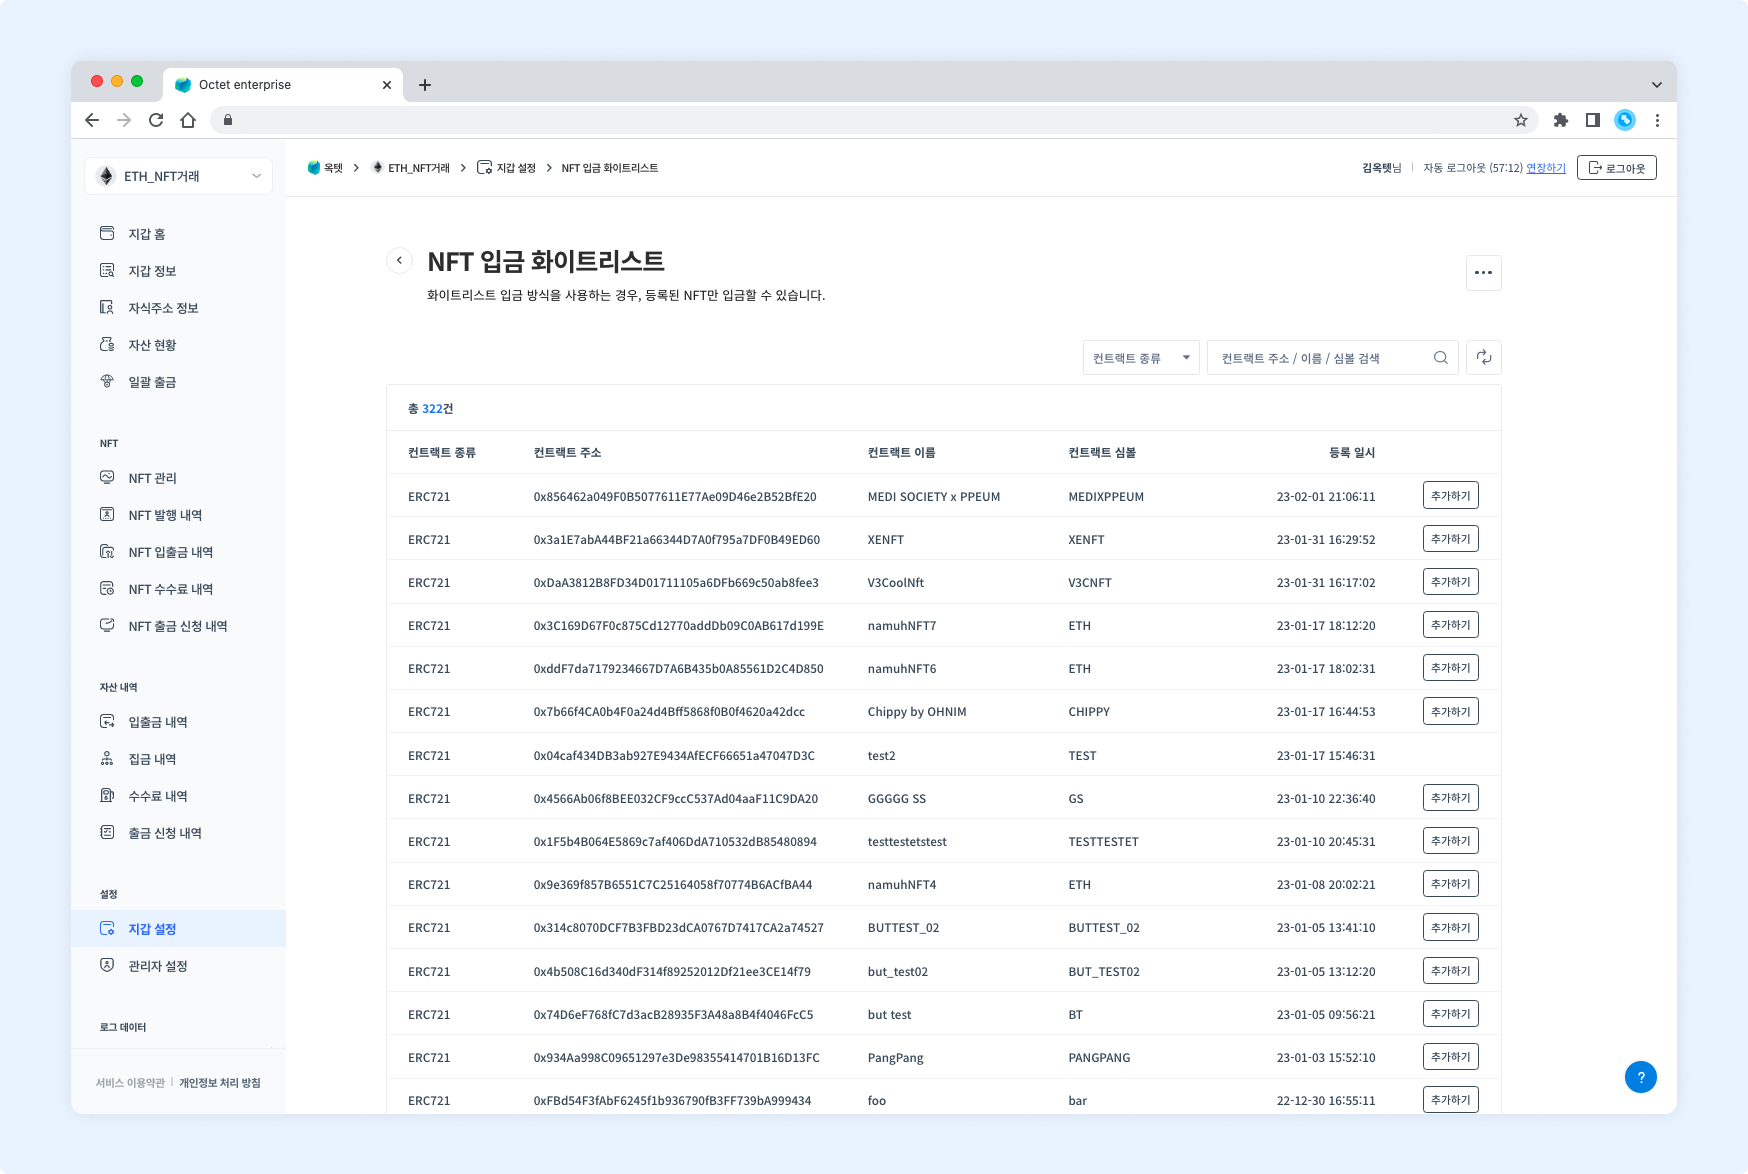
- Click the
Addbutton. The add NFT contract popup appears. - Check the NFT contract to add.
- Enter your OTP code and click the
Addbutton. - The NFT contract is added.
Request a new NFT registration
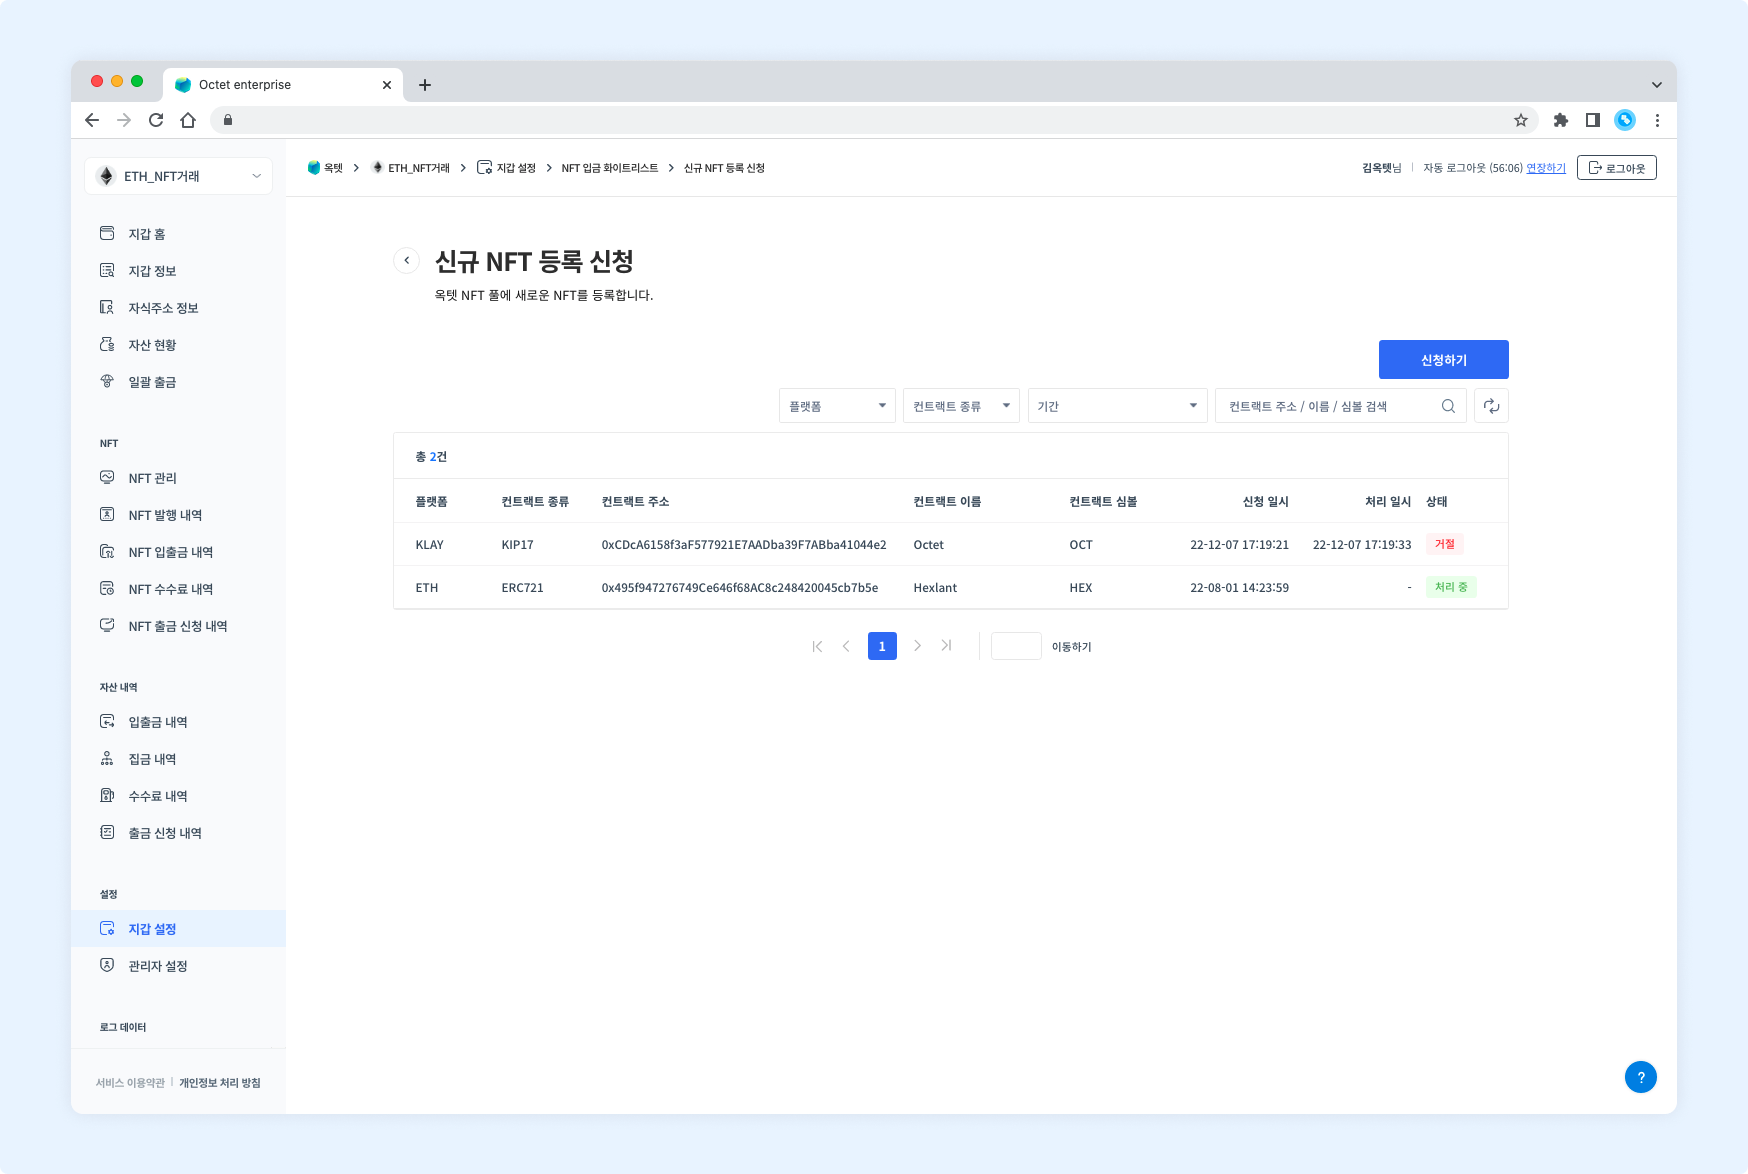
Click the More button in the upper right of the [NFT Deposit Whitelist] page to go to the new NFT registration request page. If the NFT you want is not in the [NFT Deposit Whitelist], you must request it on the new NFT registration request page. A requested new NFT takes up to 2 business days to be registered.
Permission -
Owner,Manager
- Click the
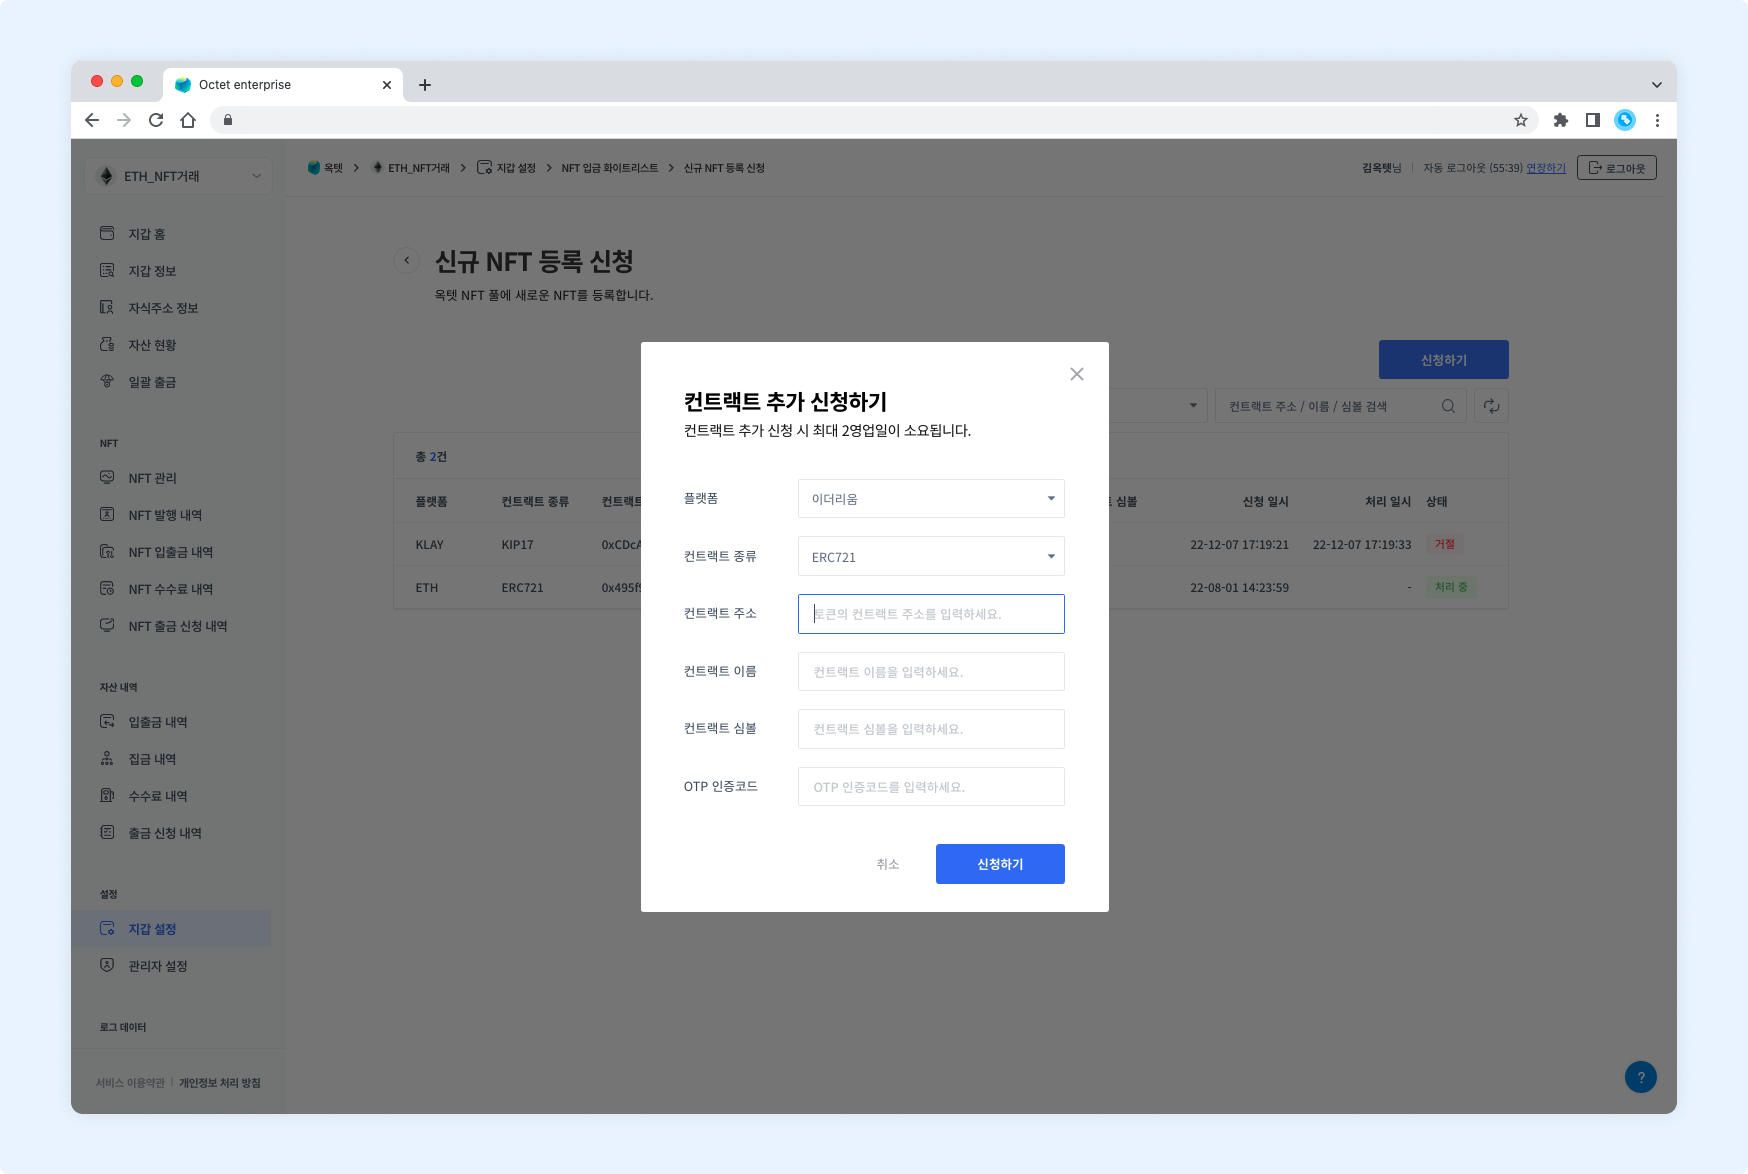
Requestbutton. The new NFT registration popup appears. - Enter the basic information of the NFT to register (platform, type, name, symbol).
- Enter the NFT contract address to register. The request is rejected if the contract address is incorrect.
- Enter your OTP code and click the
Requestbutton.
TIP
With the Add NFT contract API, you can register a new NFT immediately without a registration review.
NFT withdrawal approval
In Octet, every withdrawal must be approved by an administrator in the console by default. However, for operational convenience, you can change the setting so that withdrawals requested through the API are withdrawn immediately without approval.
Permission -
Owner
- Click the
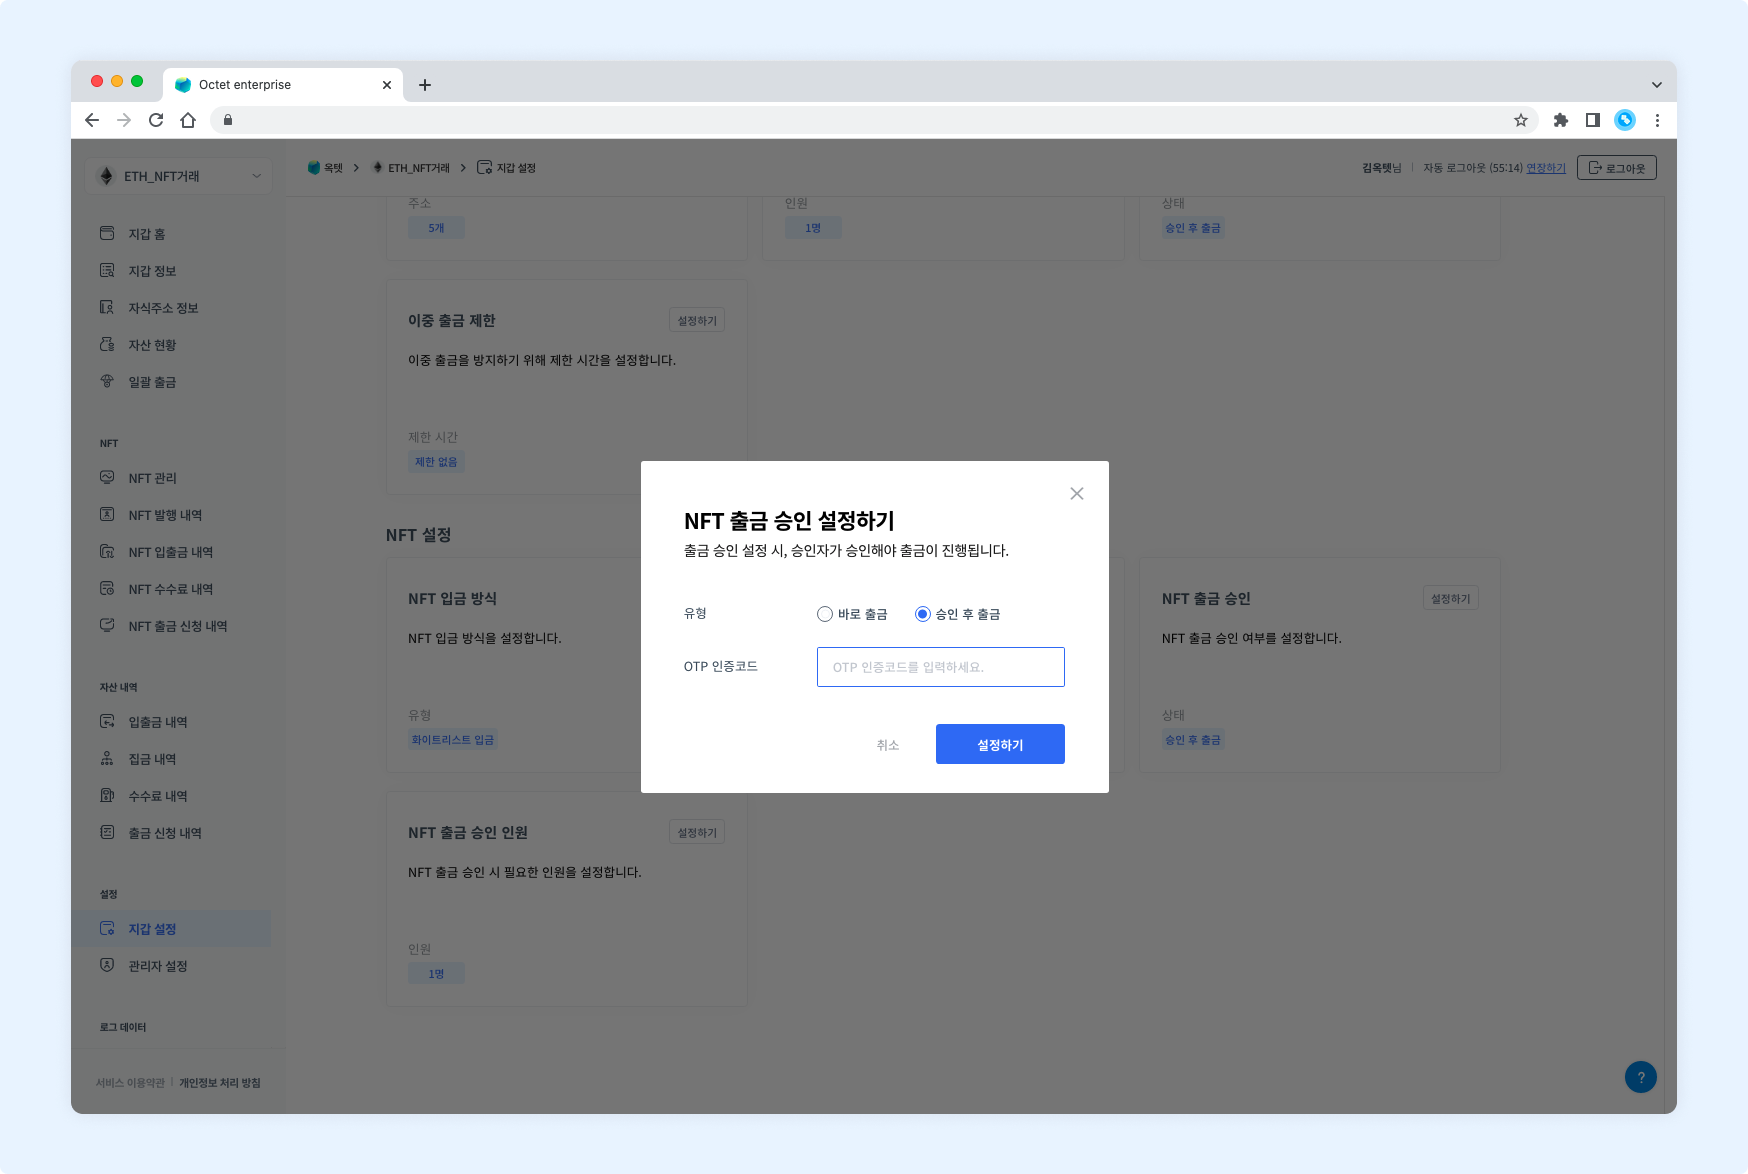
Setbutton. The API withdrawal approval setting popup appears. - Select the API withdrawal approval type.
- If you select
Withdraw immediately, withdrawals requested through the API are withdrawn immediately upon request. - If you select Withdraw after approval, withdrawals requested through the API proceed only after an administrator approves them.
- If you select
- Enter your OTP code and click the
Setbutton. - The NFT withdrawal approval option is changed.
Number of NFT withdrawal approvers
A withdrawal proceeds only after all of the configured number of approvers have approved it.
Permission -
Owner
- Click the
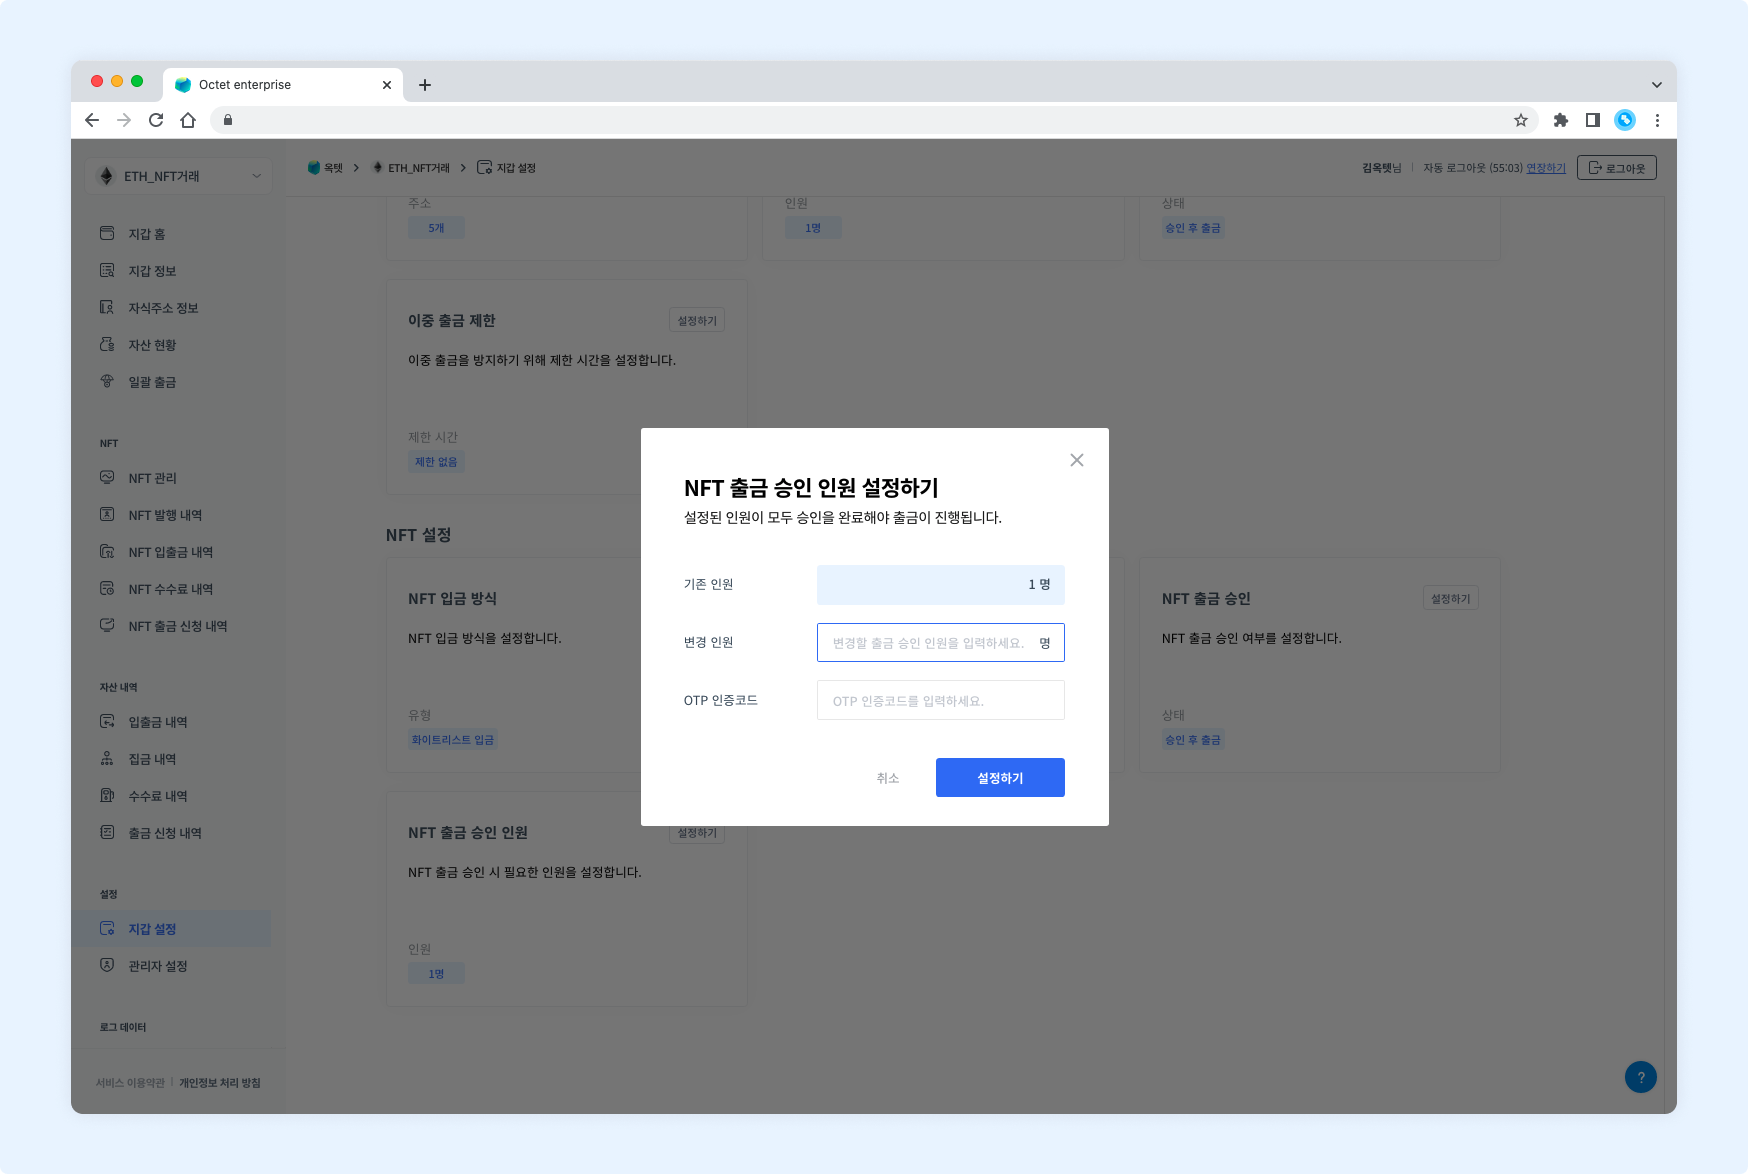
Setbutton. The NFT withdrawal approver count setting popup appears. - Enter the new number of withdrawal approvers.
- Enter your OTP code and click the
Setbutton. - The number of NFT withdrawal approvers is changed.