SDK Integration
1. SDK method overview
The SDK method is an integration method in which the MPC SDK provided by Octet is integrated directly into the end user's app (iOS/Android) or web environment. Security computations are performed directly on the end user's device without going through the client server, and the User Share is stored in the device's secure storage.
System architecture
- End user (App/Web - SDK): The client application with the Octet MPC SDK built in. It creates and stores the key share, and takes part directly in the MPC computation on the device when a signature is requested.
- Client server (Client): Relays API communication between the end user and Octet, and manages business logic (such as withdrawal approval).
- Octet: Generates the authentication information and data needed for MPC key creation and signing requests, and starts Octet's side of the MPC computation when an SDK key process begins.
SDK availability
For guidance on obtaining the SDK needed to follow this guide, contact us below.
- Email: octet.team@walletone.io
2. MPC key creation guide
MPC keys are created per client (Company), and a created key can be linked when creating child addresses in a wallet.
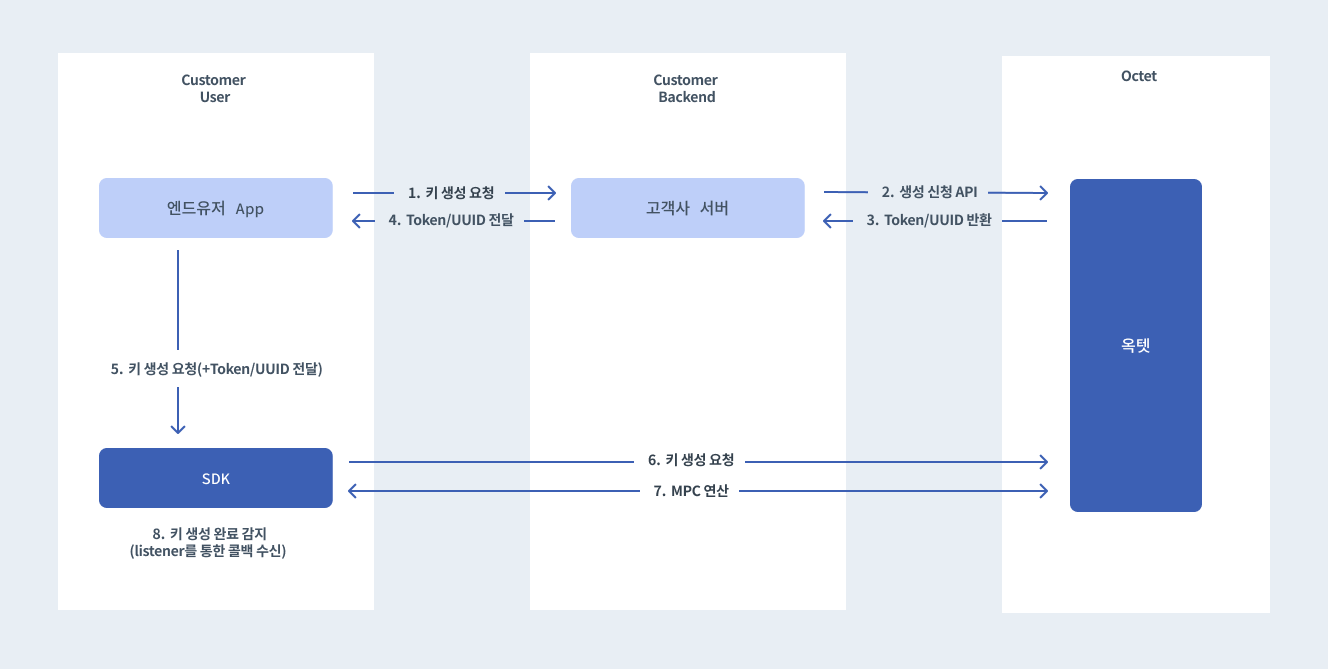
Key creation flow
- Request MPC key creation: The client calls the Octet API to request a key creation job and receives an authentication token.
- Request key creation from the SDK: The Octet SDK inside the end user's app communicates directly with the Octet server using the issued token and UUID, and starts the actual key creation computation.
- Store the User Share: After the computation completes, the created User Share is securely stored through the SDK in the end user's local secure area (Secure Enclave, etc.).
- Check the detailed steps: The progress or final result of the key creation computation can be checked through the Octet API.
Detailed steps
Step 1: Request key creation from Octet
Call the Request MPC Key Creation API.
- Response:
uuid(unique job ID),token(JWT for SDK authentication),expiredDate(expiration time of the request) - Validity period: If key creation is not completed within 2 minutes (120 seconds; the exact time is the
expiredDatein the response) of the request, the request expires (EXPIRED). An expired request cannot be reused, and you must request key creation again.
Step 2: Request the job from the SDK
Pass the information received in Step 1 to the SDK in the end user's app to start the job.
- Job: Key Shares are created in a distributed way through direct communication between the SDK and Octet.
Step 3: Manage the User Share
- The created User Share is stored in secure storage on the device by the SDK's internal logic.
Step 4: Check the status
The progress or final result of the key creation computation can be checked through the Octet API.
- Check creation status: Get MPC Key Creation Request request
- The status ends in one of
SUCCESS/FAILED/EXPIREDfromAWAITING_CREATION.EXPIREDmeans the request expired because key creation was not completed within the validity period.
- The status ends in one of
- Get final key info: Get MPC key (includes public key information, etc.)
Linking the MPC key when creating a child address
Once MPC key creation is complete, you can create addresses in the wallet that use that key.
- How: When calling the create child address API, enter the
uuidof the key created above in thempcKeyUuidfield. - All withdrawals, transaction signings, and data signings from this address will require the signature of that MPC key.
3. MPC key signing guide
Signatures for MPC addresses are produced by combining the User Share held by the end user's device with the Octet Share held by Octet. The three APIs that require signing — withdrawal request, transaction signing request, and data signing request — all work the same way, and the description below is based on withdrawals. The differences for the other two APIs are summarized in the "Transaction signing and data signing APIs" section at the end of this chapter.
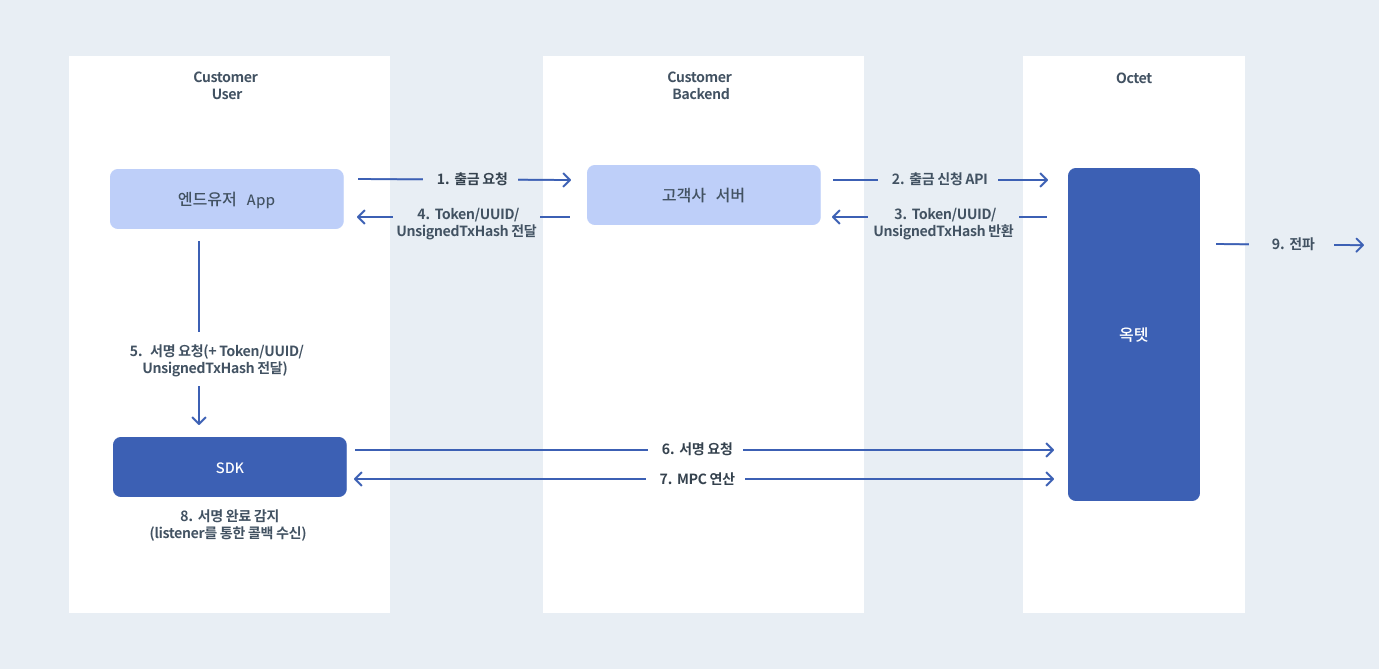
Signing and withdrawal flow
- Create the transaction: The client creates the unsigned transaction data directly.
- Request a withdrawal from Octet: Request a withdrawal through the Octet API and receive the signing job information.
- Sign with the SDK: The SDK in the end user's app performs the signing computation using the User Share stored on the device and Octet's job information.
- Broadcast the transaction: When signing is complete, Octet automatically assembles the final transaction and broadcasts it to the blockchain.
Detailed steps
Step 1: Prepare the withdrawal request
When withdrawing from an MPC address, the following two settings must be included.
autoSigning:false(required, since Octet cannot sign alone)serializedUnsignedTransaction: The unsigned transaction data created directly by the client (Hex String)
Step 2: Request a withdrawal from Octet
Call the Withdrawal request API.
- Response: On success, the response object includes an
mpcfield. The signing targets are returned as thempcSigningTargetsarray; a single signature (EVM, etc.) has one element.
{
  "uuid": "...",
  "mpc": {
    "token": "eyJhbGciOiJIUzI1NiIsInR5cCI6IkpXVCJ9...",
    "expiredDate": "2026-07-29T00:02:00.000Z",
    "mpcSigningTargets": [
      {
        "signingIndex": 0,
        "message": "2c745b3cd5af47515df7bded000d1906147e27c275a3029cc6d4a585aa1c47b0"
      }
    ]
  }
}
- Validity period: If MPC signing is not completed within 2 minutes (120 seconds; the exact time is
mpc.expiredDate) of the request, the signing request expires (EXPIRED) and the withdrawal is automatically marked as failed (FAILED). It is marked as failed without a separate withdrawal cancellation request, so if you need to retry, request a new withdrawal.
Step 3: Request signing from the SDK
Request signing from the SDK using the User Share stored on the device and the mpc information received in Step 2.
- Required input: User Share,
token, the message to sign (mpc.mpcSigningTargets[0].message) - Behavior: The SDK works with Octet to produce a 2-of-3 signature. The SDK method currently supports single signatures (one signing target, EVM, etc.).
Step 4: Complete the withdrawal
- When the signing computation completes successfully in the SDK, the Octet system detects it and combines the previously received
serializedUnsignedTransactionwith the produced signature. - The final signed transaction (
serializedSignedTransaction) is built, and Octet broadcasts it to the blockchain network. - The signing progress can be checked through
mpcSigning.statusin the response of the get withdrawal request API; it ends in one ofSUCCESS/FAILED/EXPIREDfromAWAITING_SIGNING.
Transaction signing and data signing APIs
The signing flow above applies in the same way to the Sign transaction and Sign data APIs, in addition to withdrawals. Only the request API and the processing after signing differ; the mpc format in the response and Step 3 (requesting signing from the SDK) are exactly the same.
| Withdrawal request | Transaction signing request | Data signing request | |
|---|---|---|---|
| Request input | serializedUnsignedTransaction + autoSigning: false | serializedUnsignedTransaction | The data to sign and its type (EIP191 / EIP712 / KIP97) |
Signing target message | Transaction signing hash | Transaction signing hash | Data hash computed by Octet |
| After signing | Octet assembles the signed transaction and also broadcasts it to the blockchain | Octet assembles and stores the signed transaction (serializedSignedTransaction); the client broadcasts it with the Send signed transaction API | Octet stores the signing result (serializedSignedData) |
| Checking the result | Get withdrawal request API | Get transaction signing request API | Get data signing request API |
- The validity period (2 minutes) and the handling of
EXPIRED→ request failure (FAILED) on expiration apply equally to all three APIs. - For data signing, Octet computes the hash to sign and returns it as
messageinmpcSigningTargetsof the response, so the client only needs to submit the original data. The signing resultserializedSignedDatais the RLP encoding of the 65-byte signature (r ‖ s ‖ v, v = 27 + recovery id).